Gents !!!
Let's see a quick and different building:
Beaverettes Mk I and II. When I built my
Beaverette Mk III, I really enjoyed the kit and the final result. So I ordered to
IMACO two kits of
Beaverette Mk I / II (to build versions Mk I and Mk II) and one kit
Beaverette Mk III AA version, with Boulton-Paul Defiant turret.
This post will cover the building of the two first versions of
Beaveretes, the Mk I and II.
 |
| Beaverette Mk I |
 |
| Beaverette Mk II |
Since we had seen before, the first Beaverettes (also called "Beaver bug" or "Mosquito car") were the most crude in design. The 12Hp chassis was fitted with a 14Hp engine , to propel the predicted weight of the machine, which was fitted with a steel plate body of, shall we say, angular proportions. The Mark I is said to have carried oak planks to the rear extension for the armour did not reach that far back.
 |
| Beaverette Mk II in maneuvers |
 |
Standard Beaverette Mk II of the 4th/7th Royal Dragoon Guards,
Royal Armoured Corps - 25 July 1940
font: IWM H 2506 |
Clearly Standard had a number of front wings also left over so these were the only consideration made to what might be called "styling". The Mark II was steel plated to the rear extension as well, that being the only substantial difference.
 |
| Standard Beaverettes Mk II ready for action |
A Bren .303 machine gun was the usual fitting and some carried a wireless set. The anti-tank rifle .55 Boys also maybe carried.
 |
| Beaverette mk II - Notice the aerial in the right rear corner |
The driver and gunner sat in an open cockpit, the driver having a horizontal slot to view the road and the gunner a vertical slot to fire out of.
 |
| Gunner and driver in position - "Beaver bug" Mk II |
Some shots show a third crew member, though he appears to have no seat and stands behind the driver with the appearance of waiting to be shot!
 |
| Third crew member - Mosquito cars in patrol... |
font: http://www.standardmotorclub.org.uk/page786.html
Specs:
| Standard Car 4x2 Beaverette Mk I/ Mk II |
|---|
| Type | Light armoured car |
|---|
| Place of origin | United Kingdom |
|---|
| Production history |
|---|
| Manufacturer | Standard Motor Company |
|---|
| Specifications |
|---|
| Weight | Mk I / Mk II: 2 tonnes |
|---|
| Length | Mk I / Mk II: 4.11 m |
|---|
| Width | Mk I / Mk II: 1.60 m |
|---|
| Height | Mk I / Mk II: 1.52 m |
|---|
| Crew | 3 |
|---|
|
| Armour | Mk I / Mk II: 11 mm steel + 75mm wood |
|---|
| Main armament | 0.303 (7.7 mm) Bren MG or
AT Rifle .55 in, Boys |
|---|
| Engine | Standard 4-cylinder petrol engine -12 hp (9 kW) |
|---|
| Power/weight | 6 hp/tonne |
|---|
| Suspension | 4x2 wheel, leaf spring |
|---|
Operational range | 250 km |
|---|
| Speed | 30 km/h |
|---|
The kits:
As the Beaverette Mk III, I used two
IMACO Beavarettes Mk I/ Mk II model kits in resin (IMA 01835). The kits comes packaged in an rigid plastic box, packed in styrofoam and bubbles-plastic. When I bought the two Mk I / II, also bought the
Mk III AA with quadruple turret from Boulton-Paul Defiant two seater fighter.
 |
| The 03 Beaverettes sleeping in their cocoons... |
The resin and plastic parts:
 |
| Kits parts |
I've had good and bad news when I open the box of Beaverette Mk II AA: The good news is that IMACO made a great up-grade in the Mk III kit , with interior details. This made me very excited. But the bad news came next: were missing the two rear petals of the MkIII's turret in my kit:
 |
| Where the rear petals??? |
 |
| The amazing turret |
Oh, Man...I was extremely frustrated because I was eager to start building this particular model (you guys know I love rare and strange things ...) This armored car with a quadruple turret just messed with my imagination ...I had even bought the four
.303 Brownings in RBModels (the kit comes without the gun barrels). Immediately wrote an e-mail to IMACO and was promptly answered by Mr. Russel Wilson (the quickness of the response was overwhelming ...) who sent me the missing piece. I am awaiting the arrival of the missing parts, by now. To save time, I'll just build the two girls Mk I and Mk II. let's go !!!
 |
| The two early marks |
 |
The light gray will be Mk I and the dark gray , Mk II.
Mk I with dashboard and chassis |
 |
| front view |
 |
| Notice the differences: vertical grill in the Mk I and horizontal in the Mk II |
And more bad news: more missing pieces. I was really unlucky with these 03 kits. One week after writing to Russell (and he had already sent the missing part...), I found the lack of several small parts in both kits Mk I and II
 |
| Missing two superiors triangles in the front suspension and two front wheel hubs |
Bloody hell ...The solution is scratch the parts ...
 |
| Building the triangles... |
 |
| ...and the front hubs...two hours of heavy work... |
But not over yet ... Packers forgot two headlights ...Am I or am not a lucky guy??
 |
| Aziz.... Lights !!!! |
 |
| Resin headlights from Formations...phew!! |
After these scares, we will continue to build. I noticed that the rear armor of Mk II comes wrong in the kit. It should be divided and not whole, as in the kit.
 |
| The Mk II rear view. The folding armour divided (1/3 - 2/3)... |
 |
| The one piece rear folding armour...(IMACO pic) |
But it was easy to fix: was just cut and add some details in plastic (Plastruct):
 |
| The rear armour fixed... |
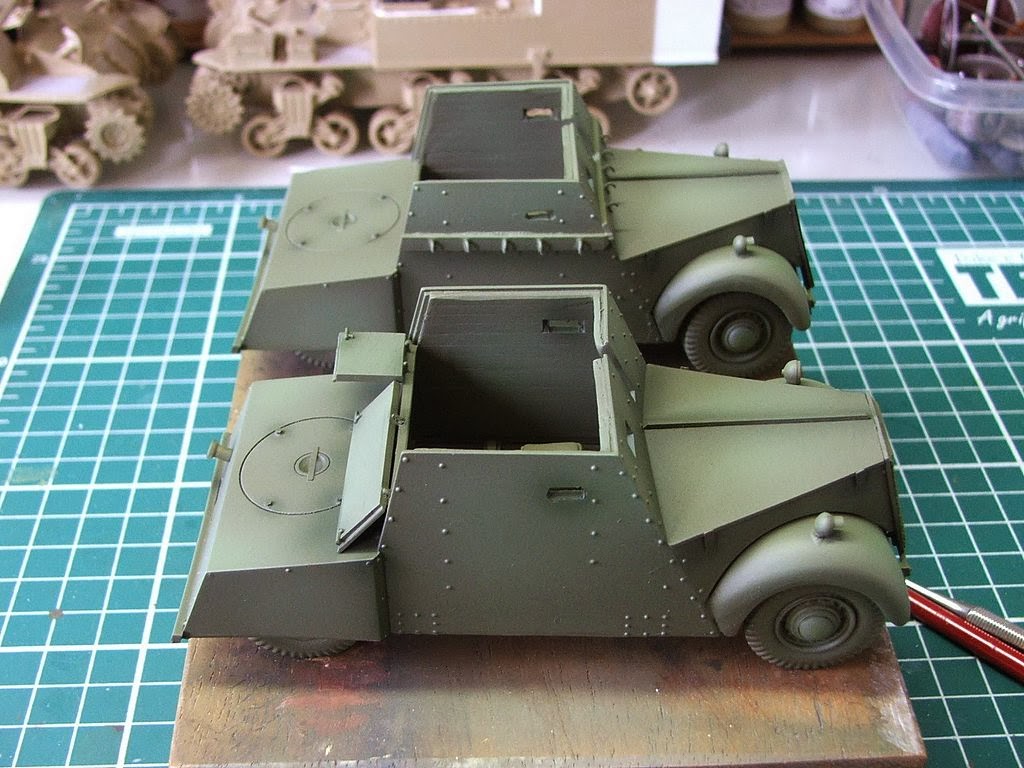
Adding details...
 |
| seats for the gunner and driver |
 |
| The Mk I (light gray0 dont have the rear armour...Notice the pedals in scartch... |
In my research, I found (very few.. ) photos of Mk I : with plain sides and "wrinkles" on the side and in the armour front:
 |
| Mk I with plain armour... |
 |
| Mk I with wrinckles... |
I decided to make my model with wrinkles, to differentiate more than the model Mk II
 |
| wrincles and hooks... Notice the details in the rear deck... |
 |
| Beaverette Mk I - bird view.. |
 |
| Plates and headlights in Mk I |
 |
| Mk II almost done. Notice the clamps in the hood (PE scraps..) |
 |
| Almost done... |
More advances:
 |
| Guns (Italeri) |
 |
| First layers of colors - Greens... |
 |
| Cammo with black |
I used generic markings for my girls...Decals from my spare box and laserjet. Notice the glossy aspect (Future) to prevent silvering. I use airbrush to apply the Future ...
 |
| Beaverette mk II B-31 |
 |
| Beaverette Mk I number 28 |
 |
The two girls waiting the Future dry...
I apply a thin layer of Future with airbrush before the decal and then apply
another layer after the decals to seal the markings..
|
While the Future dry, we will use details in resin from
Value Gear. Excellent stuff...
 |
In position....
|
And the Girls was ready: First, the Beaverette Mk I
 |
| Beaverette Mk I n° 28 - Home Guard - England, 1940 |
 |
| Beaverette Mk I - left view |
 |
Beaverette Mk I armed with .303 Bren MG
Notice the .303 Lee Enfield in the side of the vehicle |
 |
| Beaverette Mk I - right view |
 |
| Beaverette Mk I - Kojak testing the vehicle... |
Before showing the final pictures of Mk II, I will show you guys a different detail I found in a real photo:
Two British helmets attached on the hood of the vehicle. I liked the detail...
 |
| Notice the two british helmets in the front hood of Beaverette Mk II |
So, I decided to put the helmets in my Beaverette Mk II, too.
 |
| Beaverette Mk II - B-31 - Home Guard - England, 1940 |
 |
Beaverette Mk II - side view
Vehicle armed with .55 AT Rifle Boys |
 |
| Beaverette Mk II - Notice the .303 Lee Enfield in the rear corner of the hull |
 |
| Beaverette Mk II - right view |
 |
| Beaverette Mk II - front view |
 |
| Beaverette Mk II - Kojak approves, too !!! |
The two Beaverettes, side by side:
 |
| The lineage of Beaverettes...until now... |
 |
| It's a good stuff, by Jove !!!! |
 |
| Beaverettes Mk I, Mk II and Mk III |
Thanks for following, Tankers.


 Two British helmets attached on the hood of the vehicle. I liked the detail...


