
Selbstfahrende Sturmartillerie!!
The topic of our article is about one of the variants of the armored vehicle most manufactured by the Germans in WWII. Let's talk about the powerful 10,5 cm Sturmhaubitze 42 (StuH 42) Ausf. G - Sd.Kfz 142/2, the "heaviest" version of the Surmgeschütz III.

 |
| 10,5 cm Sturmhaubitze 42 Ausf. G with infantry in the rear deck. Notice the armoured side skirts (schürzen) and the extra armour made with spare tracks. The driver waving to the camera is priceless!!! Somewhere on the Russian Front - September 1943. |
History
The Sturmgeschütz (StuG) III was a formidable weapon, practically revolutionizing tactical concepts on the battlefield. Its main function was to provide self-propelled fire support to infantry, but as its anti-tank capabilities were increasingly exploited, its primary role of fire support to infantry began to be relegated to the background, opening up a dangerous gap. in the doctrine of Blitzkrieg.
 |
Sturmgeschutz (StuG) III Ausf. G early Sturmgeschutz-Abteilung Großdeutschland Kurk - Russia, July 1943. box art Das Werke 1/16 kit (#DW 16001) |
And this became even more evident after the middle of 1942, with the installation of the 75mm long-barreled cannons, prioritizing the vehicle's anti-tank function. The infantry was left practically without the support of self-propelled artillery.
 |
Infantry taking a ride on a StuG III Ausf. G armed with powerful 7.5 cm StuK 40 L/48 gun Russian Front - Summer, 1943 |
To address this gap, the Ordnance Department signed a contract with the Altmärkische Kettenwerk GmbH (Alkett) for the development of a support self-propelled gun armed with a 10,5 cm howitzer. In March 1942, Alkett installed a 10.5 cm le.FH 18 (leichte Feldhaubitze) howitzer on a Sturmgeschutz Ausf. F chassis, on an experimental basis. Twelve le.FH.18 for assembly at Sturmgeschutz were scheduled to be completed from December 1941 to February 1942, of which five guns were produced by May 1942.
 |
| Surmgeschutz III Ausf. F with 10.5 cm le.FH 18 howitzer. The 10,5 cm Sturmhaubitze prototype - front left view March - 1942 |
 |
| Surmgeschutz III Ausf. F with 10.5 cm le.FH 18 howitzer. The 10,5 cm Sturmhaubitze prototype - front right view March - 1942 |
On 2 October 1942, at an ordnance demonstration with Reich Minister Albert Speer at the Neue Reichskanzlei (New Reich Chancellery) , Hitler saw a Sturmgeschutz Ausf. F equipped with a le.FH. 18 10.5 cm howitzer. The Führer was very impressed with the prototype's unusually low profile (in height), for a self-propelled howitzer.
 |
| Hitler talking with Reich Minister Albert Speer, at a weapons demonstration. December 14, 1942. |
Hitler was informed that six vehicles were already completed, that three more should be completed by 10 October and that the last three in about four more weeks. On 13 October, Hitler declared that Sturmgeschütz equipped with the 10.5 cm le.FH would be ideal for the Russian Front and ordered that the 12 pre-production Sturmgeschütz be made immediately available for operational use.
As a result, the first nine Sturmgeschutz with 10,5 cm howitzer completed in October 1942, were sent to the East front under 3.Batterie/Sturmgeschutz-Abteilung 185 and saw action at south of Leningrad in the end of November 1942.
 |
| Prototype StuH 42 Ausf F with Winterketten tracks serving at Sturmgeschütz-Abteilung 185, in the Battle of Velikiye Luki Russian Front - December 1942. |
The other three vehicles of pre-production were not reported to have been completed until January 1943. This series of 12 pre-production vehicles were built on rebuilt Sturmgeschutz Ausf F and F/8 chassis and not on newly produced chassis.
In early December 1942, Hitler ordered that the production rate of the Sturmhaubitze 10,5 cm be increased to 24 per month. All Sturmhaubitze were completed at Alkett in Berlin. There was no specific StuH 42 production line, but these vehicles were built on the same assembly line as the Sturmgeschütz III Ausf.G, which was the model chosen as the production line.
.%20Series%20production%20of%20Sturmgesch%C3%BCtz%20III%20and%20Sturmhaubitze%2042;%20approx.%20Aug.-Sept.%201943.jpg) |
| Altmärkische Kettenwerk GmbH (Alkett) plant, in Berlin Series production of Sturmgeschütz III Ausf. G (early) and Sturmhaubitze 42 Notice that StuG and StuH are mixed on the same sssembly line approx. Aug./Sept. 1943 |
The first 10 Sturmhaubitze 42 Ausf. G series production were completed in March 1943, with a total of 204 units completed by the end of the year.
For the construction of the StuH 42 version, the 10.5 cm 42 L/28 le.FH leichte Feldhaubitze was mounted in a carriage on a robust frame in the hull of the Sturmgeschütz chassis, like in the versions armed with the 7.5 cm gun.
 |
| Soldiers operating a 10.5 cm le.FH 18 light howitzer Russian Front - 1942 |
 |
| StuG III Ausf F mit le.FH 18 haubitze prototype . Notice the robust installation of the howitzer on the vehicle chassis. |
Minimal changes were made to the chassis and superstructure of the StuG III Ausf. F for adapting the 10.5 cm howitzer. One of them was the elevation of the ceiling fan turret, to increase the efficiency of smoke extraction.
 |
| Differences between the StuG and StuH version, in the prototype. |
The large opening at the front of the vehicle's superstructure was protected by a mantlet on to which the armoured cover for the recoil and recuperator cylinders was welded. This carriage allowed the howitzer to have a horizontal drift of 10° to each side and a vertical elevation of -6° to +20°, limiting the effective range of the howitzer to 5,400 meters.
 |
| Two StuH 42 and a SuG III Ausf.G advancing on an icy Russian plain. The second StuH has its 10.5 cm howitzer at maximum elevation, as does the StuG III, with its 7.5 cm high-velocity cannon, in the background. |
But this would not be a problem, as the vehicle's function was to accompany the infantry's advance. In this condition, infantry targets on the battlefield were rarely more than 2,000 meters away.
The vehicle cold store a total of 36 rounds of ammunition, distributed as follows:
26 Sprenggranaten (high-explosive projectiles) with with the projectiles separated from the propellant cartridges and 10 Hohlladungsgranate (shaped charge projectiles) with a single cartridge, for rapid fire, for anti-tank use. These could penetrate 90 to 100 mm of armored steel, within the effective range of the howitzer.
 |
| Loading ammo into a StuH 42 with Topfblende (Saukopf) mantlet. The projectiles are Sprenggranaten (HE). The propellant charges are not visible in this photo. |
 |
| 10,5 cm HE ammo |
 |
| 10,5 cm propellant charges casings |
 |
| 10,5 cm Hohlladungsgranate (shaped-charge projectiles) with attached casing for rapid fire. |
The high-explosive projectiles (Sprenggranaten) had to be loaded separately, as was usual with howitzers. This limited the rate of fire to three to five rounds per minute. Compared to the StuG III armed with its 7.5cm cannon, the StuH 42 armed with its 10.5cm gun could deliver a much greater quantity of high explosives onto the target. A 10.5 cm field howitzer grenade weighed 15.55 kg, with a 1.75 kg high explosive warhead, while a 7.5 cm Sprenggranate 40 weighed just 5.74 kg, with warhead only 700 g of high explosive.
The serial production of assault howitzers received by the Generalinspekteur der Panzertruppen (General Guderian's office) the official designation of 10,5cm Sturmhaubitze 42 (StuH 42) (Sd.Kfz 142/2). Production models were built on the Sturmgeschütz III Ausf. G chassis. Following satisfactory reports of their successful employment on the Eastern Front, the production rate increased to over 50 in February 1944 and exceeded 100 per month from August to November 1944. Alkett produced 1,299 StuH 42 from March 1943 to 1945.
 |
| The Orchester der Deutschen Oper performing inside the Alkett factory. The orchestra was led by maestro Hans Schmidt-Isserstedt. Notice the three StuH 42 at different stages of completion. Berlin, 06 June - 1943. |
As the StuH 42 were built sharing the same assembly line as the StuG III Ausf. G, modifications in the Sturmhaubitze production series occurred at the same time as on the Sturmgeschutz. For example, the cast Topfblende (pot mantlet) had been introduced in late 1943, but did not completely replace the block gun mantlet version.
 |
| Variations shape in the gun mantlets of the StuG III and StuH 42, during production. |
 |
| 10,5 cm Sturmhaubitze 42 with topfblende and covered with zimmerit - Russian Front early spring -1944 |
 |
| 10,5 cm Sturmhaubitze 42 with topfblende - 302 Notice the T34 tracks and concrete armour, in the front. Russian Front - 1944. |
 |
| 10,5 cm Sturmhaubitze 42 with topfblende - 131 Finland - July, 1944. |
 |
| A 10,5 cm Sturmhaubitze 42 with topfblende and zimmerit leading a StuG III Ausf. G . Finland - July, 1944. |
Other modifications in the assembly line can be mentioned, such as:
- the roof-mounted machine guns, which were mounted on a shield and manually operated by the gunner in the early versions and replaced by remotely operated machine guns in the late versions (and much later, completely omitted).
- the presence (early) or absence (late) of the muzzle brake on StuH howitzers, to save material.
- replacing the rubber treads on the return rollers of the early versions with metal tread wheels on the late versions, to save precious rubber.
 |
| Comparison between the early and later models of the StuH 42 |
The StuH 42 were highly appreciated by their crews and even more by the infantry, for their ability to demolish enemy strong points. They were essential in German tactical doctrine, proving to be irreplaceable weapons. And, for this very reason, it was greatly feared by its enemies (the Russians in particular...), given that..."the short-barreled assault guns" were priority targets...
 |
| The Russians hated the StuH 42!!! |
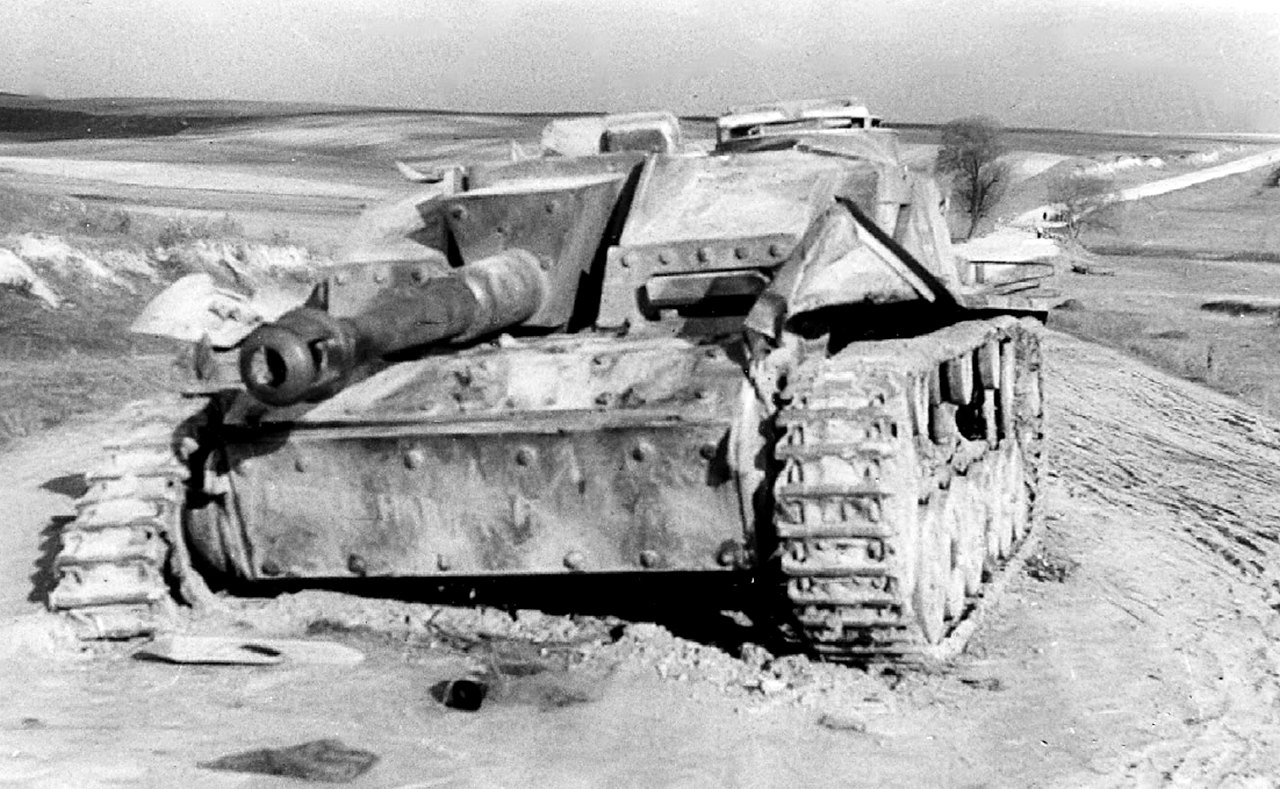 |
| 10,5 cm Sturmhaubitze 42 Ausf. G knocked out by Soviet troops. Kharkov area Winter - 1943. |
 |
| 10,5 cm Sturmhaubitze 42 Ausf. G late destroyed in Italy, 1944. |
 |
| 10,5 cm Sturmhaubitze 42 Ausf. G late somewhere in Russian Front, 1944. Notice the concrete armour |
 |
| Three 10,5 cm Sturmhaubitze 42 Ausf. G from Sturmgeschütz-Abteilung 210 with schürzen in a muddy field Russian front, 1944. |
 |
| 10,5 cm Sturmhaubitze 42 Ausf. G late Sturmgeschütz-Abteilung 325 - Notice the MG remotely operated roof-mounted and no muzzle brake in the howitzer Hungary - September, 1944. |
 |
| 10,5 cm Sturmhaubitze 42 Ausf. G "KRANICH" Sturmgeschütz-Abteilung 202 - 2. Batterie with with extensive foliage camouflage and side skikts (Schürzen), as extra-armour. Russian Front - Kurland, Latvia - September, 1944. |
 |
| 10,5 cm Sturmhaubitze 42 Ausf. G late Notice the logs in the sides of the vehicle and the MG remotely operated roof-mounted Eastern Front - Winter, 1944. |
 |
| 10,5 cm Sturmhaubitze 42 Ausf. G late no. 308 Notice the MG remotely operated roof-mounted Ukraine - 1944. |
 |
| 10,5 cm Sturmhaubitze 42 Ausf. G with concrete, KV russian links and metal sheet in the glacis, as extra-armour Russian Front, 1943 |
 |
| A well-worn 10,5 cm Sturmhaubitze 42 Ausf. G , with concrete and Russian T34 track links reinforcing the frontal armor. Russian Front, Summer 1944. |
 |
10,5 cm Sturmhaubitze 42 Ausf. G with muzzle brake similar to the Wespe. Armor side skirts appear to be field adaptations. |
 |
| 10,5 cm Sturmhaubitze 42 Ausf. G late no muzzle brake on the howitzer Hungary - Winter, 1944 - 1945. |
The importance of the StuH 42 on the battlefields can be confirmed by what was reported by the commander of the Sturmgeschütz-Ersatz und Ausbildungs-Abteilung (Assault Weapons Training and Replacement Division) when visiting the Sturmgeschütz units on the Eastern Front in 1943, to determine how the StuH 42s were faring in combat: "The Sturmhaubitze has completely proven its worth and is indispensable against infantry targets..."
This brave and important machine fought in Eastern Front and Europe until the end of the conflict, in 1945.
 |
| The last stand: a destroyed 10,5 cm Sturmhaubitze 42 Ausf. G, in the Reich Chancellery's garage, during the Battle of Berlin. 1945. They fought until the end... |
Specs:


| 10,5 cm Sturmhaubitze 42 Ausf. G | |
|---|---|
| Type | Assault gun (howitzer) |
| Place of origin | Nazi Germany |
| Service history | |
| In service | 1942 -1945 |
| Used by | Nazi Germany |
| Wars | World War II |
| Production history | |
| Designer | Alkett |
| Manufacturer | Alkett |
| No. built | 1.299 |
| Specifications | |
| Mass | 24 tonnes |
| Length | 6.14 m |
| Width | 2.95 m (fenders) 3.41 m (Schürzen skirts) |
| Height | 2.16 m |
| Crew | 4 (driver, commander, gunner, loader) |
| Armour | 11 to 50+30 mm |
Main armament |
|
Secondary armament | |
| Engine | Maybach HL120 TRM V-12 gasoline engine 300 HP @ 3000 rpm |
| Power/weight | 12 PS (9.2 kW) / tonne |
| Transmission | six-speed transmission |
| Suspension Speed | torsion bar 40 Km/h (road) 15 Km/h (off road) |
Fuel capacity Operational range | 320 liters Road:155 km Off road: 95 km |
The kit:
For this project, I used an old Tamiya kit Sturmgeschuetz III Ausf.G (#MM114) from 1972 (yes, my friends... a kit from half a century ago!!). This kit is a true 2x1, as it comes with parts for the assault gun version (StuG III Ausf.G) and self-propelled support artillery (StuH 42).
 |
| Box art from Tamiya kit Sturmgeschuetz III Ausf.G (#MM114) |
 |
| A true time capsule... The kit is in perfect order... |
And before anyone comments (and especially criticizes...), I'm going to answer the always present question: "Why do you "waste" time with these old kits?? There are much better and modern things on the market!!"
The answer is simple: because I ALREADY HAD this kit!!
Why I need to buy a new kit (and modern ones are quite expensive) if I have this one in my stock?? If the kit was worthless, I agree!! But these old ladies aren't that bad...they take us back to old memories... it's like a trip back in time!
Therefore, as I see modeling as a Hobby (whose objective is expend time having fun...) and not as a Religion or Political Faction (as many, unfortunately, belive today...), these old and venerable ladies still know how to dance a very good waltz!!! And, with a little care and work, they look great in any collection. This is also a kind of challenge: doing a lot with little!!!
An old kit challenges, teaches, improves and most importantly, entertains us!!
But back to the project, Kojak is a well-organized guy... Starting by the booklet: chassis and suspension.
 |
| Starting with the "bathtub" of the vehicle... Look at the internal details... These Tamiya kits were manufactured to be motorized... something crazy!! chassis front view |
 |
| Starting with the "bathtub" of the vehicle... chassis rear view |
 |
| All wheels are dry-run, to facilitate subsequent painting... |
 |
| Building the main gun cradle. |
 |
| and the main gun cradle glued in position. Notice the gaps closed with plasticards |
After glue the upper-hull in position, installing the mantlet (block type) and the 10.5 cm gun barrel. Here's a trick: put something on the muzzle brake to visualize a perfectly horizontal installation of the muzzle brake holes. I used pieces of wooden popsicle sticks.
 |
| The vehicle with gun. Notice the "attitude indicator device" made with a popsicle stick. Kojak is an ingenious guy... |
 |
| Horizontal like the horizon!!! |
 |
| The fun begins: correcting defects in this old creature... notice the putty and plasticard filling holes in the side armor... left view |
 |
| Right view. I made the cushion for the commander's hatch using the powder+dental acrylic+brush technique.(red arrow) |
 |
| These old Tamiya kits are very simple...but very cool!!!! |
 |
| Another deadly sin: the thickness of the schürzen. Yes, no PE or other modern perks... Let's try to rectify that with some sandpaper. |
 |
| Good thing the "internal" details are minimal... We can wear a lot in this area |
Using the "Panzerserra Sanding Apparatus": two sheets of water-based sandpaper (of different grits) glued with contact glue on the sides of a glass plate (bevelled at the edges, to avoid cuts) 10mm thick: cheap and extremely effective!!!
 |
| The schürzen on the Panzerserra Sanding Apparatus... Sanding must be done carefully and in circular movements... |
 |
| The after and the before... |
But I can still sand a little more...
 |
| Reducing the schürzen to 1.3mm thick... Not bad!!! |
 |
| The final after and the before... |
 |
| The two schürzen sanded and thinner. I engrave the lines of the skirts and the markings for the support rack. Quick and easy... |
 |
| Making the new racks!! |
And now, a bonus-surprise: I found a scrap of an old Tamiya (the same kit, but already built in the StuG III version, which I bought at a flea market, years ago...), very damaged and with construction errors and horrible marks on her plastic. After removing the paint (synthetic enamel) with a 4-hour bath in caustic soda (very carefully), the semi-destroyed girl looked like this:
 |
| The StuG and StuH, side bu side... The old and the new (new??!!)... Notice the plastic scars in the StuG one.... |
My idea: use this old carcass as a test bench... I'll try to do something based on this photo (but using the StuG version of the scrap); CONCRETE ARMOUR!!
|
| 10,5 cm Sturmhaubitze 42 Ausf. G , with concrete armour Notice in the thick layer of concrete applied in the front arch and on top of side fenders, reinforcing the vehicle's armor. |
In our case, the "concrete" will be dental acrylic, which will be manipulated and applied to these areas. To reduce the amount of acrylic, I will almost fill in with pieces of plastic in the areas that will be "reinforced" with the "concrete".
 |
| Notice the sprues applied on the vehicle's original armor... For the side, I will use pieces of thicker plasticard. left view |
 |
| Right view |
 |
| Preparing the "concrete": Dental acrylic (powder + liquid) separated to be mixed. The acrylic will be applied with a spatula... |
 |
| Dental acrylic (powder + liquid) already mixed. Note the viscous consistency... |
Acrylic being applied, in several layers. As the acrylic after hardening (5 minutes) becomes extremely hard, you must shape the surface while it is pasty, otherwise you can only wear down the acrylic with abrasive instruments like rotatory tools from Dremel. Manual sanding is very hard and difficult!!! The good news is that acrylic has a similar grain to concrete when we use this technique.
 |
| Placing the "concrete" over the steel... |
 |
| Filling the gaps and texturing the concrete surface with a brush moisted in acrylic liquid, dipped in acrylic powder... You can apply small portions of acrylic with this technique variation. |
 |
| The concrete armour almost ready!! Don't be alarmed if you feel "heat" coming out of this mixture: acrylic hardens through an exothermic reaction. |
 |
| left view |
 |
| right view |
While the "concrete" hardens, let's scratch the rear deck racks of these vehicles. StuGs (and StuHs) almost always had these racks on the rear upper deck, with a bunch of stuff tied back there. Some of these racks were built at Alkett, but the vast majority were made in the field... let's go!! See the vehicles in the pic below:
 |
| Notice the racks in the rear hull of the Stuhs |
Lets build these racks by scratch...
 |
| Making the rack posts with Plastruct "L" profile and thin plasticard discs cut with punch-&-die tool |
 |
| Gluing the poles in position in the StuH 42 |
 |
| Adding the horizontal beams... |
 |
| Repeating the technique for the StuG with concrete!! |
 |
| ...but with a slightly different look... |
 |
| The StuG and StuH, with racks ready, side by side |
While I research for the markings and colors on my old books and sacred scrolls, let's give it a coat of primer to prepare the final painting...
 |
| StuH 42 early - left view |
 |
| StuH 42 early - right view |
 |
| StuG III Ausf. G with concrete armour left view |
 |
| StuG III Ausf. G with concrete armour right view |
For StuH 42, I chose these markings: For the StuH 42, I chose these markings: 10,5 cm Sturmhaubitze 42 Ausf. G (StuH 42) - Sd.Kfz 142/2 (early) belonging to Sturmgeschütz- Abteilung 185, 1st Company, 3rd Platoon, vehicle no. 1, which fought in Kursk, at the Russian Front, during Operation Citadel (Unternehmen Zitadelle), in July 1943.

My idea for the StuG III would be a reworked vehicle that suffered damage at the combat zone and was sent to the rear to be rebuilt. The vehicle features extensive additional concrete armor, perhaps to reinforce damage from previous penetrations. The gun barrel was changed (featuring only a dark gray antioxidant primer, like paint), and in the desperate days of 1945 any and all rolling stock was worthy of use. This vehicle fought in Germany in 1945, during the violent Battle of Königsberg, in the first days of February. This Sturmgeschutz III Ausf. G - Sd.Kfz 142/1 belonged to Sturmgeschütz-Brigade 232 ("Samland"), 1st Company, 2nd Platoon, vehicle no.1., named ERIKA, by its crew. ERIKA proudly sports 5 kill marks on her new cannon and additional protection provided by tree logs firmly tied around the superstructure.

But here we go: Painting with basic color in German dark yellow and its tones...
 |
Hulls, schürzens and drive sprockets in dark yellow. Bogie wheels in dark gray color. Then their centers will be painted yellow... Note the Pomegranate tree (Punica granatum) branches, which are perfect for making wooden logs, on this scale.... |
 |
| The StuH 42... |
 |
| ...and the concrete StuG III Ausf. G |
 |
| StuH 42 in wavy camouflage with olive green and red-brown left side |
 |
| StuH 42 in wavy camouflage with olive green and red-brown right side |
 |
| StuH 42 with schürzen in wavy camouflage with olive green and red-brown left side |
 |
| StuH 42 with schürzen in wavy camouflage with olive green and red-brown front right side |
 |
| StuH 42 with schürzen in wavy camouflage with olive green and red-brown rear right side |
 |
| StuG III Ausf. G with concrete armour Notice the gun barrel in gray-primer left side |
 |
| StuG III Ausf. G with concrete armour Notice the gun barrel in gray-primer and the block mantlet (late) with coaxial MG |
 |
| StuG III Ausf. G with concrete armour right side |
 |
| StuG III Ausf. G with concrete armour rear right side view |
 |
| StuG III Ausf.G and StuH 42, side by side |
 |
| Time to choose which wooden logs to use... |
But first, let's apply the decals: two or three thin layers of glossy acrylic varnish applied with an airbrush, in the places of the decals to avoid silvering. After the varnish is dry, we apply the markings...
 |
| Markings in the StuH 42 Sturmgeschütz- Abteilung 185 |
 |
| Markings in the StuH 42 Sturmgeschütz- Abteilung 185 rear view |
 |
| and in the schürzens, too... |
 |
| The schürzens are just attached, for viewing... left view |
 |
| The schürzens are just attached, for viewing... right view |
 |
| ERIKA, the reworked StuG III Ausf. G Sturmgeschütz-Brigade 232 ("Samland") front left view |
 |
| ERIKA, the reworked StuG III Ausf. G Sturmgeschütz-Brigade 232 ("Samland") rear view |
 |
| Gluing the logs together with superglue... |
 |
| Wooden logs in the left superstructure dry-run |
 |
| Wooden logs in the right superstructure dry-run |
Tying the wooden logs: 100% polyamide thread to reproduce ropes with fine copper wire braided and painted in black to reproduce steel cables. Our Kommandant doesn't want these logs to fall around...
 |
| Notice the steel cables in black, with ropes on top, tying everything together... Notice the logs underwent paint touch-ups to cover the peeling... |
 |
| I glued the bundles of logs to each side of the tank, using gelatinous superglue... Before, of course, I scraped off the paint for better adhesion... |
 |
| Since the gelatinous superglue takes a little longer to dry, I'll keep everything in place with rubber bands... Notice the spare wheels in the rack´s rear... right view |
 |
| Drying the log glue - left view |
And since we're talking about increasing vehicle protection, let's see what the StuH Kommandant is doing in this regard, while the logs dry in the StuG III...
 |
| Extra Panzer III track links applied to the StuG III's frontal arches... They may not be as effective, but they boost the crew's morale!!! Notice the periscope in position, in the roof of the superestructure... left view |
 |
| In addition to protection tracks, tools and more details. right view |
 |
| After the gelatinous superglue dries, we upgrade our old, refurbished StuG with its tools. left view |
 |
| Right view. I love taking those old kits that no one cares about and turning them into girls that really stand out on the catwalk!!! |
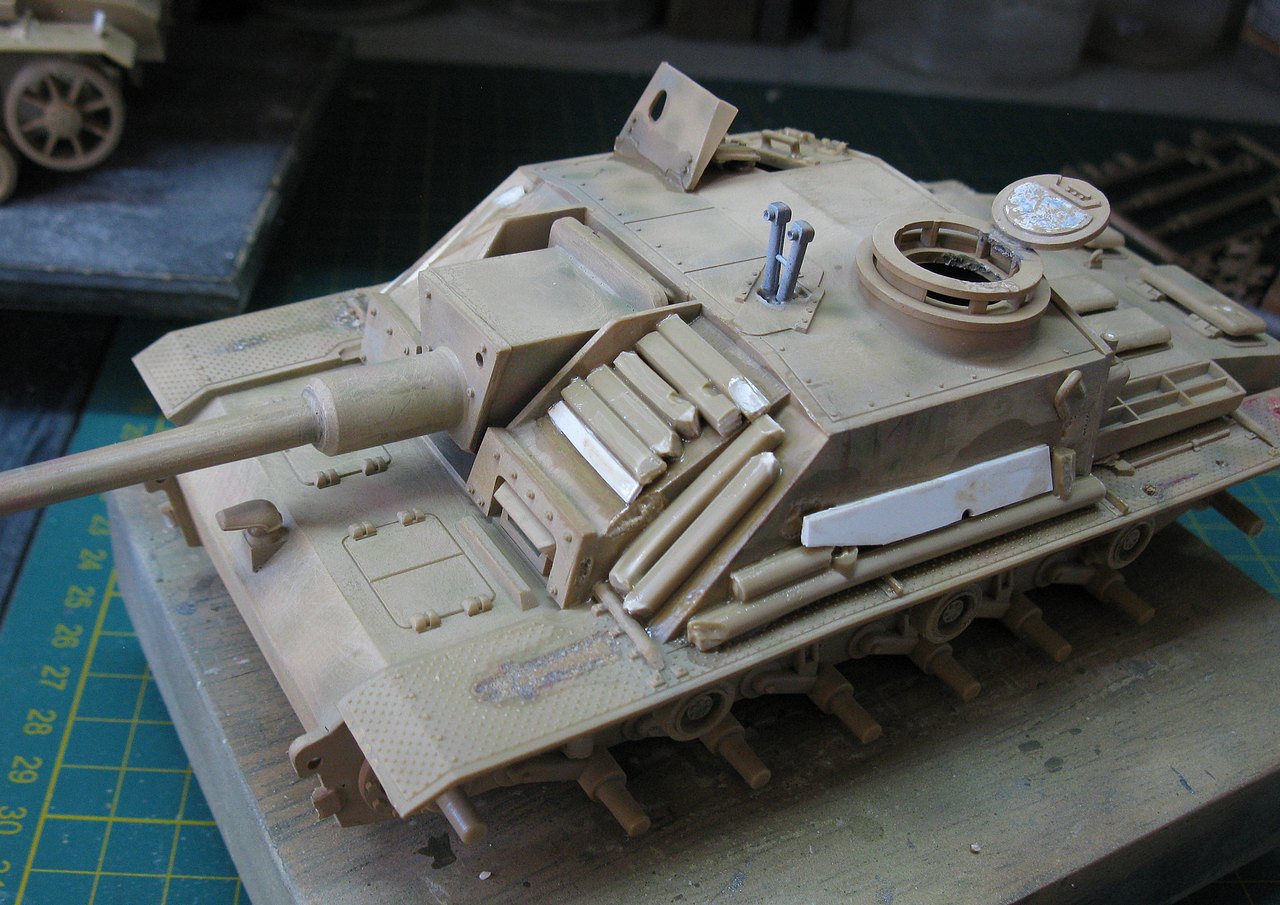
And continuing with this Ping-Pong construction, let's go back to the StuH 42, where they put some "stuff" in the rear deck area. The crews of these assault cars loved to use this area to transport all sorts of things... Here's a hodgepodge of details being tested in place:
 |
| A 200 liter drum from AFV Club (Kursk is far away...), wooden crates from Value Gear (thanks, Steve) and old canvas rolls from Italeri... Notice the spare wheel, in the rack sides... |
 |
| Our girl is getting badass!!! |
 |
| Yes... all the stuff was coherent and inherently stable, back there... Now, let's separate everything and paint things separately... |
 |
| In the meantime, let's do the same thing with our StuG III... |
 |
| These Sturmgeschutz are real cargo trucks!!! |
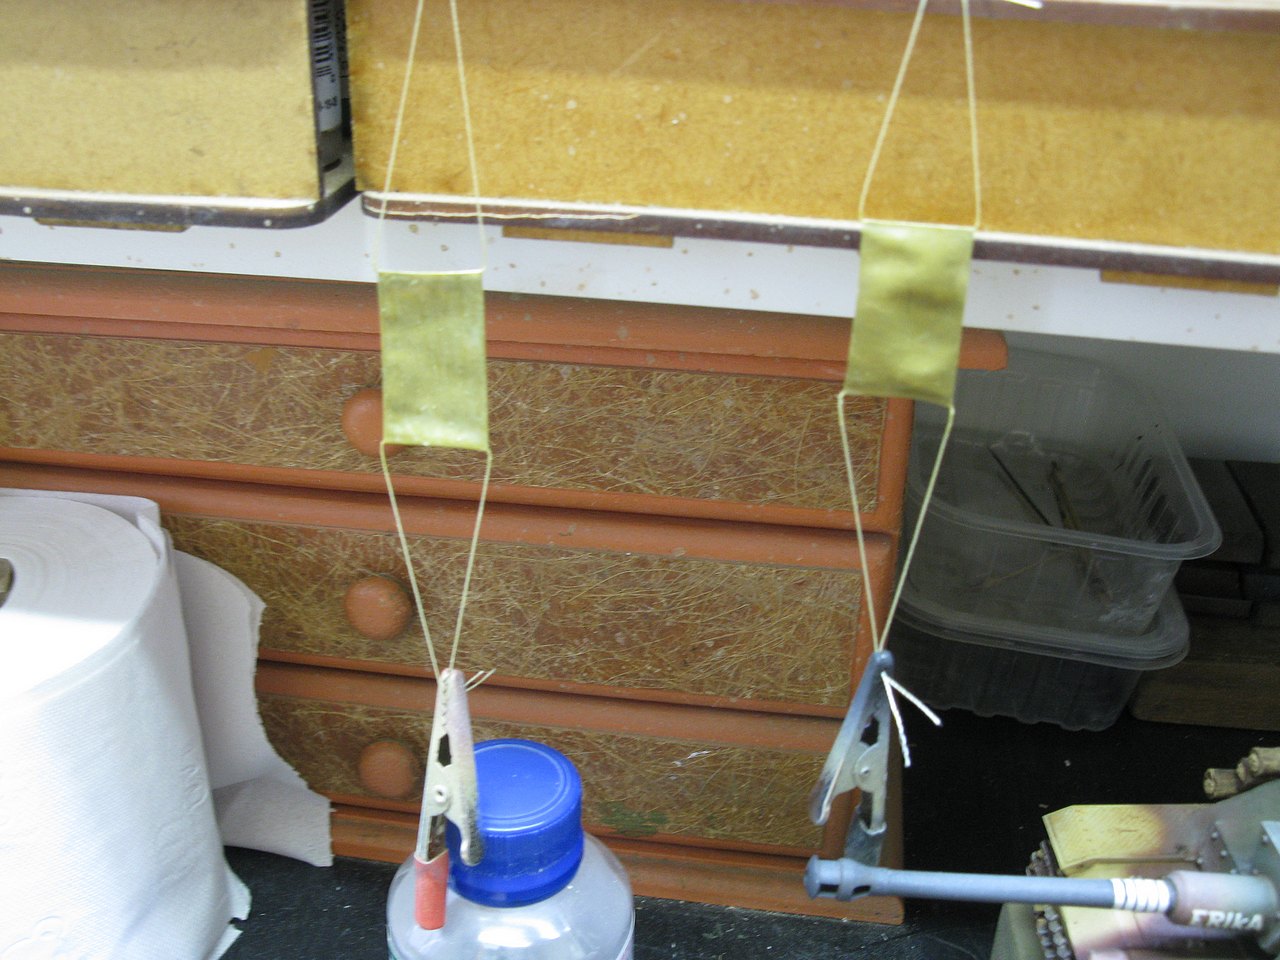
I separated all these accessory pieces and applied light layers of primer, before starting the individual paintings. While this was drying, I decided to make two canvas panels that would be installed on the sides of the StuGIII for the correct individual identification of the vehicle, as the trunks would be covering the original markings. To make these two canvas panels, I will use the tracing paper technique with PVA glue. So let's look at the photos:
 |
| Material: pieces of tracing paper cut to the correct size, 100% polyamide thread (does not become "hairy"), water and water-soluble PVA glue, as well as soda caps to be used as disposable containers, to receive glue and water. Tweezers, scalpel, scissors and ruler will also be used, as well as a soft brush and a small spatula... |
 |
| Expensive and extremely sophisticated equipment... |
 |
| First, we folded a small portion on the edges of the "tarps", which would be where the "rope" would be passing, to support the tarp... |
 |
| To make this crease better, I placed an acupuncture needle in the fold and, with a spatula, pressed the paper against the needle, forming a channel where the thread will be glued... |
 |
| Gluing the threads and edges of the canvas with pure glue, without being diluted... Don't forget to keep the brush in a glass of water to prevent the hairs from sticking together... |
 |
| The process was repeated, forming two canvas panels with mooring cables at the ends... |
After a few minutes for the "ropes" to dry, paint the canvas panel with Khaki acrylic. Note that when you start painting, the tracing paper wrinkles and curls, due to the moisture in the paint. Be quick and start painting on the other side, to prevent it from completely "curling up"... Things get a little messy at first, but then things go back to normal...
 |
| The top canvas has both sides painted... the bottom one has only one side painted (and damp...)... It curls up very quickly. To counteract this, paint (or wet) the other side... |
 |
| The tarpaulins drying, with the "humidity" being neutralized... no more rollers... |
Now, let's "waterproof" the canvas by applying a layer of PVA glue diluted in the same amount of water (50% + 50%). In the case of the photo, I used the "dirty" brush with Khaki, which pigments the diluted glue... No problem!!!
 |
| The glue+water solution, smeared with Khaki |
After painting both sides of the canvas, using good and infallible gravity to help us: threads tied with claws, supported on the bench and suspended with the weight of the claws, to avoid excess wrinkling...
 |
| Gravity and evaporation: building kit models is also studying physics!!! |
While the tarps were drying, I bent thin copper wires and, after perforating the hull in the appropriate areas, I glued these lashing eyes to stretch the canvas panel. In the upper portion, I made a hanger in the front portion. on the rear one, I will use the kit's own handle (red arrows). In the lower portion, two lashing eyes between the logs and the fenders, almost invisible (yellow arrows). These handles were painted in the respective colors... Look at the photos, below:
 |
| The canvas already tied to the lower straps (yellow). Notice that there is not much tension... |
 |
| Now tying the tarp to the top straps. Notice that the canvas has a beautiful drape... A micro-drop of superglue on each knot finishes everything off perfectly... |
 |
| Repeating the same method on the right side: yellow strings for yellow handles and red strings for red ones... |
 |
| And the "stretched" (but discreetly draped) canvas placed in its place! |
 |
| As the canvas is already waterproofed with PVA glue, the decal adheres perfectly. Using Microsol softens the decal, allowing it to conform to the canvas drape. Notice how Microsol wrinkles the decals (red arrows)... |
 |
| Canvas with markings. The decal still has the Microsol wrinkle... Within a few minutes, the Microsol evaporates and the decal stretches again... |
I was forgetting to show how the "things" looked after they were painted and installed on the girls' back decks. First, let's look at the StuG III stuff, in close-up:
 |
| Crates, rollbags, personal things and oil cans, installed on the rear deck of StuG III |
 |
| Rear left view |
 |
| Detail: drum manufactured in 1944, for a girl portrayed in 1945. The Devil lives in the small details... front left view |
 |
| It's incredible how these accessories give this tired kit another life... |
 |
| Now, it's time to girl StuH's show us her rear... |
 |
| Everything is very well organized and fitted together... Nothing will fall out when moving... Ropes are for sissies... |
 |
| I really liked these details... |
 |
| Final detail: a drum from 1943 for our fighter from Kursk!! |
And after some more painting and weathering details, I finished both girls.
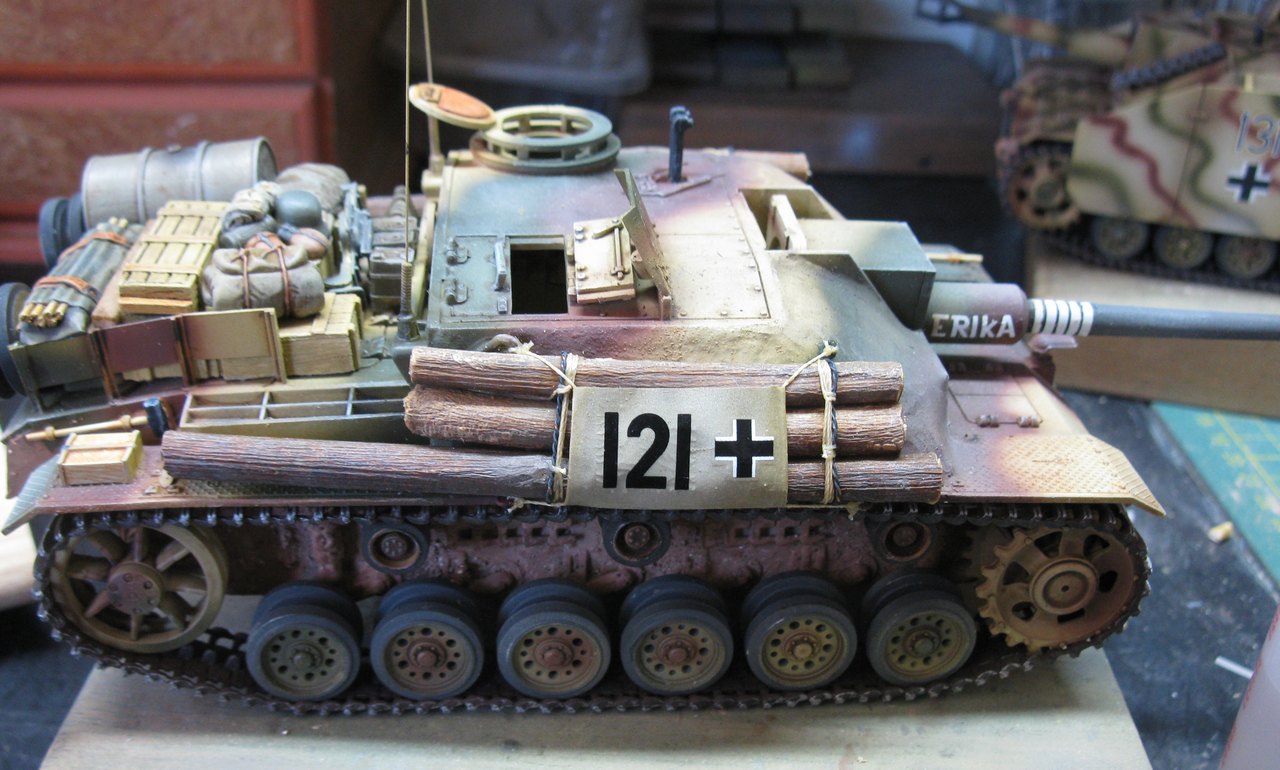
First, ERIKA, a Sturmgeschütz III Ausf. G - Sd.Kfz 142/1, representing the desperate days of 1945. A vehicle that has been repowered, repaired, adapted and reinforced to continue fighting. And to represent this destroyer vehicle, a scrap kit, which went through the same process as your real-life example, a demonstration that nothing is lost, everything can be used when you feel like it. With you, ERIKA, a StuG III Ausf. G - Sd.Kfz 142/1 of Sturmgeshütz-Brigade 232 ("Samland"), 1st Company, 2nd Platoon, vehicle no.1, during the Battle of Königsberg, Germany, in the first days of February 1945.
 |
Sturmgeschütz III Ausf. G -Sd.Kfz 142/1 Sturmgeshütz-Brigade 232 ("Samland") 1st Company, 2nd Platoon, vehicle no.1 "ERIKA"Battle of Königsberg, Germany - early February 1945. |
 |
| Sturmgeschütz III Ausf. G - "ERIKA" |
 |
| Sturmgeschütz III Ausf. G - "ERIKA" left side view |
 |
| Sturmgeschütz III Ausf. G - "ERIKA" left rear view |
 |
| Sturmgeschütz III Ausf. G - "ERIKA" right rear view |
 |
| Sturmgeschütz III Ausf. G - "ERIKA" right side view |
 |
| Sturmgeschütz III Ausf. G - "ERIKA" right front top view |
 |
| Sturmgeschütz III Ausf. G - "ERIKA" right front view |
 |
| Sturmgeschütz III Ausf. G - "ERIKA" rear right top view |
 |
| Sturmgeschütz III Ausf. G - "ERIKA" rear left top view |
 |
| Sturmgeschütz III Ausf. G - "ERIKA" rear top view |
 |
| Sturmgeschütz III Ausf. G - "ERIKA" with Kojak |
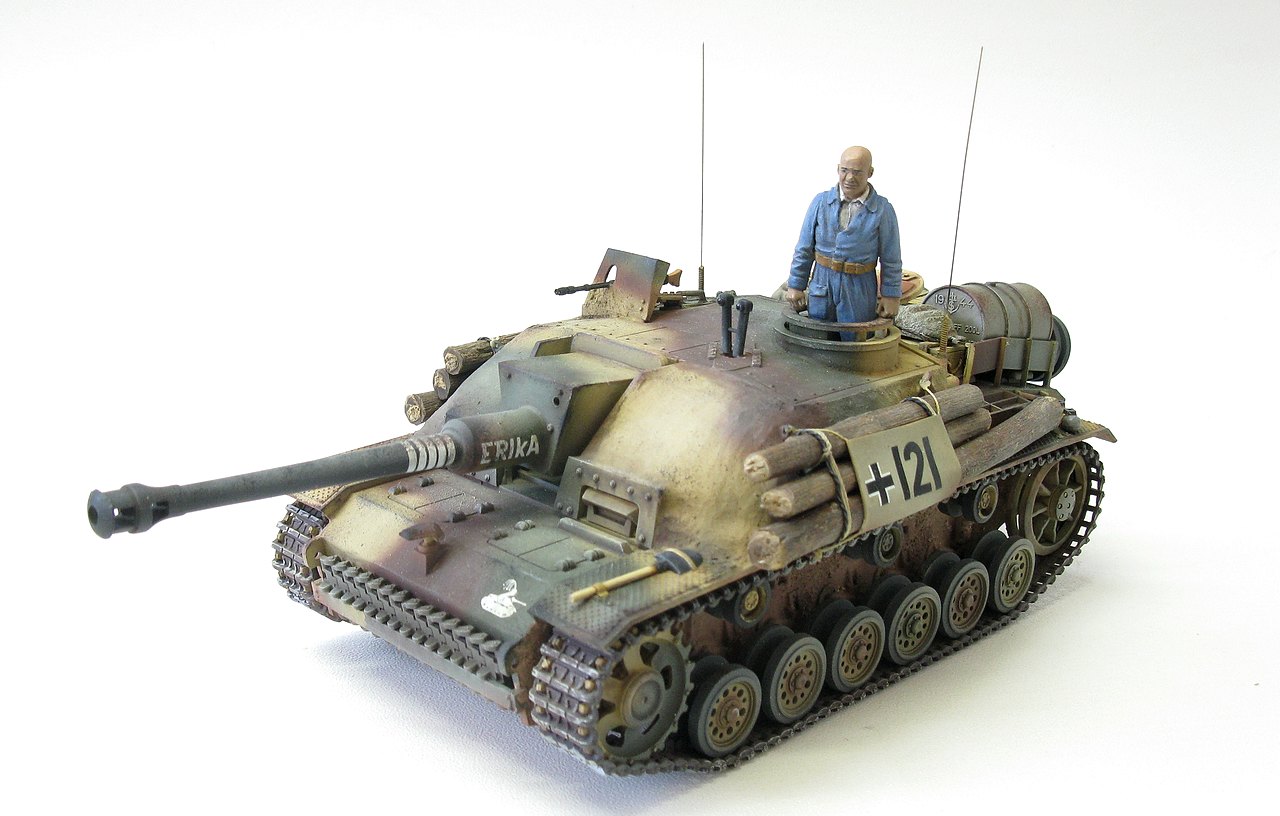 |
| Kojak is very happy with this job, no doubt!! |
 |
| Sturmgeschütz III Ausf. G - Sd.Kfz 142/1 Sturmgeshütz-Brigade 232 ("Samland") 1st Company, 2nd Platoon, vehicle no.1 "ERIKA" Battle of Königsberg, Germany - early February 1945. |
And now, a 10.5 cm Sturmhaubitze 42 Ausf. G (StuH 42) - Sd.Kfz 142/2 (early version) belonging to Sturmgeschütz- Abteilung 185, 1st Company, 3rd Platoon, vehicle no. 1, which fought in Kursk, at the Russian Front, during Operation Citadel (Unternehmen Zitadelle), in July 1943.
 |
| 10.5 cm StuH 42 Ausf.G - Sd.Kfz 142/2 (early version) Sturmgeschütz- Abteilung 185, 1st Company, 3rd Platoon, vehicle no. 1 Kursk - Russian Front - July 1943. |
 |
| 10.5 cm StuH 42 Ausf.G - Sd.Kfz 142/2 (early) front left top view |
 |
| 10.5 cm StuH 42 Ausf.G - Sd.Kfz 142/2 (early) left side view |
 |
| 10.5 cm StuH 42 Ausf.G - Sd.Kfz 142/2 (early) rear left view |
 |
| 10.5 cm StuH 42 Ausf.G - Sd.Kfz 142/2 (early) rear right view |
 |
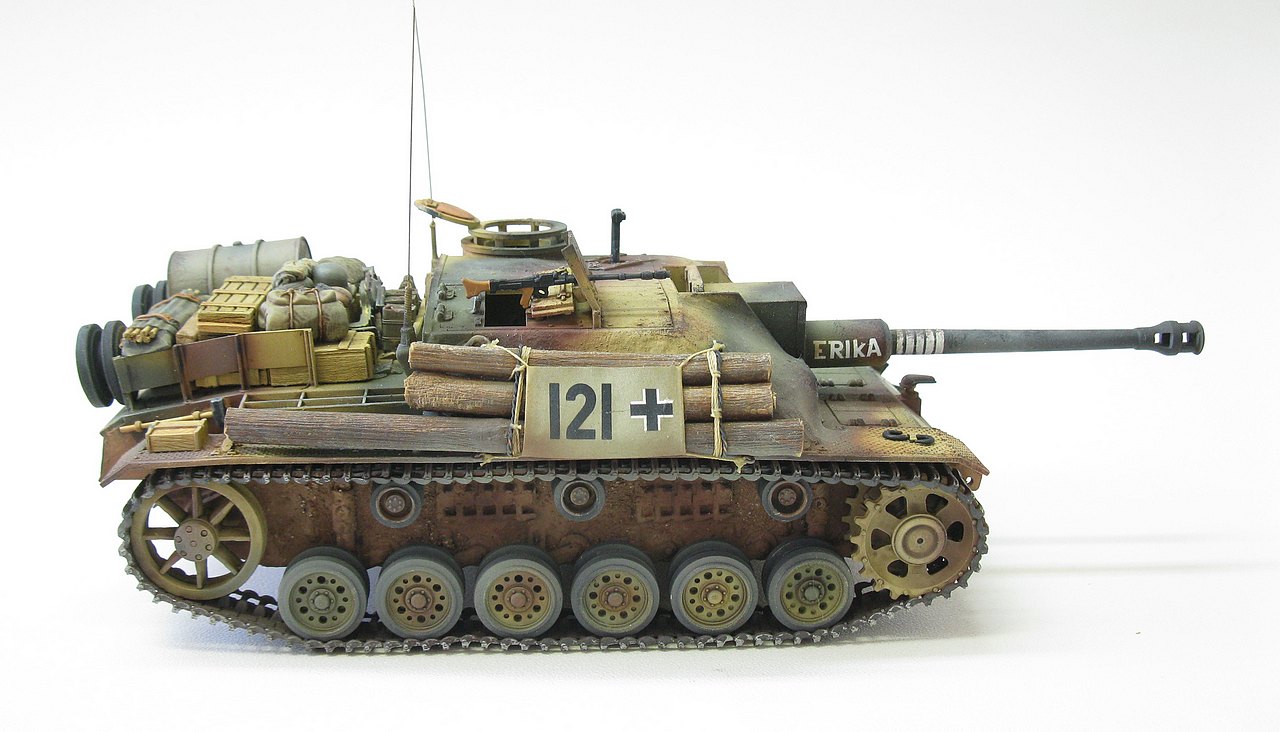
| 10.5 cm StuH 42 Ausf.G - Sd.Kfz 142/2 (early) right view |
 |
| 10.5 cm StuH 42 Ausf.G - Sd.Kfz 142/2 (early) right front view |
 |
| 10.5 cm StuH 42 Ausf.G - Sd.Kfz 142/2 (early) rear left top view |
 |
| 10.5 cm StuH 42 Ausf.G - Sd.Kfz 142/2 (early) rear right top view |
 |
| 10.5 cm StuH 42 Ausf.G - Sd.Kfz 142/2 (early) right top view |
 |
| 10.5 cm StuH 42 Ausf.G - Sd.Kfz 142/2 (early) with Kojak, standing at the Kommandantenstation!! |
 |
| Two first cousins, side by side!! |
 |
| 10.5 cm StuH 42 Ausf.G - Sd.Kfz 142/2 (early version) Sturmgeschütz- Abteilung 185, 1st Company, 3rd Platoon, vehicle no. 1 Kursk - Russian Front - July 1943. |
I loved this double project... How pleasant and satisfying it is to take these old Tamiya kits from my childhood and bring them to the shelf, pairing them with much more modern, sophisticated, detailed and expensive kits... They are girls from the 70s, but still, beautiful girls!!!
Thanks for the visit...
See you, soon!!!
