Hallo, Freunde!
Today, I will show to you guys one of the craziest projects I've ever done (I built this girl in 2010)...
 |
| An irresistible invitation ... |
One of the vehicles that I always wanted to build was an Opel Blitz Bus.
 |
| Opel Blitz Bus - civilian version |
 |
| Opel Blitz Bus - militarized version |
But as the 'Great Companies' not yet injected this wonder in 1/35 scale (and I never really understood the why this gap ...The Germans loved to use buses to transport soldiers...There are hundreds of photographs ...), the problem is to find an available kit. The Azimuth-Ironside manufactured this vehicle (out of production), but it is hard to find...
 |
| Opel Blitz bus in log's road... |
History:
In 1939 Germany was rapidly preparing for global hostilities. The plans of the German command supposed an instantaneous capture of quite large areas of other countries, and therefore special attention was paid to the question of the greatest possible motorization of infantry units. Besides a large number of different types of trucks which were already in the Wehrmacht's inventory, staff buses also began to be taken on charge, whose main task was the conveyance of officers during offensive actions of the army with a likely prospect of minimal resistance by an opposing party in the conflict.
The practice of building buses on a truck's chassis had existed for a long time, and therefore the most common types of buses which came into the German's inventory were based on the most widely used trucks. One of the most popular trucks at this time was the well-known Opel Blitz, and on its chassis was designed a standard army bus (at the time the more common term for it was "omnibus").
 |
| Opel Blitz bus in the desert |
The Ludewig firm which was engaged in designing the bus, was located in Essen and had great experience in the manufacture of civilian multiseat vehicles. The standard chassis of the three ton truck was extended a little bit (up to 4450 mm), and the frame structure was reinforced.
 |
| Opel Bus chassis |
The original all-metal body of the new bus was quite elegant in outline, and only the front part where the engine was hidden, and the classic radiator with its distinctive logo, immediately reminded one of its predecessor, the famous "Blitz". Inside the cabin were several rows of seats which could be easily demounted if necessary (transportation of bulk goods, medical equipment, etc.).
Series production of the bus, officially designated the Opel 3.6-47 type W39, started in the second half of 1939, almost at the same time as the invasion of Poland by Germany and the start of WWII. At first, the number of vehicles produced per month was very small, but already in 1940 about one hundred units per month off were coming off the production line in Essen.
Series production lasted until mid-1943, when the situation became worse for Germany at the Front, basic industrial materials were in short supply, and as a result, Ludewig had to seriously simplify the structure of the bus. During this period 2,880 units of the early version were produced overall, which were sent both to the Eastern Front in Russia, and to the Afrika Corps of General Rommel in North Africa.
 |
| Opel Blitz bus in transport...She worked on virtually all fronts... |
 |
| Opel Bus in Afrika ... |
 |
...and in the Russian front.
A Stalinetz S-65 tractor (captured) tugging a stucked bus. A good idea for a diorama.. |
Opel Blitz 3.6-47 buses were used by the army until the very end of the war, but immediately afterwards they quickly disappeared, giving way to more modern developments of the Opel concern during the early postwar years.
(font: Roden)
 |
Opel Blitz bus with cammo, in 1944.
|
Specs:
| Opel Blitz bus |
|---|
Type
| personal transport vehicle |
|---|
Place of origin
| Germany - 8.336 made |
|---|
| Specifications |
|---|
Weight
| 2 t (bare weight) 6.0 t (total) |
|---|
Length
| 7.356 mm |
|---|
Width
| 2,248 mm |
|---|
Height
| 2,481 mm |
|---|
Crew
| driver + 28 men or 5 wounded with medical assistance |
|---|
|
Wheelbase
| 4.65m |
|---|
Gearbox
| 5 speed gearbox with low noise 4th and 5th gear, middle shifting |
|---|
Tires
| 190x20 (rear double 4x2) |
|---|
Engine
| Opel 6-cylinder 3.625 cc
75 Hp at 3200 rpm |
|---|
Suspension
| front: semi-elliptic, 10 leaf-spring suspension, forged I-profile with shock absorbers.
rear: semi-elliptic, 12 leaf-spring with shock absorbers. |
|---|
Speed
Eletric
| 90 km/h
6 Volt, 12 Volt from 1942 |
|---|
The kit:
As I said, I used for this project the vacu-form kit from
Airmodel Products (Germany). This kit is very, but very, very, very spartan...The kit consists of two halves of bus body in white thermo-formed plastic (vacu-form), and two halves of the same shape but in transparent plastic (like PET plastic of soft drink).
 |
| The Airmodel kit: instructions sheet, the transparent body and the white body... |
 |
| The kit complete (believe or not) |
 |
| Cutting the white body... Oh, Man!!! |
 |
| The (spartan) instructions... |
After taking some courage and powerful tranquilizers, I started the project...Cutting the body:
 |
| Opel Blitz bus - left side |
 |
| Opel Blitz bus - right side |
 |
| Using pencil to delineate the edges |
 |
| The surgery line |
 |
| After the surgery.... |
For my crazy projects, I always use scrap parts. This is my Italeri's Opel Blitz snout...
 |
| Opel Blitz snout (Italeri) from my spare parts box |
 |
| The Blitz snout after surgery... |
 |
| Dry-run...The bus is growing... |
I love challenges...I decided open the windows of my bus. Marking the angles of the cuts...
 |
| Puncturing the angles |
 |
| Done |!!!! |
 |
| Working with the piece supported in the wood... |
 |
| areas that will be removed marked (to avoid mistakes) |
 |
| ...and... |
 |
| Bingo !!! |
 |
| Left side |
 |
| Right side... |
 |
| The bus with windows opened... |
 |
| Gluing the halves together ... |
 |
| Tons of putty... |
 |
| Removing the putty... |
After grinding and sanding the windows, it's time to make the transparencies ...using paper tape to isolate the transparencies ...I do this in the external and the internal side....
 |
| A monk's job !!! |
 |
| Transparencies in place with superglue... |
 |
| The spots of superglue... |
 |
| Opening the fenders... |
 |
| Adjusting the snout... |
 |
| Planning the surgery... |
 |
| Strips of plastic for reinforcements... |
 |
| The snout in position... |
 |
| The bus with snout !!! |
Now, it´s chassis time. I thought the profile on the instruction sheet of Airmodel was in 1/35 scale, but no. The design is much smaller. See below:
 |
| The drawing in not in 1/35 scale...What a shame, Airmodel !!! |
 |
| The Opel truck chassis...Too short !! |
I transform the drawing in the real 1/35 scale to transform the truck's chassis in the bus chassis.
 |
| The drawing in 1/35 scale, with the kit... |
 |
| Testing the blueprint... |
 |
| ...and the correct length of the chassis. |
 |
| Making the stringers... |
 |
| and the curvature for the rear axle |
 |
| The rear portions of the chassis done!!! |
 |
| In position... |
 |
| Gluing the chassis parts... |
 |
| Open the windshield area... |
 |
| Gluing the chassis in the body... |
This image inspired me:
 |
| I'll do my bus with the back door open ...but this is for a little later! |
Making the floor, with plasticard...
 |
| Making the floor... |
 |
| Gluing the supports of the floor. The idea is to put the floor as the last step ... |
 |
| The rear door open...Notice the floor in position... |
 |
| Cutting the details in the floor: rear fenders and steps... |
 |
| The treasure map ... |
 |
| Making details... |
 |
| Testing...testing... |
 |
| Gluing the floor in the chassis |
 |
| The floor: almost there... |
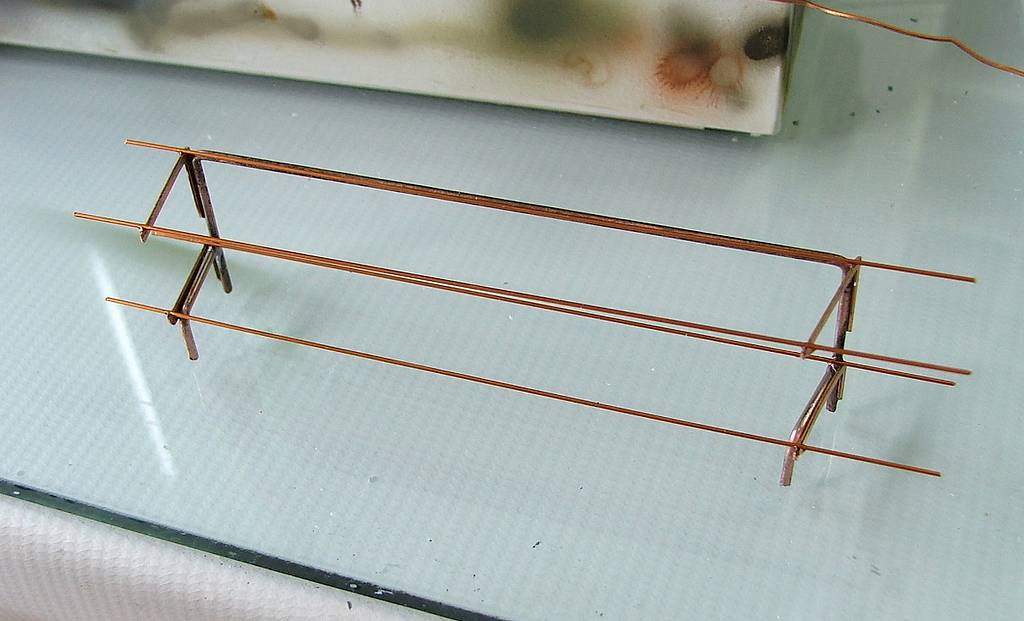
Since the back door was open, I decided to make the interior of the ambulance: Build in metal wire the racks of stretchers ...
 |
| The racks and the stretchers |
 |
| Done !! |
 |
| Testing the position in the bus... |
 |
| Making the canvas of the stretchers with tracing papel and aluminium foil... |
 |
| making the stretchers... |
 |
| ...and... |
 |
| Done !!! Testing the ergonomy... |
 |
| The cockpit of the bus... |
 |
| Making the timbering of the floor with plasticard |
And since I'm using strips of plasticard, we will continue working with the strips ...
 |
| Strips and strips... |
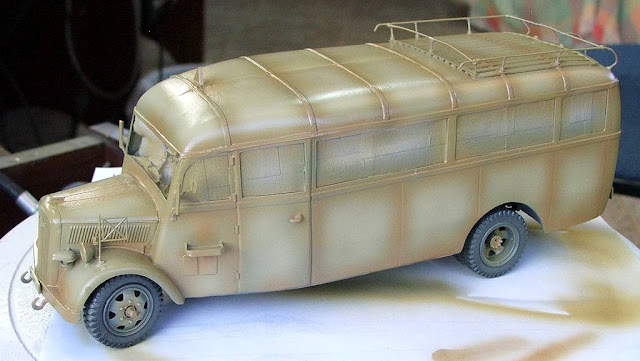
Painting time: My bus will be in desert-yellow, but these vehicles were painted originally, in panzer-gray. So, the interior of the bus will be in panzer-gray.
 |
| Panzer-gray and wood. Notice the weathering... |
 |
| Internal sides in panzer-gray... |
 |
| The stretchers... |
 |
| The racks positions with paint scratched for better glue's adhesion... |
 |
| Removing the internal paper-tapes... |
 |
| Fuel tank, transmission axle and exhaust pipes... |
 |
| Fuel line... |
 |
| Spare wheel and suspensions (and wheels...) |
 |
| Exhaust pipe... |
 |
| In close... |
 |
| Internal view... |
 |
| Driver seat... |
And the bus in on their own feet!!
Whew!!
To relax, we build the upper rack with metal wire ....
 |
| Heavy metal.... |
 |
| opening holes for the top rack |
 |
| The racks done !!! |
 |
| In position with superglue |
 |
| More details in metal and plastic... |
 |
| Wow !!! |
 |
| The nurse is huge, Man !!! |
 |
| Adding scratch details: jerry-cans racks... |
 |
| Jerry-cans from Tamiya |
 |
| Testing !!! Notice the headlights... |
 |
| ...and spare parts from Italeri's Opel truck. |
 |
| ... and other details... |
 |
| Notek light from Italeri |
The frame of windshield was done with plasticard...
 |
| ...and transparency of presentation. |
Again, metal work: the rear ladder
 |
| welding... |
 |
| Done !! |
 |
| The ladder in the rear door. |
 |
| Details in the rear door... |
 |
| The bus ready for painting... |
 |
| Primmer |
 |
| ...and desert-yellow: Afrika Korps |
 |
| I did a burnt and frayed painting.... |
 |
| The towing triangle in position. You will see, later... |
 |
| Future to prevent silvering.... |
 |
| ...and decals: Ambulance of Afrika Korps |
 |
| Medic !!!! |
 |
| Side by side with my Chevrolet 6x4... |
 |
| Starting the weathering... |
 |
| Dirty girl...Notice the windows... |
 |
| Detailing the interior... |
 |
| Internal view |
 |
| Making the cargo in the top rack: styrofoam... |
 |
| The block... |
 |
| Sculpting the styrofoam... |
 |
| softening the tracing paper with water... |
 |
| Using PVA glue (white-glue) |
 |
| The canvas made with tracing paper... |
 |
| Dry-run... |
 |
| The cargo in place... |
I decided to make a small trailer (field solution) with the trailer of the 20mm Flak, to carry two drums of drinking water.
 |
| The trailer... |
 |
| In the bus... |
 |
| Painting the cargo.. |
 |
| Done... |
 |
| Adding acessories... |
 |
| In the interior, too... |
 |
| Windshield in position... |
 |
| The load tied in the ceiling |
 |
| The trailer in position... |
 |
| Testing the movement... |
 |
| moving... |
 |
| moving... |
 |
| moving... |
 |
| The trailer does not touch the rear door |
 |
| supports of the windshield (see photo below) |
 |
| The actual bus with windshield open... |
 |
| I like the canvas in the windows...I'll make with tracing-paper... |
 |
| The canvas for the windows... |
 |
| details of rear door hinges |
And the Girl was done !!! Loved to turn a bottle of soda in a bus ...
 |
| Uops...The poles for the sun-tent... |
 |
| Blood stains in the floor...Dramatic !!! |
 |
| In good company: two buses...Ford 1936 and Opel Bus |
 |
The Ford bus is a Romanian vehicle in use by German forces.
Freies Indien !!! (I'll tell that story later ...) |
And when I thought I had finished my work, I found this photo below: I decided to make a ceiling banner, but with the markings of the Red Cross (Geneva Convention). I used the same technic of tracing paper with PVA glue...
 |
| Bus with swastika flag in the ceiling... |
 |
| Opel Blitz Omnibus - Afrika Korps - 1942 |
 |
| Red Cross of Convention of Geneva |
 |
| Opel Blitz Omnibus - Afrika Korps - 1942 - Done !!! |
Well, Gents...
I received several suggestions and criticisms about the headlights of my kit. The headlights were too high in the front fenders. A defect of Italeri kits that I had not corrected ...
 |
| Note the height of the headlights, with the pictures above ... lower ... |
 |
| Opel buses - Roden and Airmodel |
Now I think my ambulance got better and more correct. Thanks to colleagues who have written to me !!!


 Whew!!


OMG Simply amazing work!!! Congratulations!
ResponderExcluirValeu, Vitor !!!
ResponderExcluirBig hug and take care !!!!
Hello.
ResponderExcluirReally great and a lot of effort to see this work.
A great result and very practical on the ground that the trailer blank.
I had not noticed your last Plog in the past.
I was wondering in what might you be, when you've been silent for a long time.
But I must say that you are indeed quite correct scale model builder.
Resourceful and having a good eye.
I wonder where you can find these drawings that the building of the new body.
Do you draw these yourself.
Waiting for more.
Happy rest of the summer
I mean trailer body it's very practical many things
ResponderExcluirMarcão,excelente!!!
ResponderExcluirSó não esquece de corrigir a altura dos faróis,que nas instruções da Italeri está errada,veja nas fotos que vc postou como eles ficam posicionados na altura das aletas de refirgeração do capô.
Parabéns!
Maximex, thanks again, my Finnish friend...
ResponderExcluirTake care !!!
MVTB: valeu pela dica, Marcão..Vou corrigir, assim que estiver com a bancada em funcionamento...
Se cuida !!!
Optimo Trabalho como sempre Parabens por essa obra prima feita do que para muitos seria impemssavel ,magnifico
ResponderExcluirObrigado, Paulo. Um grande abraço
ResponderExcluirQue trabajo más profesional, me has dejado como un simple aficionado, pero es bueno aprender de un gran maestro. Esta maqueta va a favoritos, no pretenderé hacerla igual, ya que mi escala es mucho menor (1/72).
ResponderExcluirBest Regards!
Gracias, Cristian...Un gran abrazo !!!
ResponderExcluirMestre Serra.
ResponderExcluirFinalmente estou com um omnibus nas mãos./Essa sua inspiração já devidamente favoritada para referencias....Hehe.
Great Job !
Estou sem palavras!!!
ResponderExcluirFantástico.
R1cardo e Faria: Muito obrigado, senhores !!!!
ResponderExcluirExcellent modeller work!
ResponderExcluirThanks, Stan !!! Cheers !!!
ResponderExcluirWhat an amazing piece of skill, from a very basic vac form kit to a sublimely detailed miniature life piece. Incredible. Well done, many congratulations. This has inspired me to but an Azimut Ironside version at no small cost lol.
ResponderExcluirWhat an amazing piece of skill, from a very basic vac form kit to a sublimely detailed miniature life piece. Incredible. Well done, many congratulations. This has inspired me to but an Azimut Ironside version at no small cost lol.
ResponderExcluirSorry the delay, but Thanks, my friend!!!
ExcluirDouble bravo, considering the base of work and the lack of details that you have superbly built from zero.
ResponderExcluirThanks, my friend!!! This PET-kit was a true challenge...but very fun!!!!
Excluir