Drivers!!!
Let's see a tanker, now... not a crew member, but a canadian truck with thousands of fuel liters in his back: the rare
Chevrolet CMP C60S petrol tank, wearing the cab 11.
 |
| Chevrolet CMP C60S - cabin pattern 11 - petrol tank |
History:
The Canadian Military Pattern (CMP) truck was a class of military truck made in large numbers in Canada during World War II to British Army specifications for use in the armies of the British Commonwealth allies. Standard designs were drawn up just before the beginning of the war.
CMP trucks were also sent to the Soviet Union following the Nazi invasion of Russia, as part of Canada's lend-lease program to the Allies. During the War, CMP trucks saw service around the world in the North African Campaign, the Allied invasion of Sicily, the Italian Campaign, the Russian Front, the Burma Campaign, the Battle of the Philippines (1941-42), the liberation of Northwest Europe, and theWestern Allied invasion of Germany.
CMP trucks also saw service in post-war conflicts in Indonesia, French Indochina, and the Portuguese colonies in Africa.
You can see all about this amazing lineage of Canadian trucks in my other post, about CMP's.
When IBG Models was release this fuel tanker kit, it was heavily criticized because the Polish factory had injected a kit with no historical evidence. The controversy remains with the truck with cabin pattern 13...No pics found about this version!!!
With pattern 12, nothing was found, also (for now ...)!!
But few photos with the cabin pattern 11 were found (see in the top and below)
It is not version 12 of the IBG model, but the transformation of pattern 12 into 11 is not that sooooo difficult. And this will be the goal of this post: show the Chevrolet C60S petrol tanker CMP with cabin pattern 11. Let's have fun, colleagues ....
 |
Chevrolet C60S cabin pattern 11
Petrol tank (font: Armorama) |
Specs:
| Chevrolet CMP C60S petrol tank |
|---|
|
| Type | 3 ton 4x4 petrol tanker |
|---|
| Place of origin | General Motors of Canada Limited F |
|---|
| Service history |
|---|
| In service | From 1940 |
|---|
| Wars | World War II |
|---|
| Production history |
|---|
| Designer | Chevrolet Canada |
|---|
| Designed | 1936–1940 |
|---|
| Manufacturer | Chevrolet in Oshawa |
|---|
| Produced | 1940–1945 |
|---|
| No. built | ? |
|---|
| Specifications |
|---|
| Weight | 3,850 kg |
|---|
| Length | 4,35 m |
|---|
| Width | 2.13 m |
|---|
| Height | 2.05 m |
|---|
|
| Engine |
Chevrolet GM 216
216 cu in (3.5 L) gas I6
85 hp (63 kW)
|
|---|
| Suspension | Wheel 4x4 |
|---|
| Speed | 80 km/h |
|---|
The kit:
As I said before, I'll use the IBG Models (#35036) Chevrolet C60S Petrol Tank for this project:
 |
| IBG's box art |
Following the booklet: wheels!!
 |
| ...and axes!! |
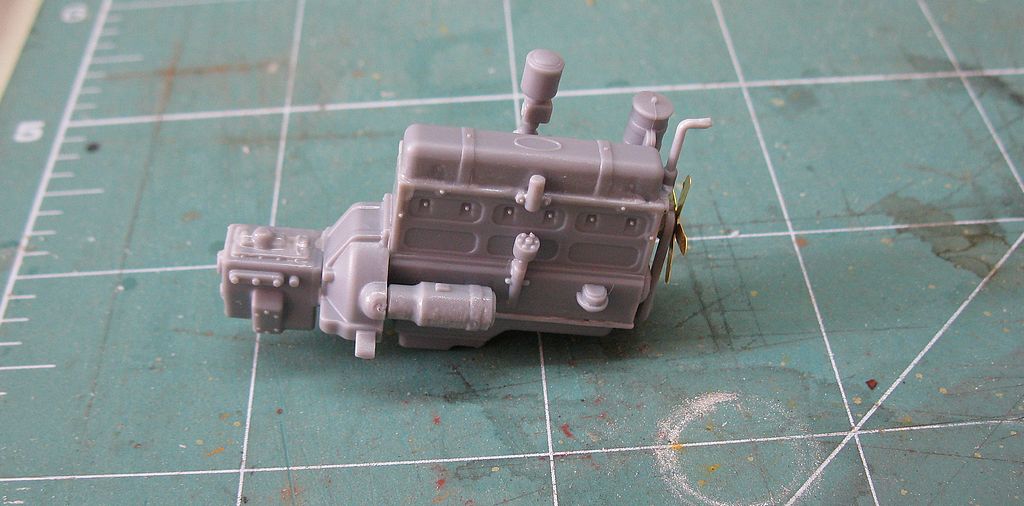
The engine is very detailed, but it does not get exposed. As in other projects, I will reproduce the ventral part of this engine and save the engine for another project ...
 |
| The Chevrolet engine : 6 cylinders in line... |
 |
| I'll reproduce this portion of engine... |
 |
| A very detailed engine.... |
Well, as I said above, the IBG presents a very complete kit with the possibility of building two different cabins, the pattern 12 and 13. But the only known photos of this vehicle is precisely with the pattern cabin 11. As I like historical acuity, I chose to transform the pattern cabin 12 in 11, with the modification of some details ...
 |
Planning the surgery in the engine hood
Notice the pattern 11 cabin in the image... |
 |
| I used Dremel (with dental drills) and scalpe to sculpe the hood... |
 |
| The surgery done in the right side |
 |
In close up
Right side |
 |
| Left side |
 |
Testing the hood in the Chevy snout (blue arrows)
Notice the grills of the pattern 12 ( red arrows) |
 |
Removing the grilles from the truck.
Done in the right side... |
 |
| The holes of the pattern 11: 3mm diameter |
 |
| Pattern 11 snout done!!! |
 |
| And the hood in place... |
 |
Scribbing details of the pattern 11 hood engine
right side |
 |
| Left side... |
No...I did not miss the position of the grill ... In cabin pattern 11, the grill was one-piece and with this position I'm going to hide the "splicing" of pattern 12
 |
With the grill...
splicing bellow |
 |
| The pumps in the rears tank |
It's time for painting the internal portions. first, the cabin... Olive-drab
A major sin of this kit is the absence of decals from the dashboard instruments of the versions and the dials of the petrol pumps. Well, it's time to do the decals with my Laserjet color. As the laserjets don't print the white, I do the decals in transparent films and painting the decal positions in white...See below:
 |
Panzerserra decals: in order:
Shift plate, rectangular instrument of dashboard and
dials of petrol pumps. |
 |
| The white backgrond painted in the cabin... |
 |
| ...and in the pumps... |
 |
| Decals in place... |
 |
| ...and pumps with dials. Much better!! |
Weathering in the cabin. Notice the Enfields in the rear portions of cabin...
 |
| Light weathering... |
 |
| The pump casamate |
And the girl is growing:
 |
| The trunck in development!! |
The tank in close-up:
 |
| The tank sub-chassis... |
As I said before, I think it's a waste to "spend" a very detailed engine inside a "closed" kit. Again, I will mold the lower portion of the engine (the only visible part) with reusable dental material (Reversible Hydrocolloid) and cast the piece with dental acrylic mixed with graphite powder. Let's see the results...
 |
| The IBG engine in the hydrocolloid... |
 |
| The mold ready for casting... |
 |
Casting material: dental
acrylic with graphite powder
The graphite is for color... |
 |
| The engine's bottom... |
 |
The master and the copy...
The hydrocolloid returns to vase,
for future use... |
 |
The chassis with suspensions,
waiting the engine... |
 |
| The original arrangement... |
 |
| The "visible" bottom view... |
 |
| The copy in acrylic!! Good!! |
 |
Copy result: Kit with perfect visual and
a 6 cylinder engine in stock ... |
While building and researching on this model, I noticed that the vehicle does not feature a spare wheel in its original design. But as we've always seen in vintage photos, crews often fitted the vehicle to their needs. But if I were a vehicle driver in battle conditions, I would love to have a spare wheel to replace a defective or pierced tire. Time to make a field adaptation in my tanker:
 |
| The concept... |
 |
| Scratching... |
 |
| The spare wheel in position!! |
And extra fuel is always welcome:
 |
| scratching an auxiliary rack for jerry-cans... |
Time for painting and markings: Royal Canadian Army - 4th Canadian Armoured Division - Service Corps; 4th Canadian Armoured Brigade. Normandy, france - August, 1944.


Maravilha!!! Acompanhando com toda certeza!!!
ResponderExcluirÉ sempre um prazer contar com sua visita, Gercino!!
ExcluirMais uma aula !!! Acompanhando com certeza.
ResponderExcluirObrigado Polimeno!! A casa é sua!!!
ExcluirMany military variants Chevrolets. Bravo Marcos. Stana
ResponderExcluirThanks, Stana, my friend!! Hugs!!
ExcluirI know I'm very late, but... first of all, excellent work as always! just an historical note: the square vs. round vents at the front of the truck are not due to the Cab 12 vs. 11, but rather square = Ford, and round = Chevrolet.
ResponderExcluirGood morning!!! Thanks for the tip, man!!! Hugs and all the best!!
ExcluirBonjour je viens de tomber sur votre démonstration, et elle m'a apporté beaucoup d'enseignements. je suis effectivement sur le Chevrolet C60S (IBG Model) en 1/72 et les deux cabines sont proposées, j'était tenté par le modèle 11, et j'ai eut raison il me semble! ensuite la roue de secours n'est pas proposée, et je pense que je vais l'ajouter(5 sont disponible dans le coffret. bravo pour vos explications.
ResponderExcluirHi, MadM... You are welcome, my friend!! Good luck with your project!! Have fun and big hug!!
Excluir