
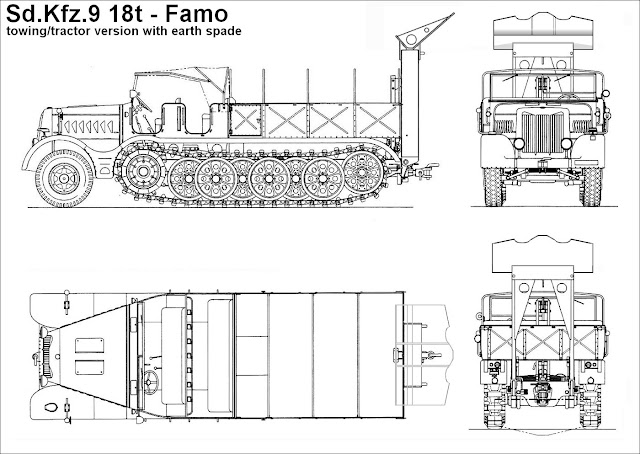
Tankers!!
Let's revisit this formidable machine, one of the most powerful and robust tractors of the WWII ... Yeah.. we are talking about the FAMO - Schwerer Zugkraftwagen 18t - Sd.Kfz.9 in the version of tank transporter, towing the heavy trailer Sd.Ah.116. Let's go on this mission together !!!
 |
Sd.Kfz.9/1 Famo crane driver of a 10th Panzer Division - Panzer Regiment 7
relaxing a little while traveling by train. France, 1941.
|
 |
| FAMO - Schwerer Zugkraftwagen 18t - Sd.Kfz.9 with Sd.Ah.116 heavy trailer carrying a Tauchpanzer III - Summer 41 |
The Sd.Kfz. 9 (also known as "Famo" ) was a German half-track that saw widespread use in WWII, and the heaviest half-track vehicle of any type built in quantity in Nazi Germany during the war years. Its main roles were as a prime mover for very heavy towed artillery and as a tank recovery vehicle. Approximately 2,500 were produced between 1938 and 1945.
History:
At the end of the 19th century, more precisely in 1890, an American company based in California, the Stockton Wheel Company (later, Holt Manufacturing Company, later Catterpillar Inc.) released a strange agricultural vehicle, with tracks replaced the rear wheels for better traction, but maintaining the front wheels for easier handling: the Stockton steam driven crawler tractor - 1890.
This tractor can be considered the predecessor of the entire world military halftracked vehicles.
The American Armed Forces saw the potential of using this vehicle as an artillery tractor and off-road transporter, being immediately converted to military use as a Holt heavy artillery tractor.
 |
| Stockton steam driven crawler tractor - 1890. |
 |
| The Holt's first logo as it appeared on a 25th anniversary sales brochure |
 |
| Original vertical design - Patent Office - USA gasoline engine |
 |
| Drawing repositioned horizontally, for better visualization. |
 |
| U.S. Army punitive expedition against Pancho Villa - Mexico,1916 Holt Artillery Tractor |
From 1930 onwards, we can say that work on the development of half-track tractors has started more seriously in Germany. The Krauss-Maffei company received a request from the Army Weapons Department to develop a tractor.equipped with a retractable rear track drive.
 |
| Krauss-Maffei project for a retractable rear track suspension tractor |

 |
| Krauss-Maffei Type MSZ 201 was a wheeled tractor with supporting tracks. For cross-country drive, a track could be applied in the rear retractable suspension. During road driving, this track was stored in racks on both sides of the body. The vehicle had a payload of 1 ton and a towing capacity of 6 tons. There were seats for ten soldiers in the superstructure. In 1931, the Reichswehr procured 24 vehicles of this type. |
The Weapons testing agency conducted tests on a test bench created especially for this purpose. The goal was to develop a new type of traction and steering system that was a combination of conventional steering and halftrack traction.
Preliminary design of all the German half-tracks of the early part of the war was done by Dipl.Ing. Heinrich Ernst Kniepkamp of the Military Automotive Department (Wa Prüf 6) before the Nazis took power in 1933.
 |
| Heinrich Ernst Kniepkamp - Engineer 1895 - 1977 a civilian official in the Wehrmacht |
His designs were then turned over to commercial firms for development and testing. Fahrzeug- und Motorenbau GmbH (FAMO) of Breslau received the contract for the 18t (18 long tons; 20 short tons) heavy towing tracked vehicle. Their first prototype, the FM gr 1, was completed in 1936. It had a 200 horsepower (200 PS) Maybach HL98 TUK engine and was only 7.7 metres long. The F 2 prototype appeared in 1938, but differed only in detail from its predecessor.
The F 3 appeared in 1939 and was the production version. The design was simplified over the course of the war to reduce costs and the use of strategic metals. Some vehicles produced by Tatra had its 12-cylinder, air-cooled Type 103 diesel engine fitted. Large spades were added at the rear of the chassis during the war to improve the vehicle's ability to recover tanks and other heavy vehicles.
Description:
The Sd.Kfz. 9 had a ladder frame chassis. Power was provided by a Maybach 12-cylinder, water-cooled, 10.838 litres HL 108 gasoline engine of 270 horsepower (270 PS). It had a syncromesh ZF G 65 VL 230 transmission with four forward and one reverse gears. It had two fuel tanks, one of 90 litres and the other of 230 litres capacity.
 |
| Sd.Kfz. 9 ladder frame chassis under construction in Famo plant - Germany, 1938. |
 |
| Maybach 12-cylinder, water-cooled, 10.838 litres HL 108 gasoline engine with 270 horsepower in |
Both tracks and wheels were used for steering. The steering system was set up so that shallow turns used only the wheels, but brakes would be applied to the tracks the further the steering wheel was turned. The drive sprocket, like all German halftracks, had rollers rather than the more common teeth. The rear suspension consisted of six double sets of overlapping, interleaved Schachtellaufwerk layout roadwheels mounted on swing arms sprung by torsion bars. An idler wheel, mounted at the rear of the vehicle, was used to control track tension. The front wheels had leaf springs and shock absorbers.
 |
| Famo under construction showing the front wheels, the drive sprocket and overlapping, interleaved roadwheels. Notice the final transmission box and air tank in the top of the chassis |
 |
| A Famo worker building the swing arms sprung by torsion bars of the Sd.Kfz 9 rear suspension |
The upper body had a crew compartment common to all versions. This had bench seats, one for the driver and his assistant, and another for the crew. The rear portion of the upper body was adapted for the vehicle's intended role. The windshield could fold forward and was also removable. A convertible canvas top was mounted at the upper part of the rear body. It fastened to the windshield when erected.
The Sd.Kfz. 9 was designed to have a towing capacity of 28 tonnes (28 long tons; 31 short tons). This was adequate for medium tanks like the Panzer IV, but two or even three or four were necessary for heavier vehicles like the Tiger I, Panther or King Tiger. It towed Sd.Anh 116 low-loader trailers to carry disabled vehicles. All were equipped with a winch, mounted at the middle of the vehicle, just under the cargo platform.
Variants:
The Famo's upper body had a crew compartment common to all versions. This had bench seats, one for the driver and his assistant, and another for the crew. The rear portion of the upper body was adapted for the vehicle's intended role.
- Artillery version: The artillery model had two extra bench seats for the gun's crew and a space for transporting ammunition for the artillery piece being towed. Although the space was not very large, it allowed the artillery piece to go into action immediately as soon as it was detached from the tractor.

 |
| Sd.Kfz.9 18t artillery version |
- Cargo/tractor/towing version: The cargo/tractor/towing version had two rows of seats and two storage compartments mounted in the front of the cargo compartment, one on each side, that opened to the outside. I built this version. See here, in our Panzerserra Bunker!!

 |
| A Famo Sd.Kfz.9 tractor version in rough terrain. Notice the two rows of benches for the crew. |
- This version could also carry a earth spade in the rear, to "anchor" the tractor to the ground, for it to pull heavy loads with its winch installed in the middle of the chassis.

 |
| Frame for earth spade in the Famo (early) rear body The frames were not standardized, and several types of frames can be seen in the photos that have reached our times. Notice the different shape of the spade frame and the presence of "X" shaped ribs on the tractor cargo door panels compared to the photo below. |
 |
| Frame for earth spade in the Famo's (late) rear body Notice the different shape of the spade frame andthe absence of "X" shaped ribs on the tractor cargo door panels compared to the photo above. |
 |
| Three Sd.Kfz.9 18t towing a broken King Tiger II. The last Famo shows his spade frame erected with the earth spade installed in the frame's top, during the displacement (rare photo - red arrow). Three Sd.Kfz.9 18t were needed to drag a Tiger II Notice the shadows of the tractors, in the lower left corner of the photo (yellow arrows) |
 |
| The original pic from above |
- The frame and spade at the rear of the vehicle serve as an anchor when winching heavy loads.(special hollow steel chock blocks are also supplied to beused at the rear of the tracks). The hinged frame is rectangular in sharpe and consists of three pieces of channel-section steel, two longitudinal and one or two transverse, reinforced by triangular plates. The open end of the frame is hinged to reinforced ends of the chassis frame. The spade is attached to the free end of the frame by two removeable pins.
 |
| To increase the pulling power of the installed winch, massive earth spades were attached to the vehicles used to recover heavy vehicles. These often had a different appearance... Notice the two shapes of earth spades... |
- The frame is raised and lowered with the winch by running the winch cable over a pulley mounted on a vertical framework at the rear of the body. A hook to engage the eye of the cable is attached to the free end of the frame. To recover a vehicle, the frame is dropped with the winch and the spade is attached to it. The winch cable is then unhooked from the frame, removed from the upper pulley, and extended to the rear for coupling to the vehicle to be recovered. The winch is located under the body and is controlled at the rear of the vehicle. It has a hand operated brake with an extension bar and handle.
 |
| Modified drawing from German technical manuals |
- Tank transporter version: This is not an official "version" of a specific type of Sd.Kfz.9 18t, but when a Sd.Kfz.9 18t Famo (usually a tractor version) towed a heavy tank transporter trailer, this composition was called a tank transporter. The trailers were usually the Tiefladeanhänger für Panzerkampfwagen 10t (Sd. Ah. 115) with capacity of 10 tons and the Tiefladeanhänger für Panzerkampfwagen 22/23t (Sd. Ah. 116) with capacity of 23 tons.One, two or three Famos Sd.Kfz9 18t coupled together could tow one Tiefladeanhänger für 60 t (or 75 t ) Nutzlast (Sd. Ah. 121), for the transportation of the heavy Tiger I and Tiger II tanks six-axle trailers for a payload of 60 and 75 tons or another heavy trailer, like the Culemeyer-Strassenroller 24 wheels heavy trailer.
 |
| A Sd.Kfz.9 18t Famo tows a Sd.Ah. 115 with a Sd.Kfz. 252 ammo carrier taking a ride. Crete - May 1941. |
 |
| A Sd.Kfz.9 18t Famo tows a Sd.Ah. 116 with a Tauchpanzer III - (Dive-tank III) France - 1941 |
 |
| A solo Sd.Kfz9 18t Famo "ERNA" towing the chassis of Karl-Gerät self-propelled siege mortar to firing position The trailer is a Culemeyer-Strassenroller 24 wheels heavy trailer Heavy Artillery Battalion 833 - Siege of Sebastopol - Crimea - Summer 1942. |
 |
| 3 Sd.Kfz.9 18t Famos towing a 38-cm gun barrel for Batterie Todt in a double composition of Culemeyer-Strassenroller 24 wheels heavy trailers Calais - France |
- But the champion of versatility was undoubtedly the trailer Sd.Ah. 116, which carried everything and anything when attached to the Sd.Kfz9 18t. Here are some examples, in addition to the tanks ...
 |
| The couple Sd.Kfz.9 and trailer Sd.Ah. 116 carrying barrels of fuel.. a lot of fuel!! |
 |
| And talking about fuel, here's the double Famo + Sd.Ah.116 with a fuel tank for a Luftwaffe airfield. The Famo is a late version, with bumpers and simplified stirrups |
| Sd.Kfz.9 18t Famo "HEDI" with a Sd. Ah. 116 transport a huge electric transformer in narrow streets. Kharkov - Russian Front |
| Same composition above, by other angle... |
- Crane version: A new upper body was used for the Sd.Kfz. 9/1 with a 6 ton capacity Bilstein crane in lieu of the crew's bench seat and the cargo compartment. It was issued to tank maintenance units beginning in September 1941.This version was very popular with maintenance personnel, as it was practically irreplaceable on the battlefield, due to its usefulness and versatility. I built this version, too. See here, in our Panzerserra Bunker!!

 |
| A Sd.Kfz.9/1 Bilstein 6t crane : versatile, robust and irreplaceable |
 |
| A Famo 6ton crane rescuing a Nashorn with serious transmission problems. |
- A larger, gasoline-electric, 10ton Demag crane was fitted on the later Sd.Kfz. 9/2, but this required outriggers to stabilize the vehicle before operations could begin.

 |
| A Sd.Kfz. 9/2 10ton crane lifting a Tiger turret... Notice the Sd.Ah.116 trailer in background |
- A larger, gasoline-electric, 10 t (9.8 long tons; 11 short tons) crane was fitted on the later Sd.Kfz. 9/2, but this required outriggers to stabilize the vehicle before operations could begin.
- Anti-tank version: In 1942, was placed order for 112 self propelled 8.8cm Flak 37. The first prototype vehicle was completed at the end of October 1942. From July to September 1943, a total of 12 production vehicles 8.8cm Flak 37 (Sf.) auf s. Zgkw. 18t - a self propelled 8.8cm anti aircraft gun - were produced. The armoured upper body was 14.5mm thick armour riveted plates. The gun itself had limited traverse because of the armored cab and could only be fully traversed with the gun elevated. A platform with drop-down sides was fitted for the gun. During combat, these stabilizing legs had to be folded down for reasons of stability. The vehicle weighed 25 tonnes, was 9.32 metres long, 3.67 metres tall and 2.65 metres wide. 40 rounds could be stored in ammo boxes at the rear. Due to the increased weight of the vehicle, the chassis had to be strengthened.All 12 serial vehicles were assigned to Heeres-Flak-Abteilung 304 of 26. Panzer Division. They were used in Italy from 1943 to 1945.

 |
| A Famo 8.8cm Flak 18 (Sfl.) auf Zugkraftwagen 18t (Sd.Kfz. 9) in anti-tank firing position. Notice the crew's side platforms lowered, as well as the stabilizing legs beside and above the tracks |
 |
| Another Famo 8.8cm Flak 18 (Sfl.) auf Zugkraftwagen 18t (Sd.Kfz. 9) in rolling position. Notice the crew's side platforms raised, as well as the stabilizing legs beside and above the tracks |
 |
| A Famo 8.8cm Flak 18 (Sfl.) auf Zugkraftwagen 18t (Sd.Kfz. 9) in anti-aircraft firing position. Notice the crew's side platforms lowered, as well as the stabilizing legs beside and above the tracks |
Production:
Vomag of Plauen began producing the Sd.Kfz.9 in 1940 and Tatra joined in the last years of the war. 855 were on hand on 20 December 1942. 643 were built in 1943 and 834 in 1944. In total, approximately 2,500 were built.
Specs:

| Schwerer Zugkraftwagen 18 t - Sd.Kfz. 9 Famo | |
|---|---|
| Type | Heavy half-track |
| Place of origin | Nazi Germany |
| Service history | |
| In service | 1938–1945 |
| Used by | Nazi Germany Romania |
| Wars | World War II |
| Production history | |
| Designer | FAMO |
| Designed | 1936–1939 |
| Manufacturer | FAMO, Vomag, Tatra |
| Unit cost | 60.000 Reichmark |
| Produced | 1939–1945 |
| No. built | approx. 2500 |
| Variants | Sd.Kfz. 9/1, Sd.Kfz. 9/2 |
| Specifications | |
| Mass | 18,000 kg |
| Length | 8.32 metres |
| Width | 2.6 metres |
| Height | 2.85 metres overall |
| Crew | depends on body type fitted |
| Engine | 10.8L Maybach HL108 petrol 12-cylinder, water-cooled 270 horsepower (270 PS) |
| Payload capacity | 2,620 kilograms |
| Transmission | 4+1 speed ZF G 65 VL 230 |
| Suspension | torsion bar |
| Ground clearance | 44cm |
| Fuel capacity | 290 litres |
Operational
range | 260 kilometres road 100 kilometres cross-country |
| Maximum speed | 50 km/h road |
The kit:
For this project I will use a wonderful kit, manufactured by Tamiya in 2000: the Schwerer Zugkraftwagen 18t "FAMO" und Tiefladeanhänger für P.Kpfw. Sd.Ah.116 (# 35246), in 1:35 scale.
 |
| Tamiya kit 35246 box art |
Although it is a twenty-year-old kit, I can only classify it as fantastic, with the Tamiya standard of injection quality, detailing and ease of construction. And I will also use an accessory part also manufactured by the same Tamiya, the Tank Recovery Accessory Set for German 18 ton half-track (# 35243), which is nothing more than the earth spade for my Famo!
 |
| Tamiya kit 35243 box art |
Imagine the bald one, satisfied and happy with life !!!
 |
| Panzerserra's workbench... |
Starting now!! By the book, as usual!! Gents, start your engiiiiines!!!
 |
| Maybach engine!! I love Tamiya stuff... |
 |
| I'll put some metal here... (No..I'm not sissy...I'll scratch with cooper wire..) |
 |
| Starting the chassis...Man..the alignement is perfect... right side |
 |
| Chassis - left side |
 |
| The engine is in dry-run, for testing in the chassis...Perfect!! left side |
 |
| Right side!! |
The building continues...torsion bars&arms&suspension... and front axle, too... But, in step 10 you need to step on the brake, as the wire rope guide subassembly composed of parts E-26,27 and 28 must not be installed, in the earth spade version. See below:
In this stage, you start adding the specific earth spade parts to the chassis ...
 |
| Wait a minute, man... |
 |
| Earth spade joint supports at the rear of the chassis... Chuck approves!! |
 |
| The subassembly 10 replaced by the set provided in the conversion kit |
 |
| This subset is very important, as it will be the basis of the future blade lift that will be made in scratch, since Tamiya's accessory kit does not come with this part ... |
 |
| The earth spade in dry-run in the chassis rear..Ya, baby...ya!! |
 |
| And the blade will now wait for the rest of the tractor building ... |
 |
| Cabin and "engine room"... |
 |
| ...under construction!! |
My girl will wear more traditional makeup (she's shy ...), in panzer-gray tones. Let's start painting the lower and more hidden parts (OMG ...) of it in gray, before proceeding ...
 |
| Panzer-gray in the chassis and suspension. Notice the engine and transmission... |
 |
| Adding details in metal (scratch) in the firewall of tractor |
 |
| Again, the glorious panzer-gray |
 |
| The steel cable was made with twisted waxed wire for making bijoux necklaces (red arrows) |
 |
| The steel cable painted in matte-black...starting the weathering... |
 |
| With weathering, the engine and transmission lose the "toy" aspect |
 |
| Firewall with weathering and in gray tones... |
 |
| The engine bay under construction... |
 |
| Notice the radiator "hoses" made with the insulation of electrical wires ... The girl has a cold heart ... |
 |
| ...and speaking of "hoses", let's give the air filter hose a more real look. An "accordion look" made with scraps of enameled wire ... |
 |
| Final results... the air filter hose got much better, after wire, matte-black and dry-brush... |
 |
| Kojak loves a clean and organized engine bay ... |
 |
| Notice the radiator aspect... |
 |
| I replaced the two plastic ties (very fragile ...) by two stainless steel ties. One of the advantages of being dentist, in my spare time: having great alternative materials on hand !! |
 |
| Closing the engine bay with upper hood. I will not install the engine-bay sides ... I want to expose certain details of my girl. She has beautiful side-boobs !! |
 |
| Right-side!! |
 |
| Now, it's time to build the easel for raising the sword. For this, we will build the cargo area and make some adjustments .... |
 |
| The central guide of the steel cable, previously installed. Do not forget that the spare will not be installed on the chassis in this version ... |
 |
| The biggest question is about the height of the easel. For this, I installed the earth-spade for reference ... |
 |
| Plastruct and patience ... and the easel is ready !!! |
 |
| I made two reinforcements at the base of the easel, on my own ... Kojak is a thoughtful guy .... |
 |
| The easel ready, with Chuck's approval !! |
 |
| The easel, after german-gray painting... left side |
 |
| Right side |
 |
| And the cargo-bay in position... Before gluing the cargo area in position, I painted the bottom in panzer-gray ... |
 |
| The tractor is almost ready!!! |
 |
| The easel, with earth-spade frame in position... Notice the details added in the tractor |
 |
| Right side... |
 |
| The earth-spade complete, in transit position... Right side view |
 |
| The tractor is almost ready for the final details... Now, I'll start the heavy trailer... |
Starting the trailer... Now, a big warning!! In the step 29, the beginning of the trailer, we're going to use some nuts and bolts (I love you, Tamiya!). And there are two types of nuts: some small and some slightly larger ... But the instructions, there is a small detail that can mislead you: the nuts that we will use in step 29 are described as SMALL NUTS. But the (correct) drawing and measurement (2mm) indicates that they are the biggest nuts ... and at the future steps, in step 52, the smaller nuts are described only NUTS, but the (correct) drawing and size (1,6mm) refers to the small nuts ... See below:
 |
| Step 29...Warning...Nut (small) are the big ones... The smallers (step 52) are just called nuts... But the drawings are correct!!! |
 |
| The front suspension of the trailer is under construction... The plasticard stripes are from Tamiya's kit...perfect!! |
 |
| Notice the nuts in position!!! |
 |
| Front mainframe almost ready... |
 |
| Time to assemble the steering system of coupling device Metal steering rods. Shorts...no doubt this time... |
 |
| The little Philips screwdriver comes with the kit ... Tamiya rules!!! |
And the entire front suspension moves, according to the coupling device. Of course, this is not a toy, but it allows the placement of the trailer in a diorama, for example ... Besides being very cool !!!
 |
| The steering device in action... Eyes front!!! |
 |
| Eyes right!! |
 |
| Eyes left!! |
I was almost forgetting to mention this important detail: before installing the metal clamps, check that the "eyes" are aligned with the clamp. It is very common for the end of the "eye" to be bent and if you install the clamp like this, the screw forces the clamp to the wrong position. The correct thing, if it is bent, is to use pliers and realign the discrepant tip. With this alignment, the eye is flat with the long axis of the clamp ... Look at the figures below:
 |
| Notice the eyes of the clamp: The top one is folded down ... The bottom one was realigned with the pliers |
 |
| The perfectly aligned clamps ... The small screw does not exert tension on the joint ... |
 |
| The front trailer is ready... |
 |
| Time to do the same with the rear suspension.... Notice the big nuts in position, in the rear suspension... |
 |
| The rear of the trailer is growing... |
 |
| Starting the steering system of the small cabin at the rear of the trailer... Do not forget to check the alignment of the eyelets of the clamps, as described in the first assembly, a little above ... |
 |
| Rear suspensions of the trailer... |
Here I found out that I was drawn with the absence of one of the 1.6x10mm Philips type screws. The packaging was sealed, but someone forgot a screw ... Hell !!! Good thing I have a Dremel and a willingness to challenge: time to make a small metal pin ...
 |
| The mystery of the missing screw ... But it's no use crying: let's make a metal pin to replace it ... |
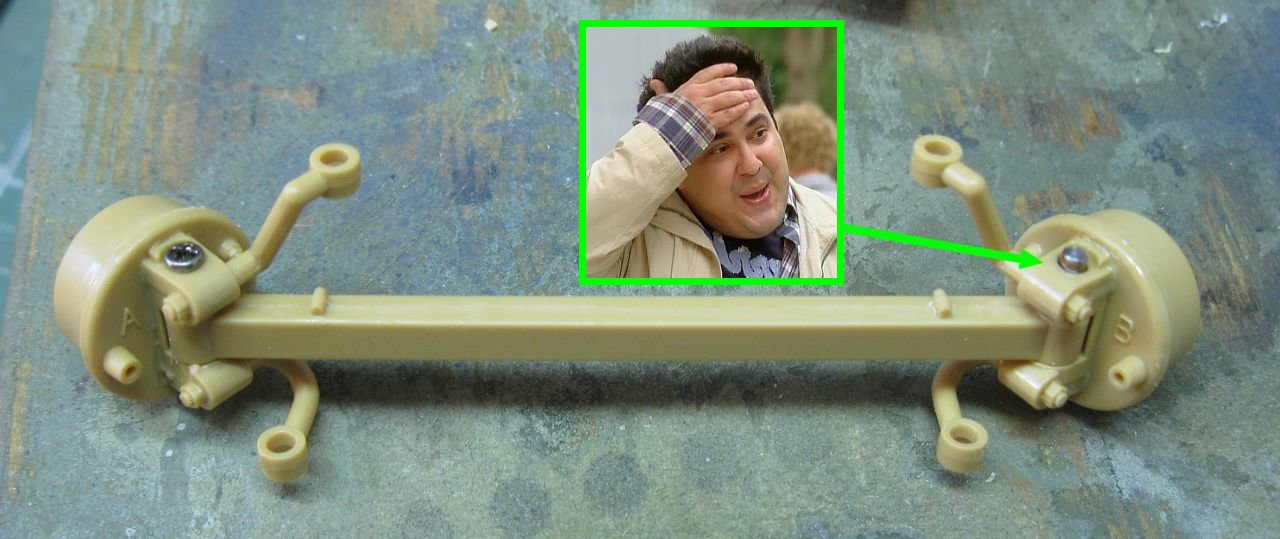 |
| The new pin in position!!! The brake hubs have movement and resistance, now ... |
 |
| Full assemble of the rear uspension... |
 |
| Testing the movment!!! Eyes right!! |
 |
| Eyes left!! |
 |
| The little rear cabin. Notice the big cable roll (red arrow) and the retractable ladder.... |
 |
| The rear's cabin ladder movment... So cute, so Tamiya!! |
 |
| And speaking of cute !!! |
 |
| Soooo kawaii!! |
 |
| Kawaiii!!! |
 |
| Cabin and wheels!!! |
 |
| The front and rear trailer's suspension sets |
 |
| Starting the cargo bed... Notice on the metal reinforcement stringers so that the model does not bend... |
 |
| The stringers are attached to the structure, like a sandwich, but I reinforced everything with a superglue "welding" .... |
 |
| The trailer's chassis... |
 |
| ...under construction!! |
 |
| Do you remember the small nuts from step 29 ?? Here they are, almost at the end of the story ... |
 |
| The rear ramps show movement ... |
 |
| Uff ... the thing is almost done !!! |
As I said before, the Tamiya kit is complete, with many accessories and details. And the chains are part of these details, but the chain that comes with the kit is a little too big, in my opinion. It is in plastic and with some burrs in the links that would be a hell to be removed. Taking advantage of the fact that I didn't like the size of the chain, I replaced the plastic chain by a metallic one, from my box of trinkets. I think it was much better !!!
 |
| Damn it, Jim ... I'm not an engineer, but it just got a lot better !!! |
 |
| And the metal chains in position.... rear of the trailer... |
 |
| ...and in the frontal portion. |
 |
| Dr. McCoy was extremely satisfied with the result of the transplant... Next step: Painting!!! |
Damn, I lost the pictures of the trailer painting ... my old Canon is starting to play tricks on me ... I'm so sorry !!! But to make up for it, I'm going to toast you with the images of a fantastic apparatus for building LBL tracks: I imported this complicated device directly from NASA: check out the Panzerserra Link Aligner, made with popsicle sticks ...
 |
| Panzerserra Link Aligner, made with popsicle sticks |
 |
| The Panzerserra Link Aligner in action... You align the links in the slot of the incredible device and then glue the shoe-pads over the joints ... Super-easy !! |

 |
| The two tracks, each with 47 links... Notice the spare portion of track that left over, to be loaded into the cargo area !! |
 |
| The girl with "rear" shoes...left side |
 |
| The girl with "rear" shoes...right side |
 |
| The girl with all shoes... Pretty!! |
 |
| The girl with all shoes... Cute!! |
The markings are the original ones from Tamiya, with a few more addenda. Meet the Tractor Famo Sd.Kfz.9 18t number 3, providing services at the Luftwaffe, Herman Göring Workshop Battalion, Vehicle Maintenance Company, Germany - 1943.


The bogies of the Sd.Ah.116 heavy trailer. The decals on the fenders, in red and white, were cut to fit the size of the pieces. The small irregularities of the cuts were then painted with white and red acrylic paint. The decals served as templates for these delicate paintings ...
 |
| Rear bogie of the trailer, with its small rear driver's cab. |
 |
| Rear bogie, rear view... |
 |
| Rear bogie, left view... |
 |
| Rear bogie, front view... Meet Paula, the heavy trailer!!! |
 |
| Front bogie, front right view... |
 |
| Front bogie, front left view... |
 |
| Dashboard instruments painted by hand... Where's the decal, Tamiya?? |
Continuing the project ... Weathering...
 |
| Wash and dry-brush (I'm old school!!) Left side |
 |
| Right side |
 |
| Rear top view |
 |
| Driver station |
 |
| Right side of Sd.Ah.116 heavy trailer |
 |
| Trailer's rear bogie |
 |
| Trailer's front bogie |
 |
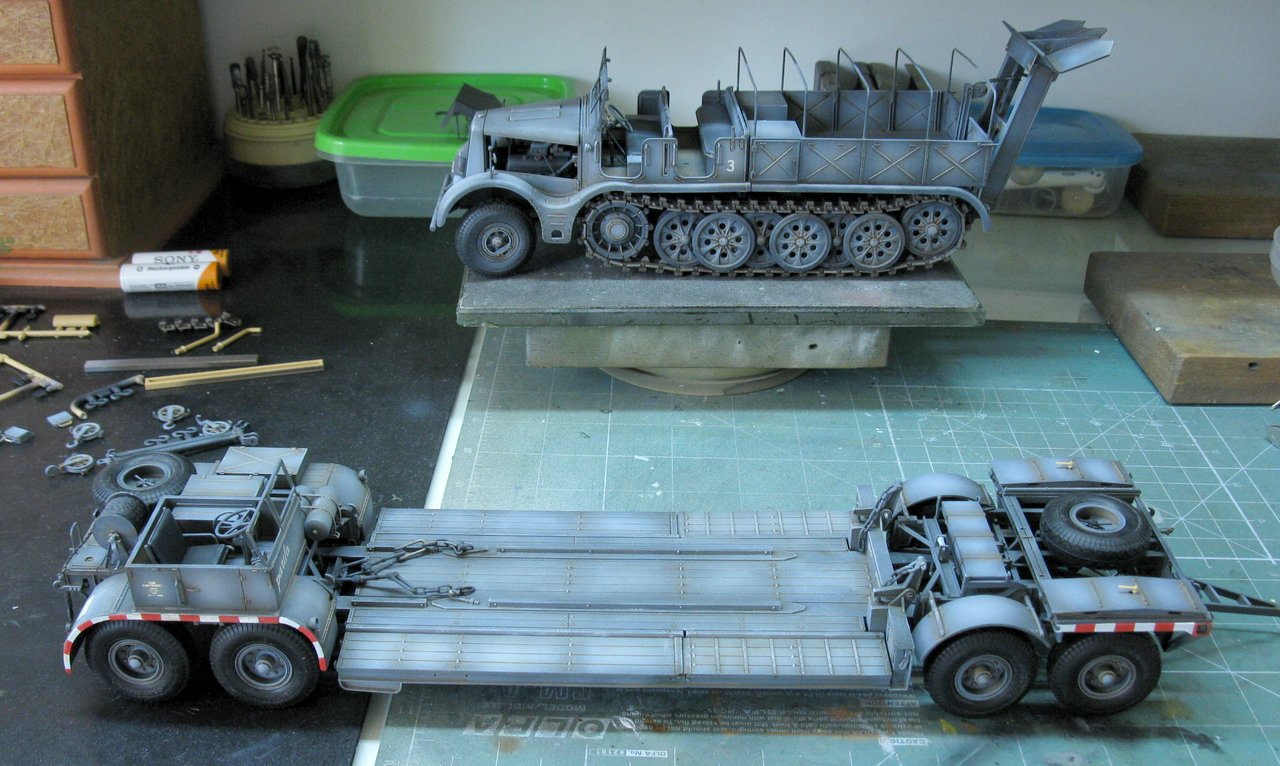
| Testing the composition... A really big mothafocka !!! |
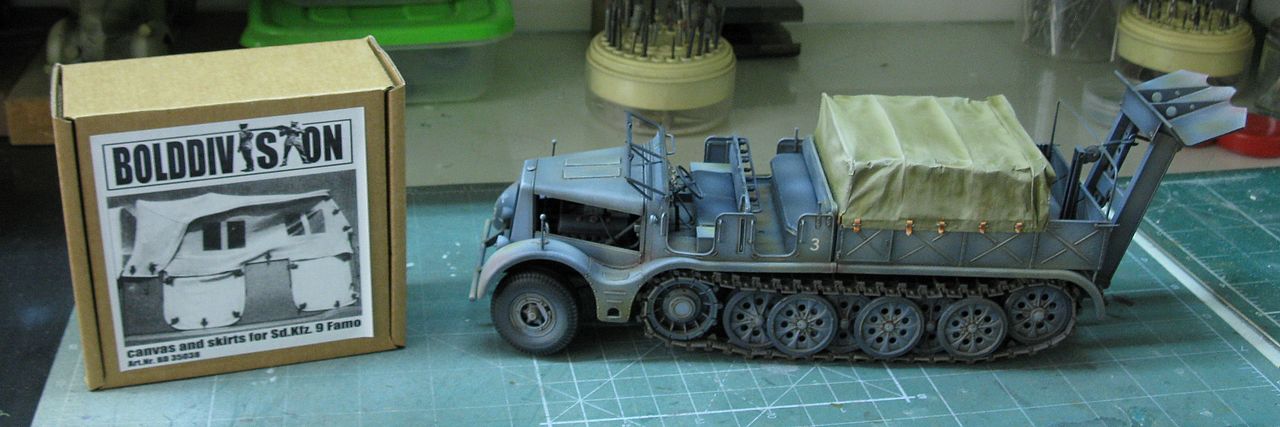
The colleague who ordered this project wants the vehicles with the tarps installed. I ordered the canvas from the crew area with BoldDivision...But while this canvas does not arrive from Germany (the Post Office is always slow ...), we are making the tarpaulin from the cargo area in scratch ...
 |
| BoldDivision crew stations canvas... |
... with the good and old technique of tracing paper. The first thing is to cut the tracing paper in the desired size. In this case, it will be enough to cover the cargo area, except for the last segment, because with the use of the earth spade and its erector device, the canvas should not reach there behind ... and also because with the folded canvas, the vehicle is more stylish ...
 |
| the tracing paper already cut being tested in its position... |
A characteristic of tracing paper is to wrinkle all when moistened. We will use this feature to our advantage, simulating the normal folds of a canvas. It would look ridiculous if it were stretched like the leather of a drum ...
First, let's glue the first segment... We apply pure PVA glue with a fine brush to the marked areas and apply the tracing paper. With your fingers or using small sticks or spatulas, we wait for the paper to dry and adhere to the plastic. We can "mold" the paper in the meantime, taking advantage of the moisture of the PVA glue "soften" the paper ...
 |
| Applying pure PVA glue with a brush ... |
 |
| We apply and keep the paper on the glued areas ... Notice the paper "wrinkling" ... With the glue drying, it returns to normal, but if we conform and shape the wet paper it in this step, it remains with "folds" .. . |
 |
| Extending the collage to the posterior segments ... Let's do it in stages, to allow time to be able to "model" the paper in position ... |
 |
| The first two segments glued to the first three frames ... Now, it is time to wet these segments, to soften and deform the paper ... |
 |
| We apply a mixture of 60% PVA glue and 40% water to the glued segments to wrinkle and reinforce the paper. It is like the process of covering the old WWI fighters. |
 |
| With the paper softened, we can fold the paper much more easily ... notice the rear fold of the canvas .... |
 |
| The paper drying spontaneously ... Notice that it stretches, but not at all ... |
 |
| The canvas is fully finished, almost completely dry. The final product is very convincing ... Right front view |
 |
| The canvas...right rear view... |
 |
| And the canvas painted with Khaki and some tonal variations ... Extremely satisfying, IMHO ... Right view |
 |
| The canvas painted in Khaki and some tonal variations ... Left view |
 |
| Cargo area in canvas, made with tracing paper... No bad!! |
 |
| Using the same colors for the rear bogie canvas ... |
 |
| And the Sd.Ah.116 heavy trailer is almost ready!! |
Well, now is time to do the tie-downs in the canvas. The proposal is to make these details with simple materials and techniques, like the canvas itself. So, here we go: here's the basic concept drawing: tie it down with paper adhesive tape, cut out, painted and glued in position, with the help of small handles made with thin copper wire, folded with thin pliers. Let's see the photos ...
 |
| The tie-downs in concept... |
 |
| First of all, glued the paper tape on the cutting base, paint the tape... |
 |
| ...and then cut with the scalpel. Notice the pointed ends cut in the ribbons |
 |
| Parallel to this, we will make the metal "handles", which will be glued to the vehicle ... I used thin cooper wire of dead coils from washing machines |
 |
| Opening the holes for the handles, with drill ... |
 |
| Inserting the strips of paper tape under the canvas (red arrow) ... Using the paper tape adhesive to keep the strip in place (straight blue arrow) Then, folding the strip over the canvas (blue curved arrow)... |
 |
| Almost all strips inserted and folded on canvas ... |
 |
| This step should be done individually, one strip at a time ... Apply a superglue micro-drop just below an imaginary line between the two holes of the metal handles. The strip will be folded and glued to this micro-drop ... |
 |
| Use a thicker piece of wire to allow for more perfect folding. Be careful not to touch the glue with the wire ... |
 |
| Reviewing the metal parts of this step ... In red, the metal for the strip's folds In blue, the metal handles... |
 |
| After gluing the strip, remove the thicker wire and install the thinner wire to make the handles. Don't forget to apply MINIMUM amounts of superglue to the vertical portions of the handles ... Slide the handle into the holes, until the horizontal portion of the handle rests on the strip ... |
 |
| Don't forget to "bend" the tapered end of the strip ... |
 |
| A close-up image of the glue applied to the handle, before sliding ... Apply the glue and slide, BEFORE the glue acts and keep the handle in the wrong position ... |
 |
| Applied handle and strips without handle ... Installation stages ... |
 |
| A tie-down in close-up vision... |
 |
| All tie-downs in position... left view |
 |
| All tie-downs in position... right view |
 |
| The tie-downs painted and characterized ... left view |
 |
| The tie-downs painted and characterized ... right view |
 |
| The tie-downs in final position... |
Good news: The BoldDivision stuff landed in my home:
 |
| Crew stations canvas and skirts for my Famo... |
 |
| The box kit and the tractor girl... |
 |
| The resin parts after cleaning... Bad news: one of the canvas doors landed with a minor damage; the absence of a part of canvas and the tie-down of this sector... |
 |
| The side windows are huge, but I choose don't use... The Famo's cabin it would be very "closed" ... We are definitely not in winter !!! |
 |
| The missing portion... No problem: let's scratch!!! |
 |
| Making the tie-down with paper tape... |
 |
| Primmer (in white...) |
 |
| And painted; notice the missing part!!! Hurrah!! |
 |
| Some fuel drums for my old spare parts box... Verlinden stuff..old, but good!!! |
 |
| Building a cargo for the cargo bay of Famo: a rectangular piece of styrofoam with tracing paper and pva glue... |
 |
| Glued in place... |
 |
| And with the drums... rear left vision.. |
 |
| Right rear vision... |
I decided to add a vehicle on the board of Sd.Ah.116. The chosen one was a Panzer II Ausf J. Something like this ...

The task is much easier, since I have such a beauty on my shelf. I built this light tank in 2012 in my Bunker (see here...) and I'm going to take the opportunity to do some up-grades ...
 |
The headlight lenses are strange and the red extinguisher is an old sin ... I'll fix these details now ... Notice the absence of the lens in the headlights and the fire extinguisher painted in khaky, as in the original vehicles. I took advantage and repainted some pieces of wood.
 |
| Panzer II Ausf J in the trailer Notice the details in the tank's front |
 |
| I made a locking system with tree trunks (red arrows) , interconnected by moorings. No chance of the tank slipping off the trailer ... Notice the wood crate for tools, in the up track, in this side... |
 |
| Front part of the trailer with tank. Notice the locking system with tree trunk, planks and jerry-cans and oil cans. The tow bars are supported on the tank's front lashing eyes, ready for use ... |
 |
| Rear part of the trailer with tank. notice the wooden trunk, the boxes and the mooring chains |
 |
| Rear view, right side... |
 |
| The Panzer II Ausf J PUMMELIG ("Chubby") tied and locked in transport position ... Kojak is really an efficient and responsible guy !! Notice the rear cab windshield insulation with paper tape |
 |
| Tied and locked!! |
 |
| Panzer II Ausf J ready for transport!! |
 |
| The rear part of the Sd.Ah.116 trailer... Details and accessories... Notice the insulation of the rear cabin windshield with paper-tape for the dust painting step... |
 |
| ...just like the Famo!!! |
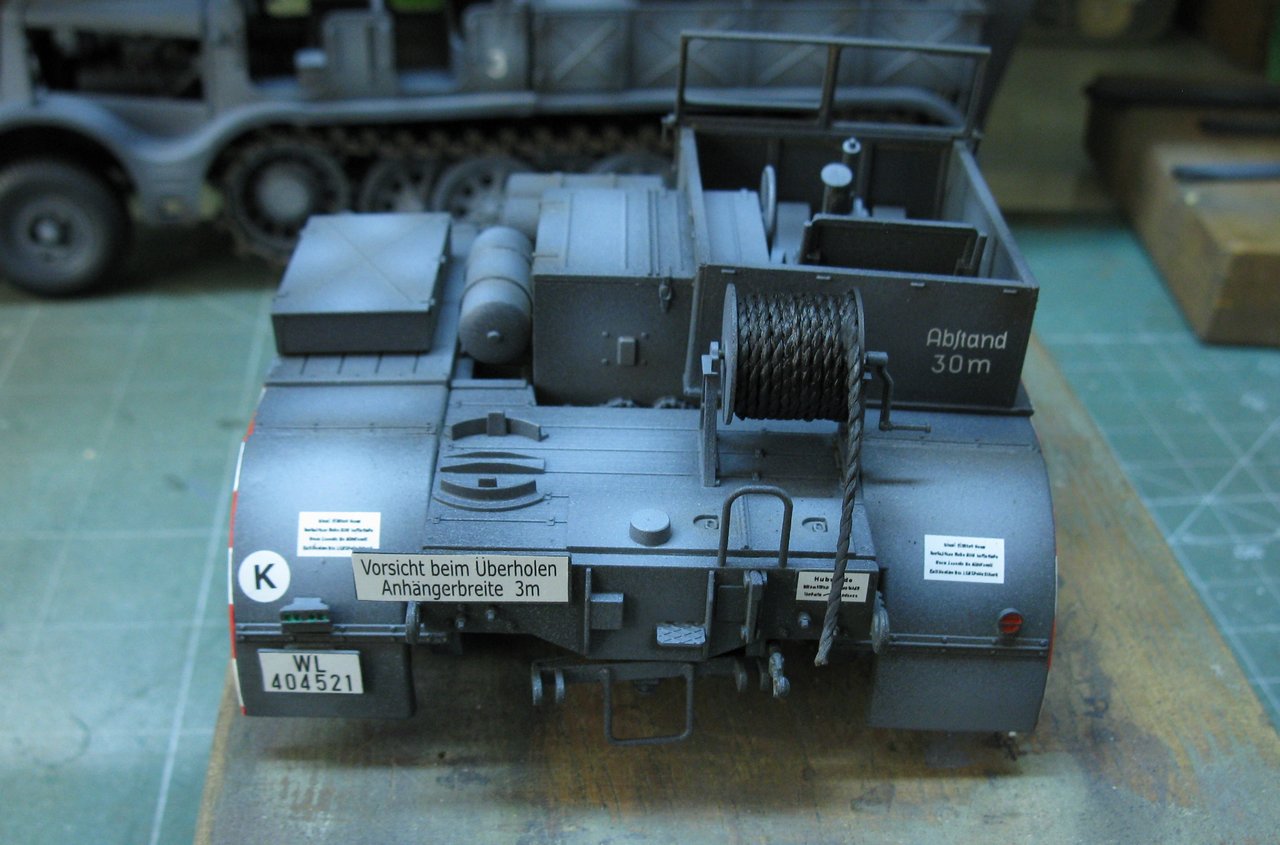
And the project was ready: Meet the SdKfz 9 Famo 18t number 3 with Sd.Ah.116 heavy trailer PAULA, providing services at the Luftwaffe, Herman Göring Workshop Battalion, Vehicle Maintenance Company, in the rear front in Germany. The composition is supporting the transportation of a Panzer II Ausf J PUMMELIG from the 12th Panzerdivision (Heer), serving in "Kompanie Bethke", in the Eastern front, after an overhaul in Germany in 1943. First, the Famo tractor:
 |
| SdKfz 9 Famo 18t number 3 - Luftwaffe - Herman Göring Workshop Battalion Vehicle Maintenance Company, in the rear front in Germany- 1943 |
 |
| SdKfz 9 Famo 18t - left side |
 |
| SdKfz 9 Famo 18t - rear left view |
 |
| SdKfz 9 Famo 18t with earth spade in position... |
 |
| SdKfz 9 Famo 18t with earth spade in position. Right rear view |

 |
| SdKfz 9 Famo 18t with earth spade in position. Right view |

 |
| SdKfz 9 Famo 18t with Kojak and Rover, the dog!! |
 |
| Sd.Ah.116 heavy trailer PAULA with Panzer II Ausf J PUMMELIG 12th Panzerdivision (Heer) - "Kompanie Bethke", Eastern front, after an overhaul in Germany in 1943 |
 |
| Sd.Ah.116 heavy trailer PAULA with Panzer II Ausf J PUMMELIG |
 |
| Panzer II Ausf J PUMMELIG left side |
 |
| Sd.Ah.116 heavy trailer - rear view |
 |
| Sd.Ah.116 heavy trailer - rear right view |
 |
| Panzer II Ausf J PUMMELIG right side |
 |
| Kojak's locking system. Fast, simple and efficient ... rear view |
 |
| Kojak's locking system. Fast, simple and efficient ... front view |
 |
| Everything in its place ... |
 |
| Kojak personally taking care of transport security ... |
 |
| SdKfz 9 Famo 18t number 3 with Sd.Ah.116 heavy trailer PAULA, providing services at the Luftwaffe, Herman Göring Workshop Battalion, Vehicle Maintenance Company, in the rear front in Germany. The composition is supporting the transportation of Panzer II Ausf J PUMMELIG from the 12th Panzerdivision (Heer), serving in "Kompanie Bethke", in the Eastern front, after an overhaul. Germany in 1943. |
 |
| The full composition - front view |
 |
| Famo and trailer, side by side. |

 |
| Indeed...Kojak is a true handy-man!! |
See you soon, Kameraden!!!
Skąd wziasc plastikowe paski do owiniec zbiornika z powietrzem??
ResponderExcluirGood morning!! More than 300, my friend...
ExcluirI congratulate what a beautiful model, a masterpiece, it's really fun to see what a brilliant work, my greatest respect, really fantastic result.🫡🫡🫡🫡🫡🫡🫡🫡🫡
ResponderExcluirThanks a lot, my friend!!! Hugs and all the best!!!
Excluirfantastico !
ResponderExcluirMuito obrigado, Anonimo!!! Um grande abraço e fique conosco!!!
Excluir