
Comrades !!!
The subject of this report is a variant of the famous Russian GAZ-AAA 6x4 truck. Let's talk about GAZ-05-193 (1936) 6x4 Staff bus.
 |
| drawing modified from MiniArt art box. |
 |
| A captured GAZ-05-193 (1936) Staff bus under maintenance... Russian front - 1942 |
History:
The GAZ-05-193 6x4 was a small class Soviet army staff bus built on the chassis of GAZ-AAA 6x4 cargo truck.
 |
| Gaz AAA 6x4 truck (1934) the little truck was very versatile, even in off-road conditions |
A closed bus body was built on the chassis of this truck. It was not a bus in the strict sense of the word, as only nine seats were built. Rather, the vehicle was used for special purposes (staff and command bus ). 237 vehicles of this type were produced from 1936 to 1945.
 |
| A russian GAZ-05-193 staff bus (1936) resting next to a shed. Notice the front tires, with off-road tread... It seems that Ivan is expecting the worst ... |
Mechanically, it featured with a gearbox with four forward and one reverse (plus reduction for all gears) and a gasoline engine, in-line, four cylinders, side valves, aluminum pistons with a volume of 3.28 liters and a power of 40 hp at 2.600 rpm, in its first two years of production. These vehicles were built on a reinforced stamped steel chassis, with a stair-type stringer structure on the front. From 1938, they received an improvement in their engines, which started to generate 50 hp (2.800 rpm).

 |
| GAZ-05-193 (1936) Staff bus - early version Notice the round front fenders and bumpers |
 |
| Ivan seems to be proud of his staff bus GAZ-05-193 (1936). Look at the roof rack, a detail added in the field ... |
With the development of WWII and the pressing needs for materials, from 1941 onwards a standardized version of this staff bus was standardized without front and rear bumpers, with only a headlight, one spare wheel, squared simplified front fenders and wooden lining.
 |
| GAZ-05-193 (1941) Staff bus - late version. Notice the squared front fenders and no bumpers A much more spartan vehicle ... |
 |
| Brand new GAZ-05-193 (1941) leaving the Gorky BusPlant. Notice the spartan details of this model |
But as in all wartime production, there were "hybrid" vehicles, with combined characteristics of the two standard models mentioned; see picture below:
 |
| An "hybrid" GAZ-05-193 (1941), but with two headlights and front bumper |
These small buses were originally built to be commanding posts or even more spacious staff cars, but some variations in the shape and height of the bus body are found in the period photos. Arrangement of doors, windows and ceiling height were not always standardized and it seems that there were many variations in this regard.
 |
| The surrender of the rest of the Second Assault Army under General Vlasov to the Germans - Battle of Volchov -Spring 1942. The rifles are a mixture of German K98k (probably captured by the Soviets... they had a chronic shortage of infantry weapons at that time) and soviet Mosin-Nagant 1891/30 rifles. Notice the GAZ-05-193 (1936) in foreground and GAZ AAA trucks behind... Thanks to my friend Roman Kracalik!!! |
 |
| A profile of the staff bus above |
 |
| Another Russian GAZ-05-193 (1936) staff bus high ceiliing Notice that this high ceiling bus is even higher than the one in the photo above. It seems that standardization was not a norm for these small staff buses ... |
 |
| Another variation in this Russian GAZ-05-193 (1936): Very-high ceiling, 2 big windows and antennas in the top (radio-car??) |
The Russians used them in different ways, as well as the Germans, who kept them avidly, as they were robust, reliable and with known mechanics, since the GAZ were derivations of the old Fords known to the Germans ...
 |
| A GAZ-05-193 (1936) with new owners. As Fritz tries to get the stubborn engine running again, his colleagues at the Wermacht wait patiently ... Notice the WH oversized markings in the side panel. |
 |
| GAZ-05-193 (1936) with new owners in slimy Rasputitsa, the fearsome Russian mud, as terrible as General Winter! Notice in the windshield of the bus the mark of the "acquisition" of the vehicle... Poor russian driver... |
 |
| Another captured GAZ-05-193 (1936), used as a sanitary vehicle. Perhaps the mobile office of a visiting doctor or counselor ... it doesn't look like an ambulance ... |
A curious thing is that in many sources it is reported that none vehicle survived after the end of the world conflict ... But it seems that, fortunately, at least one survived. Whether it is a "pure" GAZ-05-193 or a junction between a GAZ-AAA truck chassis and a GAZ 03-30 body (the much more common single-axle bus) I cannot say ... But it is very good to see a GAZ-05-193 still alive and breathing ...
 |
| GAZ-05-193 (1936) 6x4 Staff bus - Russia, 2018 3/4 right front view |
 |
| GAZ-05-193 (1936) 6x4 Staff bus - Russia, 2018 Left view |
 |
| A bad time for this russian GAZ-05-193 (1936), riddled with shrapnel. The goodbye of an old warrior ... |
Specs:


| GAZ-05-193 | |
|---|---|
| Type | Light staff bus 6x4 |
| Place of origin | URSS |
| Service history | |
| In service | 1936-1945 |
| Used by | Soviet Red Army |
| Wars | World War II |
| Production history | |
| Designed | 1936 |
| Manufacturer | Gorky BusPlant |
| Produced | 1936 - 1945 |
| No. built | 237 |
| Specifications | |
| Mass | 3.140 Kg (curb weight) 4.475 Kg (max. full) |
| Length Wheelbase Front track Rear track | 5.300 mm 3.340 mm + 940mm 1.405 mm 1.600 mm |
| Width | 2.100 mm |
| Height | 2.530 mm |
| Crew | 1 driver + 9 passengers |
| Armour | none |
| Engine | GAZ-M1I V12 - 4 cyl. 3.285 cm³ - side valves |
| Engine power | 40 Hp (2600 rpm)-1936 50 Hp (2800 rpm)-1938 |
| Transmission | 4 fwd + 1 rv (+ reduction all gears) |
| Suspension | leaf springs |
| Ground clearance | 230 mm |
| Fuel capacity | 100 L (60+40) - petrol |
Operational range | 450 km - roads |
| Maximum speed Electric system | 65 km/h 6 volts |
The kit:
For this commission project, I'll use the superb kit from MiniArt GAZ-05-193 Staff bus (#35156).
 |
MiniArt GAZ-05-193 Staff bus (#35156) art box |
The kit is very well produced and injected. In addition to the injected parts packed in plastic bags, it comes with a good sheet of decals for 4 versions (3 Russian and 1 German), a small sheet of PE and an interesting bonus: in the excellent instruction booklet, a cut-out part with propaganda posters and maps, in scale (Russian and German). A simple procedure that enriches (and very ...) the quality of the kit. I hope other companies follow the example of MiniArt. Well done!!!
 |
| Soviet and German maps and propaganda posters in a cut-out part in the instruction booklet |
 |
| Kojak at the crime scene ... |
 |
| Starting from the beginning ... Engine !! A little engine... |
 |
| Great details and injection... |
 |
| Starting the chassis frame... All parts are very delicate and fragile. The plastic is great, neither soft nor brittle, but the pieces are REALLY delicate !! |
 |
| Working with fragile parts is complicated ... The most important thing is to be aware of the perfect alignment of the parts with each other ... |
 |
| Rear axles and differentials ... The parts that make up the system are minuscule and their positioning must be rigorous, as this assembly depends on the assembly of the entire suspension in the following steps ... Thankfully, the instruction booklet is clear and correct. |
 |
| The rear spring beams under construction ... The keyword of this project is ALIGNMENT !!! |
At this stage of the project, the booklet continues to build the suspensions, but as the whole kit is very delicate and the parts that support the suspensions are small, I decided to build the wheels and tires to be able to use these parts as auxiliaries (and jigs) for perfect alignment between the suspensions and the chassis.
I know that painting the wheels in late stages makes the job much easier, but the wheels to be installed IN THIS stage of construction of the suspension I consider ESSENTIAL. Being able to place the truck on its own wheels makes alignment (I already mentioned that term before, didn't I!) a lot easier of the whole set ...
 |
| Who the Hell invented this MiniArt system to build wheels ??? Totally ridiculous and all the detail intended in the tread is lost with the collage and the inevitable misalignments of so many and unnecessary construction steps !! In my humble opinion, this is rotten !!! Starting the nightmare: 3 discs to build half wheel... |
 |
| The half-wheels made... Damn!! |
 |
| But that's not all: 4 more discs to make the rest of the wheel ... t's to make the strongest cry ... I think someone thinks that more pieces are more quality !!! It reminds me of the old 2,000-piece Dragon kits that failed the kit market in a horrible way ... |
 |
| Time to finally build the wheels: join the two hemi-parts of wheels .... Unbelievable !! |
 |
| And this bonding must be done with pressure, as the pieces do not fit easily with each other ... Very well done, MiniArt (sarcasm mode activated!) |
 |
| The final results... Too much for too little !!! |
With the wheels built, I can go back to building the rear suspension and installing it on the chassis. As I said before, the parts that make this fixation between the subsets are very thin and fragile ... In this step, you should always check the alignment between all the components, because the possibility of a warp or a twist is big. ..
 |
| Aligning the axles with each other and the set of axle-suspensions with the chassis. Use equal jigsaw pieces and with a strict square between their angles ... |
 |
| The rear suspensions in the chassis... Side view... The whole set is very light and delicate ... |
 |
| The (delicate) front suspension... |
 |
| Installing the front suspension perfectly aligned with the rear one and the chassis. Repair the wheels in the background, waiting for their installation .... |
 |
| Gluing (and checking the alignment ...) of the wheel hubs ... |
 |
| And finally gluing (and checking the alignment ...) the wheels ... The chassis perfectly supported on the ground with its wheels, without any twist . Hurray !! |
 |
| Some details are unbelievably fragile ... Point to MiniArt when reproducing them, but some are really exaggerated ... The problem is that the real vehicle was small and the factory tried to reproduce the parts following the scale ... Rear brake actuator cables, highlighted by arrows ... |
 |
| As I said, miniArt goes so far as to exaggerate in some details ... Tiny pieces before cleaning ... |
 |
| The chassis almost complete, perfectly aligned, but fragile and delicate like a feather !! This it must be handled only to the minimum necessary ... Never leave this kit close to your demon-nephew !!! |
 |
| adding more details in the kit ... |
 |
| The bus lounge... |
 |
| The alignment is justified by the perfect fit between the subsets ... Like a glove... |
 |
| details and details... |
 |
| The bus belly is black!! |
One of the columns of the right side windows of my kit came with a defective injection ... Time to transform lemons into lemonade: field adaptation, replacing two windows with a solid plate ... Commanding officers are shy people ...
 |
| Solid plate replacing two windows... Discretion is recommended ... |
 |
| Russia can be very hot ... opening the air intakes on the roof of the bus ... |
 |
| Detail of the internal division in the bus ... Shelf with the radio device ... |
This bus is commission work ... and my client is crazy about German stuff ... The request was that the vehicle had been captured and used as a Command Car by the German Officers ... and as the Germans are very organized, meticulous and detailists, the vehicle would have gone through an up-grade (after all, our valiant officers deserve the best, jawoll ??). Therefore, an ivory band inside the vehicle makes it more pleasant and spacious ...
 |
| using ivory paint to make the vehicle more spacious ... |
 |
| Dry-run with the panels...good!! |
 |
| The roof of the bus was also painted with ivory paint ... |
 |
| Painting the furniture and internal details of the bus ... |
 |
| Preparing for the closing of the cabin ... |
 |
Parts for the bus saloon and cabin painted... |
 |
| Bus cabin painted and detailed... Notice the German poster pic in place... |
 |
| Talking about posters: well done, MiniArt |
 |
| Tctical map and courtains... Notice the window glass, partially lowered ... |

 |
| Closing the girl; first, the saloon sides and after, the front doors... |
 |
| Internal view...right side |
 |
| External view...right side |
 |
| The forniture in position... notice the table with the top partially folded and the radio... |
 |
| Again, the internal view...right side |
 |
| The final proof that all the alignment of keeping everything aligned and squared was worth it ... Rear doors perfectly adjusted. |
 |
| Officers need maps for their planning. A situational map carelessly left on the table ... |
 |
| And one more map, about the first one ... see the table lamp ... a comfortable and ergonomic environment ... |
 |
| Some lights on the ceiling !! Light please !! |
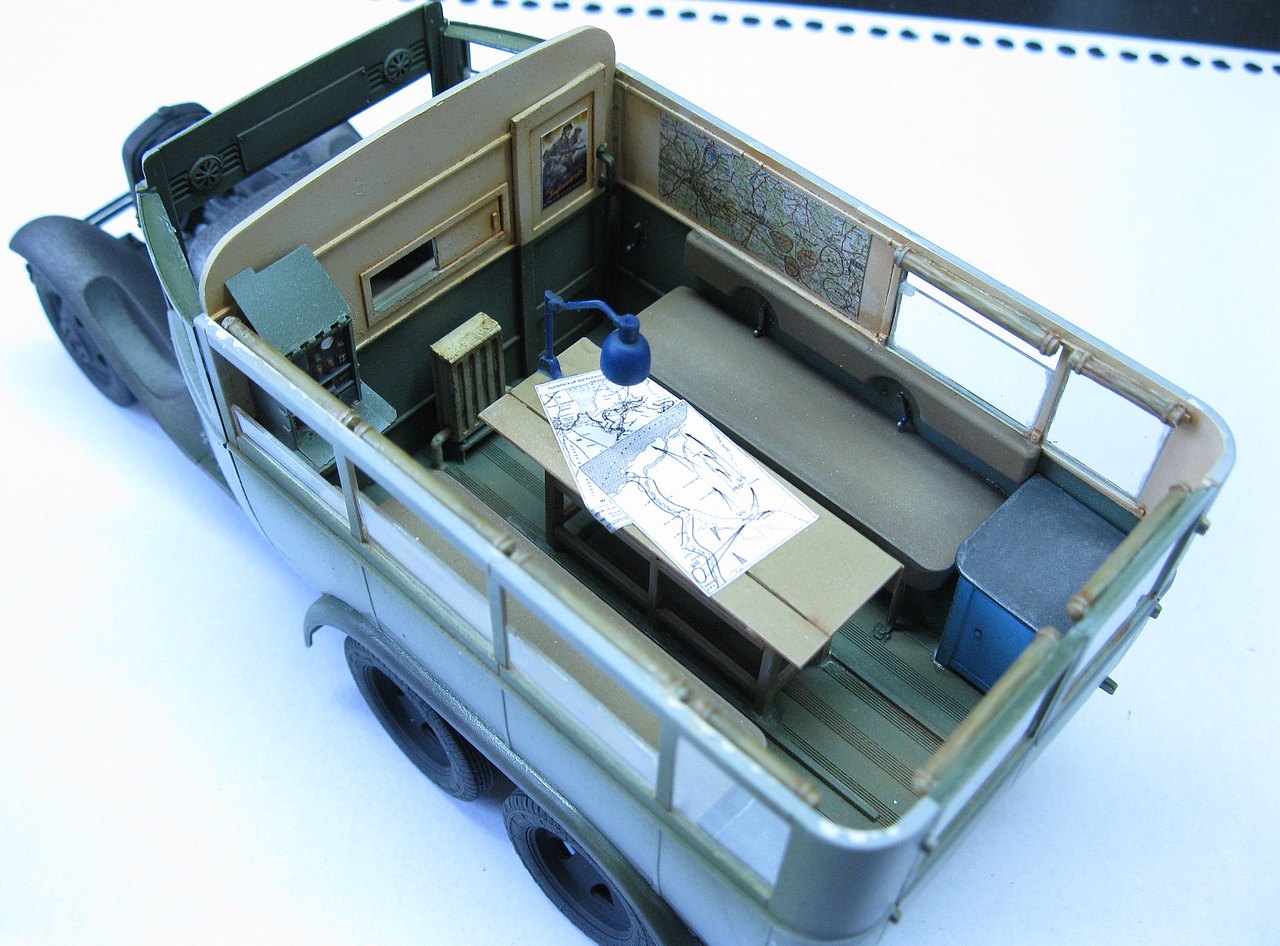 |
| The saloon, ready to be closed with the roof. Right view! |
 |
| The saloon, ready to be closed with the roof. Left view! Notice the roll bag under the radio and the rifle... |
While the roof was drying, I went to clean the part that would be responsible for supporting the main headlights and the horn. In this regard, MiniArt surpassed itself: the piece obeys the scale, but it is so, but so fragile that the simple cleaning of the piece has already damaged it ...
Really, installing something so fragile would be a waste of time; inevitably, the headlights would fall into manipulation or cleaning. I decided to radicalize and replace the plastic arch with a steel arch. Here are the comparative measures ...
 |
| Step 63: exchanging the weak for the strong !! |
 |
| The metallic arch glued in position with superglue and the plastic arch just fitted in front ... Using a blue fine-tip marker to make the headlight and horn positions (red arrows) |
 |
| Metallic graft surgery ready. Headlights and horn in position ... Much better !! |
With the end of the building visible on the horizon, I thought it would be quiet now ... What vain hope !! The construction of the last two stages (65 and 66) is simply a horror !!

Ridiculously small pieces, in a set of 4, to form the spare wheel supports. If you follow what the brochure says (assemble the 4 pieces, form a sub-set and then install on the side of the bus), I guarantee that you will have a heart attack. To avoid this drama, I suggest following my sequence:
 |
|
Proceed with the same system with the parts on the other side ...
 |
| Left spare wheel rack in position... The pieces are just scary ... |
 |
| Really, this kit is a masterpiece of over-engineering !!! |
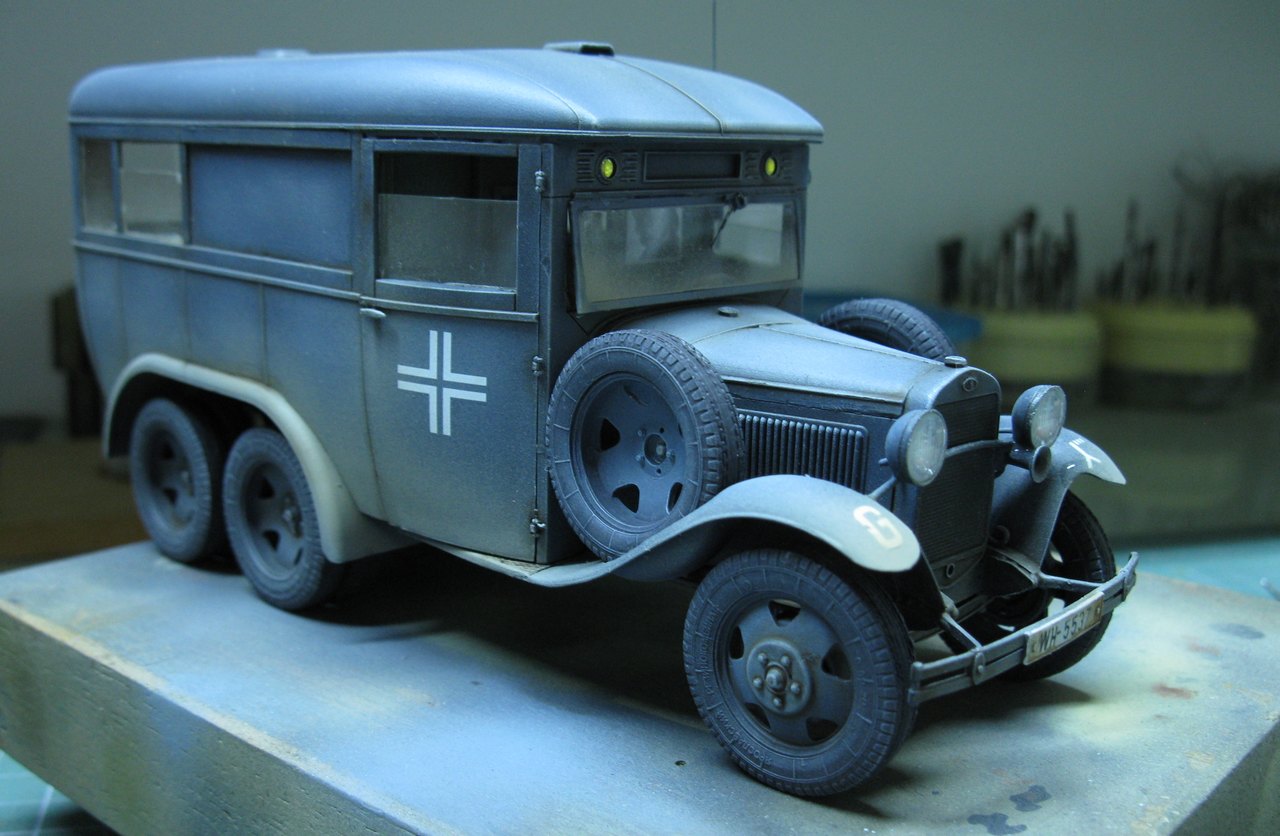
Now, the hour of painting and markings is approaching ... and nothing makes me more upset than the famous factory markings that quote: unity unknown !!! Ouch ... let's try to locate our girl in time and space. After a lot of research on my digital scrolls and the huge Internet library, behold, our girl emerges gloriously as belonging to the Army Group Centre, 2nd Panzer group (Guderian). XXIV Panzer Corps - 4th Panzer Division - 103rd Artillery Regiment. Captured GAZ-05-193 modified as Artillery staff bus, in Orel - Russia. Operation Barbarossa, October - 1941.
 |
| Vehicle painted in german-gray Look at the large Balkenkreuz painted on the side and rear doors, to avoid receiving friendly fire ... Common practice when using captured equipment |
 |
| 1941?? Shades of gray... |

 |
| Pledge (Future) to prevent silvering... |
 |
| Decals...the best part! Left view |
 |
| Right view |
 |
| Captured GAZ-05-193 modified as Artillery staff bus 2nd Panzer group (Guderian). XXIV Panzer Corps 4th Panzer Division - 103rd Artillery Regiment. Orel - Russia. Operation Barbarossa - October - 1941. |
Starting the weathering... I decided not to "destroy" this vehicle a lot, because in addition to being a vehicle of typical use for Officers (therefore more well taken care of, even in the Red Army ...), after its capture it went through an up-grade in the workshops of the Wermacht , which left the little girl practically impeccable. Worthy of a superior officer of the Glorious Artillery !!!
 |
| Just a little dust and clay ... This Operation Barbarossa is a real mess !!! |


 |
| Spare wheels, headlamps and flashlights in a position ... left side |
 |
| Right side |
 |
| Sooo cute!! |
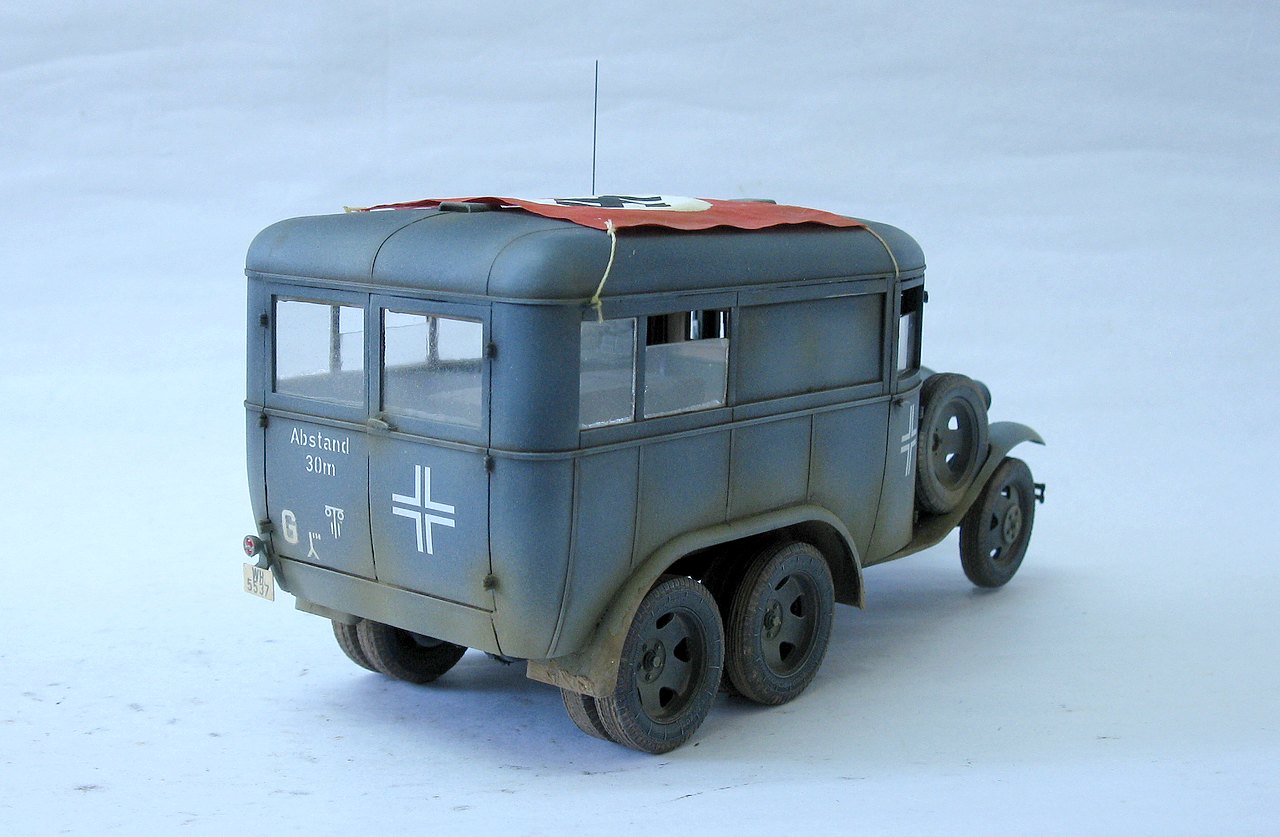
At the beginning of Operation Barbarossa, the Luftwaffe practically wiped Soviet Aviation off the map. And when using captured equipment, you were in serious danger of being machine gunned ... Thinking about it, Kojak decided to make an aerial reconnaissance flag to be applied to the roof of the bus. Prevention and chicken soup does no harm to anyone !!!
 |
| First step to make an aerial reconnaissance flag: Tracing paper with a a polyester thread glued to one of the edges ... I used a solution of 50% water and 50% PVA glue on both sides of the paper ... It wrinkles, but then it returns almost to normal, giving a very realistic aspect to the thing ... A real flag !! |
 |
| Testing the flag size in the bus roof!!! Like a glove!! |
Tracing paper previously painted in white (on both sides) and after the white paint has dried, I apply a circle of paper tape, with the desired diameter, to mask the white. Then, I apply bright red paint with the airbrush (both sides, too)...
 |
| Starting the Nazi flag: Paper with tape as mask... |
 |
| The flag is ready... Now it's time to apply the swastika cross |
DISCLAIMER
The publication of any images or informations related to nazism, fascism or any other totalitarian regimes must be understood as the reproduction of historical accuracy and not as apology to these regimes, leaders or symbols.
 |
| The swastika made with decal transparent printed in laserprint. Notice the glossy aspect of the layer of Pledge... |
 |
And the aerial reconnaissance flag in the top of the bus... Messerschmitts and Stukas: I'm friend!!! |
 |
| Right side... |
And the little girl was ready for action... Meet GAZ-05-193 modified as Artillery staff bus, belonging to the Army Group Centre, 2nd Panzer group (Guderian). XXIV Panzer Corps - 4th Panzer Division - 103rd Artillery Regiment. Providing services in battles in the vicinity of Orel - Russia. Operation Barbarossa, October - 1941.
 | |
|
DISCLAIMER
The publication of any images or informations related to nazism, fascism or any other totalitarian regimes must be understood as the reproduction of historical accuracy and not as apology to these regimes, leaders or symbols.

 |
| GAZ-05-193 staff bus - left side |
 |
| GAZ-05-193 staff bus - left rear view |
 |
| GAZ-05-193 staff bus - right rear view |
 |
| GAZ-05-193 staff bus - right side |

 |
| GAZ-05-193 staff bus with Kojak and Rover, the dog... |
 |
| Zis-42 half-track truck and GAZ-05-193 staff bus side by side... Two little (but brave...) russian girls... |
 | |
|
Stay with us, comrade !!
 |
| Make your mother proud, comrade modelist !! |
Espetacular!!!! A cada trabalho uma surpresa. Sempre Acompanhando.
ResponderExcluirPoxa, Marcão... Muito obrigado, Xará... muito obrigado mesmo...é bom receber esse seu incentivo!!! Um grande abraço e se cuida!!
ExcluirNice Blog.. So creative as well as informative., Thanks for Sharing this article.
ResponderExcluirAntique Valuations
Thanks for your incentive, Unknown...Hugs!!
ResponderExcluir