
Kanoniere !!!
Our subject today is a peculiar self-propelled artillery vehicle. Built in small numbers at the beginning of WWII, it played a decisive role in supporting fire for infantry in the shocking early days of applying the Blitzkrieg doctrine.
We are talking about the 15 cm sIG 33 (Sf) auf Panzerkampfwagen I Ausf B, the Bison I, which looks dubious, but has proven great efficiency!

 |
| Two 15 cm sIG 33 (Sf) auf Panzerkampfwagen I Ausf B named DORA and BERTA from 7th Panzer Division 705 sIG Company waiting in Anheé - Belgium May, 12 - 1940. |
History:
The 15cm sIG 33(Sf) auf Pz.Kpfw.I Ausf B, sometimes referred to (unofficially) as the Sturmpanzer I Bison was a German self-propelled howitzer used during World War II
 |
| 15 cm sIG 33 (Sf) auf Panzerkampfwagen I Ausf B proudly bearing the name Cambrai. Notice the chicken coop screen to facilitate the use of branches as camouflage 2nd Panzer Division - 703 sIG Company Battery C - Russian front - 1941 |
The Invasion of Poland had shown that the towed 15cm sIG 33 guns assigned to the infantry gun companies of the motorized infantry regiments had difficulties keeping up with the tanks during combat.

 |
| A battery of 15cm sIG 33 in action Liege - Belgium - May, 1940. |
The easiest solution was to modify a spare tank chassis to carry it into battle. A sIG 33 was mounted on the chassis of the Panzer I Ausf. B, complete with carriage and wheels, in place of the turret and superstructure.


 |
| 15cm sIG 33 on the Pz.Kpfw.I Ausf. B chassis First prototype of Bison I Germany, Spring, 1940. |
Plates with13mm (0.51 in) thick were used to form a tall, open-topped fighting compartment on the forward part of the hull. This protected little more than the gun and the gunner himself from small arms fire and shell fragments, the loaders being completely exposed. The rearmost section of armor was hinged to ease reloading.
 |
| The Bison I - superstructure detail |
There was no room to stow any ammunition, so it had to be carried by a separate vehicle. When mounted, the sIG 33 had a total traverse of 25° and could elevate from -4° to +75°. The gun used an Rblf36 sight. The chassis was overloaded and breakdowns were frequent. The vehicle's high profile (and therefore an easy target ...) and lack of on-board ammunition were severe tactical drawbacks. Thirty-eight were converted in February 1940 by Alkett.
In the video below, see the evolution of the 15 cm sIG 33 (Sf) auf Panzerkampfwagen I Ausf B concept:
In the video above, the scenes in which the 15 cm sIG 33 (Sf) auf Pz.Kpfw. I Ausf B is shooting are too dark (Game of Thrones - final season effect ...).
 |
| A 15 cm sIG 33 (Sf) auf Panzerkampfwagen I Ausf B - Bison I "roaring" down a road, on a convoy with Peugeot DK 5J 1.4 ton truck 9th Panzer division - 701 sIG Company - Battery D Operation Barbarossa - 1941 |
 |
| 15cm sIG 33 (Sf) auf Panzerkampfwagen I Ausf B - Bison I 10th Panzer Division - 706 sIG Kompanie Battery E - Russian front - 1941 |
In Action:
Thirty-six vehicles were organized into independent schwere Infanteriegeschütz-Kompanie (mot.S.) ("self-propelled heavy infantry gun companies") numbers 701-706, assigned to Panzer divisions in the Battle of France, as follows:
- Company 701, to the 9th Panzer Division
- Company 702, to the 1st Panzer Division
- Company 703, to the 2nd Panzer Division
- Company 704, to the 5th Panzer Division
- Company 705, to the 7th Panzer Division
- Company 706, to the 10th Panzer Division
As part of the 5th Panzer Division, assigned to the German XIVth Motorized Army Corps, the 704th company participated in Operation Marita, the invasion of the Balkans.
Later in 1941, the same assignment was maintained for Operation Barbarossa, the invasion of the Soviet Union. The 705th and 706th belonging to the 7th and 10th Panzer Divisions respectively, were destroyed at this time. Of the remaining companies, only the 701st participated in the opening stages of the subsequent Case Blue in 1942, although it, and its parent 9th Panzer Division, were transferred to Army Group Center by the end of the summer of 1942.
 |
| 15 cm sIG 33 (Sf) auf Panzerkampfwagen I Ausf B - Bison I DOAUAUMONT - 2nd Panzer Division - 703 sIG Kompanie Battery D - France - 1940 |
 |
| 15cm sIG 33 (Sf) auf Panzerkampfwagen I Ausf B - Bison I 1st Panzer Division - 702 sIG Kompanie Battery F - France - 1940 |
 |
| 15cm sIG 33 (Sf) auf Panzerkampfwagen I Ausf B - Bison I EDITH - 2nd Panzer Division - 703 sIG Kompanie Battery E - France - June, 1940 Notice the cross painted in the left fron gun shield: a crew member killed in 24, May - 1940. |
 |
| Same 15cm sIG 33 (Sf) auf Panzerkampfwagen I Ausf B - Bison I above EDITH - 2nd Panzer Division - 703 sIG Kompanie Battery E - France - 1940 |
 |
| 15cm sIG 33 (Sf) auf Panzerkampfwagen I Ausf B - Bison I 1st Panzer Division - 702 sIG Kompanie Battery B - France - May, 1940 |
 |
| Drawing of the same vehicle above |
 |
| 15cm sIG 33 (Sf) auf Panzerkampfwagen I Ausf B - Bison I ALTER FRITZ - 2nd Panzer Division - 703 sIG Kompanie Battery A - Greece - April, 1941 |
 |
| Drawing of 15cm sIG 33 (Sf) auf Panzerkampfwagen I Ausf B - Bison I ALTER FRITZ |
 |
| The same ALTER FRITZ Bison I above, few months later... 2nd Panzer Division - 703 sIG Kompanie |
 |
War butin... a Voroshilovets tractor towing a badly damaged 15 cm sIG 33 (Sf) auf Panzerkampfwagen I Ausf B from 10th Panzer Division - 706 sIG Kompanie Russian front - Winter, 1942 |
The last reference to these vehicles is with the 704th Company of the 5th Panzer Division during the middle of 1943.
 |
| The last of the few... |
Specs:

| 15 cm sIG 33 (Sf) auf Panzerkampfwagen I Ausf B - Bison I | |
|---|---|
| Type | Self-propelled gun |
| Place of origin | Nazi Germany |
| Service history | |
| In service | 1940 - 1943 |
| Used by | Nazi Germany |
| Wars | World War II |
| Production history | |
| Designed | 1939-1940 |
| Manufacturer | Alkett |
| Produced | February 1940 |
| No. built | 38 converted |
| Specifications | |
| Mass | 8.5 tonnes |
| Length | 4.67 m |
| Width | 2.06 m |
| Height | 2.8 m |
| Crew | Four |
| Armor | 13 mm - 5 mm |
Main armament | |
| Engine | 6-cylinder, water-cooled Maybach NL38 TR 100 hp |
| Transmission | 5 forward +1 reverse |
Operational range | 140 km |
| Maximum speed | 40 km/h |
The kit:
For this commission project, the kit I'm going to use is a classic (2005) from the scale model world: the Alan (#019) Bison I.
 |
| The veteran from 2005 Alan Bison I (#019) box art |
I think I bought this kit at that time and I haven't had the opportunity to build it yet ... And that opportunity has arrived. Nowadays we have even more modern and detailed options to represent this SPG model, like the excellent Dragon (#6259) 15cm s.IG.33 (Sf) auf Pz.Kpfw.I Ausf.B Smart Kit , but as I have the child Alan in my closet, we will dare to build it !!!
 |
| Dragon 15cm s.IG.33 (Sf) auf Pz.Kpfw.I Ausf.B Smart Kit box art |
Let the battle begin !!! The Alan Bison I is a very complete kit, with plastic sprue, photoetched fret, decalsheet (waterslide) for 4 versions and tracks link-by-link (which many like, but I hate ...). The details are poor, but I've seen much worse kits ...
 |
| Kojak doesn't seem to be very excited ... |
 |
| Starting from the beginning ... The bathtub on the chassis came without warps or problems ... The interior details are very Spartan ... |
 |
| The holes for the drive sprockets are huge ... I closed the holes with plasticard and I'm going to reopen them with drills in the correct diameter ... |

 |
| Using the old technique of heating a metal to melt the ends of the axles and keep the sprockets turning ... |
As I always do, I like to study the construction drawings to avoid surprises and headaches ... And here's a big problem: after step 2 of construction, there should be a step on how to glue the front bottom armor to the front portion of the lower hull. This stage simply does not exist ...
Well ... let's deduce that the part fits the lower hull front opening and after sliding to the rear bottom armour, it rotates and the transmission shaft cover fits into a recess in inner portion of the bottom armour. See the "original" drawing of the Alan's Bison I instructions booklet, below:
 |
| Alan's booklet: steps 1 and 2. |
The big problem is the C3 parts, which support the suspension shock absorber arms. The C3 parts have a small tab (see below - red arrows) that should fit into a slot in the front portion of the armor bottom, but when trying to do this maneuver, the bottom of the driver's station just doesn't fit. The best option I found was to cut this small tab of the C3 pieces (left and right) and glue this fragment into the armor at the bottom of the driver (pink details below). Also cut the two suspension bars that are on the sides of the drive shaft cover (light green arrows). You'll be able to replace them later, much more easily. With that, the armor bottom front rotates normally and everything fits together satisfactorily ...
 |
| The "new" step 1+2 in details... |
 |
| The C3 tabs glued in the new positions... |
 |
| The surgery in the suspension bars. These are the light green arrows in the drawing above... |
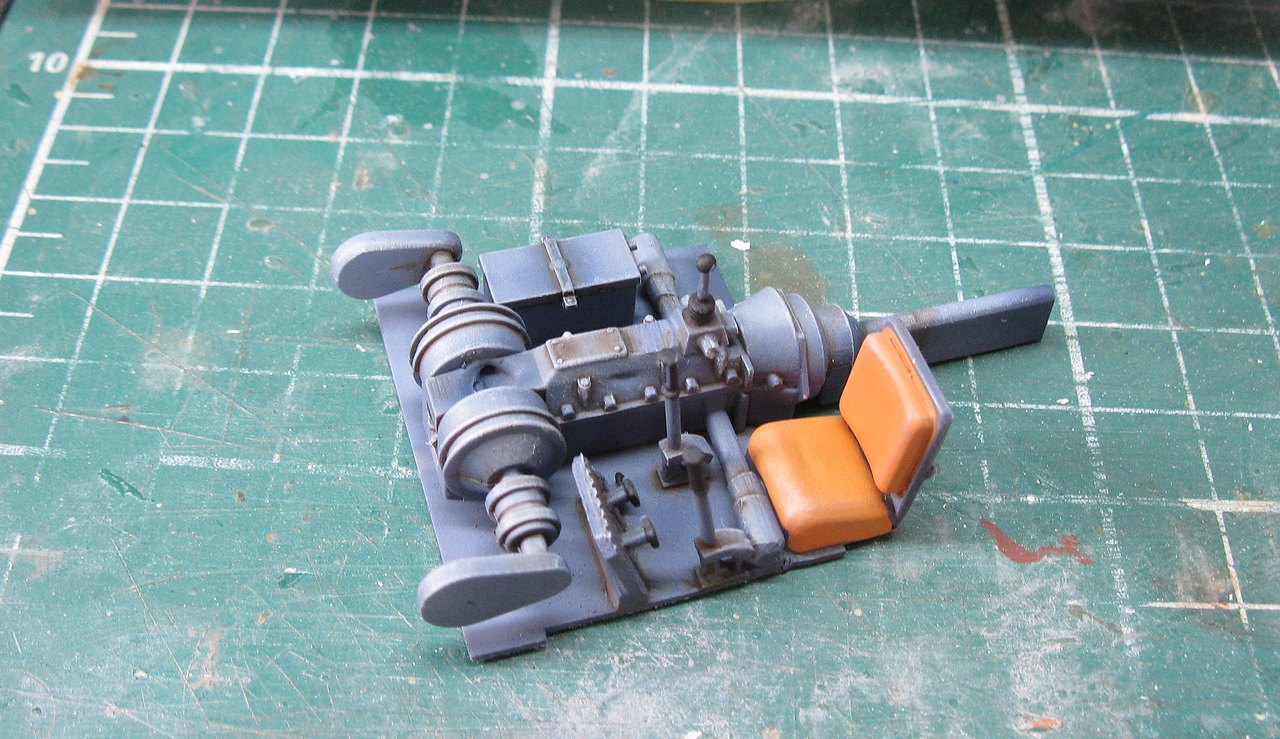 |
| The driver station already painted, ready to be glued to the lower hull (which has also been painted ...) |
 |
| The driver station glued in position. Notice the suspensions bars glued in place... A pity that almost no detail is visible |
 |
| By the booklet, now: PE grill in position in the rear deck |
After that, I used the rest of the paint in my airbrush and sprayed over the kit... I hate waste !!!
 |
| The rear deck in position and the little girl with their paws installed .... left side |
 |
| Right side... |
Sometimes, it is very pleasant to make a small up-grade with simple materials, but that represent great details. Here is a good example: The C30 parts (in the red circle, below), which "reproduce" the return springs of the rear fender flaps are simply horrible ...
Its replacement is simple and quick: two little parts of Plastruct (0.5mm round rods) supporting the "spring" made with the handle cut from an acupuncture needle. Here is the final result ...
 |
| How nice and fun it is to improve a "spartan" kit with simple techniques ... Here's the detail of the fender flap springs ... |
 |
| The new spring in the fenders flap... |
 |
| Another detail to enrich our poor kit: grills in the rear deck (red arrow). In red, the flaps springs... |
 |
| Testing the fit of the Bison's front armor. NOT GLUE THIS PART, YET!!! Man, the thing is too big... A headwind should be a nightmare for the poor engine .... |
 |
| The driver's view was tunneled... Poor Kraut!! I finally found a worse visual field than the Churchills drivers ... |

Indeed, the big 15cm sIG 33 howitzer is a big weapon. The instructions are perverse... You need to study pics, drawings and other better instructions for other kits (thanks a lot, Scalemates!!) to build this gun in the right way... From what I've built so far, Alan's kit isn't that bad. The worst, in my opinion, are the instructions, which do not clarify the small "big" details. And this defect is evident at this stage of the howitzer's building.
 |
| The gun barrel in his cradle. Many important details are omitted in the damn instruction booklet ... Definitely not a starter kit ... |
 |
| Rear view of the breech and cradle... |
 |
| The gun barrel in his cradle, finished... |
 |
| The gun's front shield. Internal view... |
 |
| The gun shield and wheels... Again, the booklet is a true nightmare... The holes in the shield must be must be closed at this stage ... and the retard here forgot this... |
 |
| The complete trial of the howitzer... That lever (red arrow) is glued in wrong position... |
 |
| Adding thin plasticard (0,3mm) to "laminate" the big, very big "canyon" between the two parts of the gun's trial. This was the biggest defect in the kit detected so far. The looks would be just awful without this "lamination", as the trim would be visible on the finished vehicle ... |
 |
| The cradle in the trail. The howitzer's elevation and depression capabilities were maintained... with blood, sweat and tears!! |
The worst part is the installation of the wheels in the trial of the weapon. In this matter, the booklet is practically useless... I recommend anyone who builds this kit to study the Dragon booklet (... of the same vehicle) or the AFV Club booklet, of SIG 33 kit, which allows a "spatial" view that can guide you through this Valley of Shadows and of Death. Be very careful with the perpendicularity of the wheels in relation to the "chassis" (trial) of the howitzer.
Testing the gun in dry-run on the vehicle is very, very important ... And do not stick the front shield of the vehicle except in the last step ... A great reference is to glue the wheel supports to the hull of the vehicle, with the front shield installed (but not glued ...) in position. The wheel supports have two tie rods that extend from the rear deck to the correct position of the parts. Forget the bottom pins of the brackets: they get in the way that help. I cut them without the slightest remorse.
Sorry for the absence of the photos, but this stage is so "manipulated" that it was almost impossible to photograph it. What was left of teaching was what I mentioned: first install the wheel supports!! These parts are your guide on installing the gun on the vehicle ... See the diagram below, modified from (damn) booklet:
 |
The gun assembly sequence: See red circles:
|
 |
| The final picture of the sequence above... Left side |
 |
| Right side |
 |
| The girl almost ready for painting... I choose to use the spare wheels in the front armour... |
 |
| Do you remember the little holes?? Closed with 0,3mm plastic discs cutted by my punch-and-die tool... |
 |
| This girl is sooo cute!! |
 |
| Indeed, very interesting... |
 |
| The end is near!! |
 |
| For those who still doubted that Kojak is "kind of weird"... Look what he is planning ... If Alan wasn't enough, how about an old Zvezda to train his skills ??? |
 |
| Indeed, the Bald one is a brave and courageous man !!! |
Now, the best part ... the markings. The decal sheet is very good, but as I chose the spare wheels in the front armour, the decals provided are incompatible with my research, since this positioning of the spare wheels was almost a characteristic of the 701 Company, of the 9th Panzer Division, on the Russian Front in 1942. It was a temptation to use decals with vehicle names, but History is History !!!
So, let's go to the torrid summer of 1942, meet our little girl:


First of all, primer. I use the Vallejo one. No, I'm not a sponsored modelist, but I have adapted to this product and use it constantly. Many love him ... many hate him. I just use ... and I like it.
My two cents !!
 |
| And I also love using light-colored primers. I didn't adopt the dark primer of "fashion ntendence" (which I really don't like !!!). |
 |
| Right side |
 |
| Panzer-gray with many shades... and Future to prevent silvering... (again, Johnson & Johnnson don't sponsor me ... but I love Future!!!) |
 |
| Right side |
 |
| Rear view |
 |
| Two Panzer-gray girls, in in the beauty salon, waiting for the makeup ... But this is another history... |
 |
| Decals immediately after application. After smoothing and drying, sealing with a new layer of Future ... |
 |
| Self-propelled heavy howitzer platoon (sIG) 9th Panzer Division markings |
 |
| rear view |
 |
| After sealing with Future, thin layers of matte varnish and beginning of weathering ... |
 |
| These large areas in Panzer-Gray are very creative for our weathering process ... |
 |
| Right side |
 |
| Painting the wheels... |
 |
| Right side |
 |
| Painting the solid tires of howitzer...ufff.... |
 |
| The worst time: building the tracks ... And I just hate LBL tracks. The links are well-injected, but cutting ALL the millions of links from the sprues is an inhuman job ... |
 |
| After an irrecoverable hour and a half of my life, the tracks in position ... I liked the final aspect, but I hate LBL: This is visceral with me .... |
 |
| Right side... |
 |
| A little bit of dust from the dusty Russian steppes, in the hot summer of 1942 |
 |
| The spare wheels in the front armor, typical of the 9th Panzer Division, are a real charm !!! |
 |
| Tools in position... |
 |
| The end is near!!! |
 |
| Value Gear Details is always a good call... |
And the 15 cm sIG 33 (Sf) auf Panzerkampfwagen I Ausf B - Bison I was ready. Look the aspect of this self-propelled heavy infantry howitzer belonged to 701 Company, A Battery, from the 9th Panzer Division, on the Russian Front in June, 1942.
 |
| 15 cm sIG 33 (Sf) auf Pzkpfw. I Ausf. B - Bison I 9th Panzer Division -701 Company, A Battery Russian Front - June, 1942. |
 |
| 15 cm sIG 33 (Sf) auf Pzkpfw. I Ausf. B - Bison I |
 |
| 15 cm sIG 33 (Sf) auf Pzkpfw. I Ausf. B - Bison I |
 |
| 15 cm sIG 33 (Sf) auf Pzkpfw. I Ausf. B - Bison I left view |
 |
| 15 cm sIG 33 (Sf) auf Pzkpfw. I Ausf. B - Bison I 3/4 rear left view |
 |
| 15 cm sIG 33 (Sf) auf Pzkpfw. I Ausf. B - Bison I 3/4 rear right view |
 |
| 15 cm sIG 33 (Sf) auf Pzkpfw. I Ausf. B - Bison I right view |
 |
| 15 cm sIG 33 (Sf) auf Pzkpfw. I Ausf. B - Bison I 3/4 rear top view |
 |
| 15 cm sIG 33 (Sf) auf Pzkpfw. I Ausf. B - Bison I 3/4 front right view |
 |
| 15 cm sIG 33 (Sf) auf Pzkpfw. I Ausf. B - Bison I 3/4 rear right view |
 |
| 15 cm sIG 33 (Sf) auf Pzkpfw. I Ausf. B - Bison I Howitzer in firing position |
 |
| 15 cm sIG 33 (Sf) auf Pzkpfw. I Ausf. B - Bison I front view |

 |
| Kojak is very pleased ... another rough girl for his garage ... |
 |
| Perfect fit!! |
 |
Side by side, two 150mm guns: a big american M40 Gun Motor Carriage 155mm (T83) and the little 15 cm sIG 33 (Sf) auf Panzerkampfwagen I Ausf B |
 |
| The end and the start of self-propelled guns with 150mm in WWII... The difference of sizes is impressive... |
 |
Something more coherent: two 150mm german howitzers: 15 cm sFH 13/1 (Sf) Geschützwagen Lorraine Schlepper (f) and 15 cm sIG 33 (Sf) auf Panzerkampfwagen I Ausf B - Bison I |
 |
| Same caliber ... same concept ... slightly different weapons ... |
 |
| 15 cm sIG 33 (Sf) auf Pzkpfw. I Ausf. B - Bison I 9th Panzer Division -701 Company, A Battery Russian Front - June, 1942. |
 |
| 15 cm sIG 33 (Sf) auf Pzkpfw. I Ausf. B - Bison I 9th Panzer Division -701 Company, A Battery Russian Front - June, 1942. |
I was very satisfied with the result of this project. This kit is old, without the smallest details or accessories so common in today's kits ... but with a little bit of historical research and dedication, the young lady was very presentable. And I loved the fun it provided ...
Stay with us, friends!!!
I relatively prefer Alan's kits.They are moulded dull,but I feel something like designer's passion from them.
ResponderExcluirI guess that if we added some details,they easily turn to much better.
I've already built Marder2D,Bison2,Framingo and Pzkpfw1F but Bison1 is not in my shelf.I'm looking forward to see the result.
Hi, Triple T!! The kit is good, indeed, but the booklet is a nightmare... Stay tunned, my friend... Welcome back!!!
ResponderExcluirIt's beautiful!!
ResponderExcluirALAN is addictive,isn't It? LOL....
Hi, Triple T... We are totally addicted to this trouble kits, my friend. We love challenges !!! And it is very good to know that you are part of this obscure religion !!!
ExcluirStay safe, my friend!!!
Boy, I love your blog! Not only a great modeling, plenty of background info, but a header picture to die for! Pure heaven!
ResponderExcluirZig
Thanks a lot, Zig!!! Take care and all the best!!
ExcluirExcellent results!
ResponderExcluirI just received this kit in the mail, (found it on eBay) I have bookmarked your build, and will definitely be consulting it for your tips, and improvements! Your little Kojak rocks by the way! 🤘🏼
thanks for your feedback, my friend!! Good modeling...have fun!!! and Kojak says "Hi"!!! :)
ExcluirIt was never called a "Bison" during the war. That name was made up some time afterwards. Panzer I Sig 33 is the proper name.
ResponderExcluirThanks for the tipi, Anonimous, but the name Bison it´s very remembered, as happened with other equipment, such as the famous Sherman, just to name one of the most numerous. In Japanese aviation, due to the difficulty of remembering the official names, the allies also called Japanese planes by nicknames, such as Zero, Claude, Jack, Sonia, etc. But thanks for your tip...
Excluir