
FIRE!!!
In this report, we will talk about a very heavy artillery piece, which was developed in the middle of WWII, to provide greater weight in demolition and barrage actions in American towed artillery. It was the largest caliber piece used in WWII, in this class: we are talking about the powerful 240mm heavy howitzer M1 Black Dragon!!
 |
 |
| 240mm heavy howitzer M1 "Black Dragon" ready for action |
History
The 240 mm heavy howitzer M1, popularly nicknamed "Black Dragon" was a towed howitzer used by the United States Army. The 240 mm M1 was designed to replace the World War I era 240 mm howitzer M1918, which was based on a 1911 French design and was outdated by World War II.
 |
| 240mm heavy howitzer M1 Black Dragon in use by US forces in Italy - 1944 |
 |
| 240-mm howitzer M1918 Field Artillery Journal - Jul-Aug 1922 |
The project to replace the 240mm M1918 began in 1941. The 240 mm howitzer was the most powerful weapon deployed by US field artillery units during World War II, able to fire a 160 kg high explosive projectile to 23 km of distance. It was the largest field piece used by the US Army during the war except for naval ordnance adapted into railway guns.
 |
| WWI era U.S. Navy 14” Naval Railway Battery MK1 railway gun at Sandy Hook, New Jersey - 29 April 1916 |
The weapon addressed the requirement for super-heavy field artillery capable of attacking heavily reinforced targets, like those likely to be found along Germany's Siegfried Line.
The 240 mm howitzer M1 was designed together with the longer-ranged 8-inch gun M1, and they shared a related carriage. While use of the 8-inch gun was limited due to excessive bore wear and poor accuracy, the howitzer saw considerable action during World War II in Europe due to its effectiveness against difficult targets such as heavy concrete fortifications.
 |
| 8-inch Gun M1- 45th Infantry Division Museum Oklahoma - USA |
It was also used in the Pacific campaign, notably in the recapture of Manila in 1945, but few targets there were fortified heavily enough to justify its use.
The US Army retained the 240 mm howitzer after World War II, and later deployed it in the Korean War. The howitzer remained in US service until ammunition stocks were exhausted, in the late 1950s.
The 240 mm howitzer M1 is still in service with Taiwan, stationed in hardened bunkers of the frontline Kinmen and Matsu Islands.
 |
| 240mm heavy howitzer M1 Black Dragon Operated by Taiwan |
Development
During World War I, the United States Army received several British 9.2-inch (233.7 mm) howitzers, but was more impressed by the French Mortier de 280 modèle 1914 Schneider.
 |
| BL 9.2-inch heavy howitzer In display outside the Australian War Memorial |
 |
| Mortier de 280 modèle 1914 Schneider ready for action WWI era picture |
About 330 of the Mortier de 280 - 1914 Schneider, in a slightly modified form, were built under license by the mid-1920s as the M1918 240 mm howitzer.
 |
| The M1918 240 mm howitzer disassembled for transport on wagons with spoked wheels Handbook of Artillery - US Ordnance Dept. - May 1920 |
 |
| M1918 240 mm heavy howitzer. |
In 1925, it was concluded that the design was flawed, so it was decided to build a new weapon; design work, however, did not begin until 1934 and resulted in the modification of existing weapons as the M1918A1M1, but the project stalled because of limited funding. In April 1940, another design program was begun, and resulted in the 240 mm Howitzer T1. Production began in November 1942, and the piece was standardized in May 1943 as the 240 mm Howitzer M1 on Carriage M1.
 |
| 240 mm Howitzer M1 on Carriage M1 profile in firing position |
Use in service
Transport
A pair of three-axle, six-wheeled transport wagons were developed - one for the cannon tube, and one for the carriage. These transport wagons were also used with the 8-inch gun.
 |
| 240 mm Howitzer M1 - barrel and recoil system in 6 wheels M3 transport wagon left view - U.S. Army Field Artillery Museum |
 |
| 240 mm Howitzer M1 - barrel and recoil system in 6 wheels M3 transport wagon right view - U.S. Army Field Artillery Museum |
 |
| 240 mm Howitzer M1 - gun carriage section in 6 wheels M2 transport wagon U.S. Army Field Artillery Museum |
These were standardized as the M2 and M3. The M2 wagon carried the carriage and the M3 wagon carried the barrel and recoil system. This separate configuration required the use of the 20-ton M2 truck-mounted crane for setup. The crane also included a clam-shell bucket that was transported on a trailer and used to dig the recoil pit for the gun. It took about two hours to emplace the gun.
 |
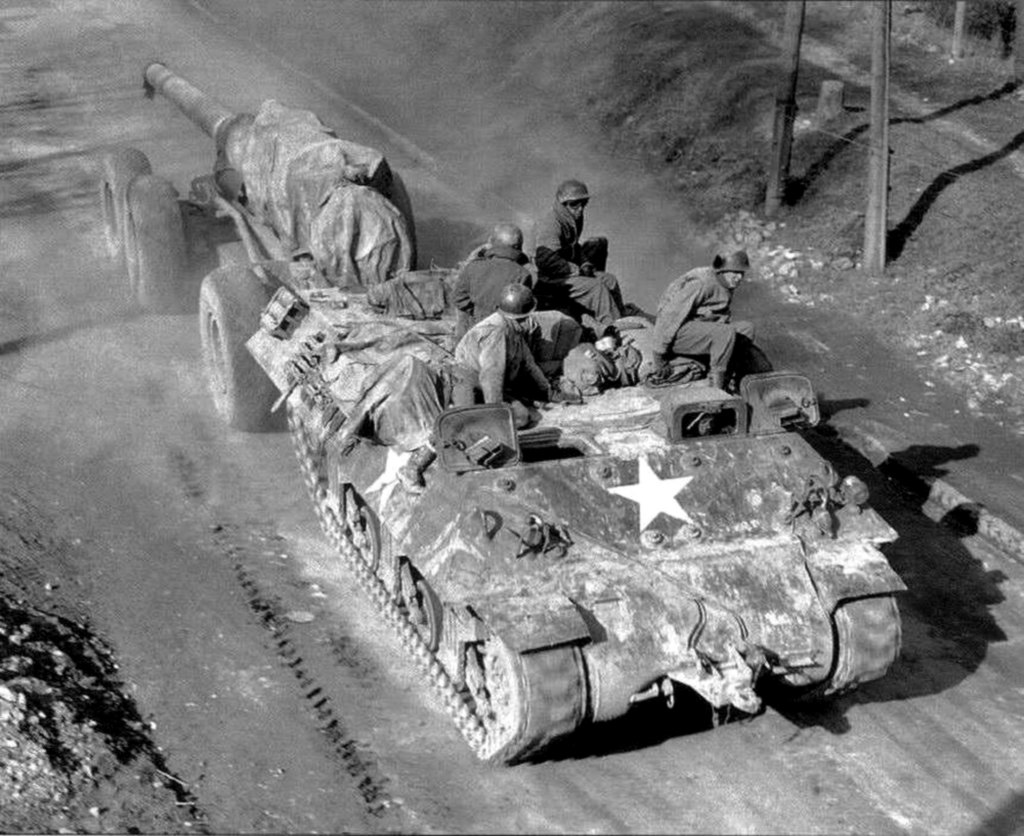
| An M33 prime mover towing the 240mm heavy howitzer M1 to new emplacement of fire... |
 |
| The 240mm Black Dragon was so large that it required a crane to be lifted into position. The howitzer carriage being removed from its wagon and being lowered to its firing location. |
| Now, the barrel of the 240mm heavy howitzer being positioned on its carriage. Notice the M33 parked in the right corner of the photo. |
 |
| Gunners from US Army 698th Field Artillery Battalion with his M1 240 mm Heavy Howitzer in Italy. January, 1945. |
Initially intended to be towed by the Mack NO 7+1⁄2-ton heavy truck, it was found that this had problems in soft ground due to its high ground pressure. Its intended replacement was the tracked M6 tractor, which was explicitly designed for towing the 8-inch gun and 240 mm howitzer.
 |
| Mack NO 7½-ton 6x6 heavy truck pulling a 155mm M59 gun Long Tom |
 |
| M6 High-Speed Tractor - Liberty Park Museum Overloon, the Netherlands. |
This was standardized in June 1943 but did not enter production until February 1944, so the Ordnance Department improvised in the meantime. Surplus M3 Lee-based M31 and M32B1 tank recovery vehicles and M10A1 tank destroyers were quickly modified and tested. These proved to be satisfactory and were adopted for use as the M33, M34, and M35 Prime Movers, respectively.
 |
Note the remaining characteristics of the T2 (M31) TRV still present on the tractor. |
 |
| M34 prime mover Notice the clear origin of the M34 from the M32, without the crane and its accessories. font: Catalogue of Standard Ordnance Items - 1944. |
 |
| M35 prime mover from 7th U.S. Army towing an 8-inch gun toward the front lines in Eastern France - 1944 |
Likewise, the wheeled transport wagons loaded with the heavy gun components often became bogged down in soft ground, so the Ordnance Department developed the T17and T17-1 carriage transport wagon with a pair of tracked bogies. One 240 mm howitzer battalion was deployed to the Pacific in 1945 equipped with these carriages.
| T17 and T17-1 tracked wagons transports in action, with a 240mm M1 gun and Mack NO 7½-ton 6x6 heavy truck |
 |
| A 240mm M1 Black Dragon heavy howitzer barking in the Pacific Theatre of Operations Notice the T17 tracked wagon just in front of the gun |
Combat use
The first operational use of the super-heavy 240 mm howitzer was by the 697th and 698th Field Artillery Battalions of the U.S. 5th Army at the Anzio Beachhead in Italy in January 1944. The 240 mm howitzers and the 8-inch (203 mm) guns of Batteries A and B, 575th Field Artillery Battalion (attached to the 697th and 698th, respectively), were used as counter-battery fire against German guns in their class. Their fire was accurate enough not only to knock enemy artillery out of action, but also to destroy targets as small as German heavy tanks.
 |
| Army soldiers of Battery B, 697th Field Artillery Battalion 5th Army prepare to fire a 240 mm howitzer into German-held territory near Mignano. Notice the gunners trying to protect your ears from the huge bang... Mignano, Italy - 30 Jan., 1944. |
 |
| M33 prime mover towing a 240 mm howitzer M1 "Black Dragon" into a firing position in Italy, 31 January, 1944. font: US Army Photo |
 |
| Clark's Express, a 240mm M1 heavy howitzer being towed by an M33 prime mover near Cory, Italy, in May, 1944. The name of the gun must be in honor of Lieutenant General Mark W. Clark commander in chief of the 5th American Army. Font: Life magazine archives |
 |
| M33 Prime Mover from the 5th Army, 697th Field Artillery Battalion towing an 240 mm howitzer M1 (Black Dragon) near Cori, Italy - May 1944 font: LIFE Magazine Archives |
US super-heavy artillery also played a role in countering the infamous Krupp K5 283mm gun Anzio Annie railway gun and putting it out of action. In Italy, the 240 mm howitzer was highly valued for its capability to destroy key bridges at long range.
 |
| Krupp K5 283mm gun Anzio Annie railway gun "Leopold" at Aberdeen Proving Ground |
Army ordnance officers credited the "devastating fire power and incredible accuracy" of the 240 mm howitzer in playing a decisive role in the Italian Campaign. During the Battle of Monte Cassino, the weapon was used in the final destruction of the monastery, already damaged by air attacks.
.jpg) |
| A low aerial view of the Monastery in Monte Cassino, showing its complete destruction - 18 May 1944 font:IWM (C 4363) |
In the Italian theater, a small number of 240 mm howitzers also saw action with the British Eighth Army. Despite their initial misgivings over the deployment of such a heavy and unwieldy weapon, 8th Army commanders dubbed the 240 mm howitzer as "the most generally satisfactory weapon" in service in 1944. By November 1944, however, all 8-inch guns and 240 mm howitzers had been withdrawn from Italy and sent to the Western Front.
%20Division's%20attack%20on%20Blerick,%203%20December%201944%20IWM%20(BU%201374).jpg) |
| 240mm howitzer of 3rd Super Heavy Regiment Royal Artillery, firing in support of 15th (Scottish) Division's attack on Blerick, Netherlands - 3 December 1944 font:IWM (BU 1374) |
The 240 mm howitzer saw extensive service in Europe, reducing reinforced targets requiring super-heavy artillery. Fifteen 240 mm howitzer battalions served in the European Theater; the 265th, 266th, 267th, 269th, 270th, 272nd, 277th, 278th, 538th, 539th, 551st, 552nd, 553rd, 697th, and 698th. Five served in the Pacific; the 543rd, 544th, 545th, 778th, and 779th.
During the Korean War, twelve 240 mm howitzers were brought out of "mothballs" and sent to the front lines to deal with deep bunkers and fortifications built by the Chinese that could not be effectively attacked by the smaller artillery weapons then on hand. They were utilized in two units in Korea, the 213th and 159th Field Artillery Battalions.
 |
| 240mm M1 heavy howitzer "Black Dragon" firing position - Korean War - 50's. |
 |
| 240mm M1 heavy howitzer "Black Dragon" firing position - rear view - Korean War - 50's. |
The weapons went into action on May 1, 1953. On that day, the first round was fired by Baker battery of the 213th at a target on top of a hill called "the donut" by aerial observers. The first round was supposed to be just a ceremonial shot; however, it struck an ammo dump directly on top of "the donut" which set off a chain reaction and blew part of the top of the hill off in a spectacular fashion. A total of 5,043 240mm shells weighing 163 Kg were fired from May 1, 1953 until the armistice .
 |
| An American soldier poses next to 240mm shells during the Korean War in the 1950s. |
 |
| An M26A1 Dragon Wagon tractor pulling 240mm M1 barrel and recoil system in 6 wheels M3 transport wagon, somewhere in Korea. Note the gun carriage sectionin 6 wheels M2 transport wagon, waiting alongside. |
 |
| An M26A1 Dragon Wagon tractor pulling 240mm M1 gun carriage section in 6 wheels M2 transport wagon, somewhere in Korea. |
 |
Three M26A1 Dragon Wagon tractors waiting next to 6 wheels M2 transport wagon, carrying the howitzer carriage, parked alongside. |
 |
| 240mm M1 Black Dragon - members of 213th Heavy Battery unloading 240mm shells from an M6 High Speed Tracor, using a crane - Korean War - 50's. |
In the late 1950s, several M1s were transferred to the Republic of China on Taiwan and stationed in the front-line Kinmen and Matsu Islands. The guns were put on rails to enable the howitzers to deploy outside for fire missions and to retreat inside their hardened bunkers/tunnels for protection (capable of withstanding direct hits from aerial bombs) when needed.
 |
| 240mm M1 heavy howitzer "Black Dragon" Kinmen Island - Taiwan |
 |
| 240mm M1 heavy howitzer "Black Dragon" Rear view - Kinmen Island - Taiwan |
 |
| 240mm M1 heavy howitzer "Black Dragon" front view - Taiwan |
 |
| 240mm M1 heavy howitzer "Black Dragon" after firing - Kinmen Island - Taiwan |
 |
| 240mm M1 heavy howitzer "Black Dragon" Kinmen Island - Taiwan |
 |
| 240mm M1 heavy howitzer “Black Dragon” operational at Matsu’s Nangan - Taiwan |
Self-propelled mount
As we saw earlier, the 240 mm howitzer M1 was broken down into two loads for travel (the barrel and recoil mechanism and the carriage), each towed on a six-wheeled wagon. A truck-mounted crane was required to assemble and disassemble the weapon. Due to the problems with moving such a large, heavy weapon, a self-propelled version was made by mounting it on a stretched Heavy Tank T26E3 chassis that featured an extra bogie wheel per side, as the T92 Howitzer Motor Carriage, While 115 were planned, only five were built and the war ended before they could be used and they were later scrapped.
 |
| US Army 240mm T92 HMC (Howitzer Motor Carriage) font: LIFE Magazine Archives |
Specs


| 240 mm heavy howitzer M1 "Black Dragon" | |
|---|---|
| Type | Heavy howitzer |
| Place of origin | United States |
| Service history | |
| In service | 1943–1959 (USA) 1958–Present (Taiwan) |
| Used by | United States United Kingdom Philippines Taiwan |
| Wars | World War II Korean War 2nd Taiwan Strait Crisis |
| Production history | |
| Designed | 1940–1943 |
| Produced | November 1942–1945 |
| No. built | 315 manufactured by 1945 |
| Specifications | |
| Mass | 29,300 kg in action |
| Barrel length | 8.38 m L/35 |
| Width | 2.79 m |
| Crew | 14 |
| Shell | 163 kg shell with separate bagged charge |
| Caliber | 240 mm (9.4 in) |
| Breech | Interrupted screw |
| Recoil | Hydro-pneumatic |
| Carriage | Split trail with 2 transport wagons |
| Elevation | +15° to +65° |
| Traverse | 22.5° right and left. |
| Rate of fire | 1 round per minute (max.) 30 rounds per hour (sust.) |
| Muzzle velocity | 701 m/s |
| Max. firing range Barrel life | 23 km 2.400 rounds |
The kit
The assembly of this artillery piece part on its transport wagon is a complement to the construction project of the M33 prime mover, built previously. The option on the market in 1/35 scale is this Des Kit kit Obusier US M1 240mm (#35139).
 |
Obusier US M1 240mm (US Howitzer M1 240mm) DES Kit (#35139) box art |
 |
| Many little parts in resin... |
The howitzer tube has a slight deviation, perhaps due to resin contraction.
 |
| The howitzer tube was bent... |
I will rectify this by immersing the barrel in boiling water and, after the resin has heated up, I will straightening it by rotating it between two wooden plates, under pression, with back and forth movements. Since the barrel is conical, the movement will be semi-circular... Keep the pressure and movement until the barrel cools and stabilizes, spatially... 2 minutes top...Easy!!

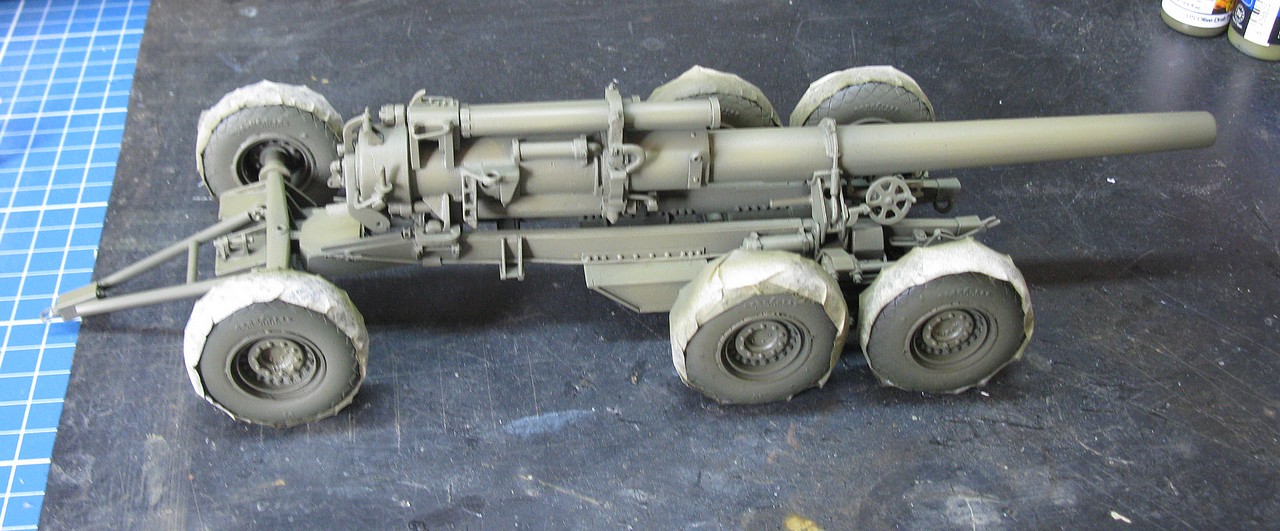
With the barrel realigned, it deviates a little from the order of the instruction leaflet and I decided to clean the front axle parts, as I noticed that the wheels are very beautiful... Let's do a dry-run with these parts... I have cleaned the inner hubs of the front wheels and will glue these hubs in place on the wheels. Then I will insert these hubs onto the front axle pins of the transport wagon.
 |
| The inner hubs of the front wheels and the front axle. The tow bar (this piece is mobile) is in position. Notice the 240mm barrel glued in his position, in background... |
The instructions on the leaflet are in French, which makes things quite difficult (for non-French speakers like me...) But thanks to Google Image Translate, things flow smoothly. The order of the photos is quite confusing. You have to incorporate your detective side, like Hercule Poirot, to navigate these waters safely.
 |
| Saint Agatha Christie, please guide and protect us!!! |
 |
| The inner hubs glued in the front wheels. Notice the "flattening" of the balloon-type tires, simulating the weight... |
 |
| The front wheels in the front axle...fit test!! |
 |
| Gluing small details to the rear portion of the barrel... There are few markings on the parts...you have to be very careful here... |
Here, for the construction of the wagon's rear axles and suspensions, I forgot the leaflet (the construction order is very confusing) and followed my investigative instincts and deductive logic.
 |
| Let's count on the invaluable inspiration of the greatest Belgian detective in history!! Rear wagon suspension... Hercule Poirot rules!! |
 |
| Installing the rear axles and suspension struts... |
 |
| A true police mystery... |
 |
| ... with small and large details until we solve the case!! |
 |
| Gluing the rear wheel hubs to the suspensions... |
 |
| Gluing the parking brake system parts... |
While the suspension dries (see in the background, right...), we will take care of building the chassis of the transport wagon. The parts are glued to the lower part with the help of plastic claws...
 |
| The Claw!!!!! |
 |
| Notice the barrel waitng the chassis of the transport wagon, in the background... |
 |
| Installing the double rear suspension on the transporter wagon chassis. right view |
 |
| Installing the double rear suspension on the transporter wagon chassis. left view |
 |
| And finally, gluing the barrel/recoil system to the chassis of the transport wagon. |
 |
| Notice the mobile fron axle, with a pin (copper wire) to allow its movement (scratch) |
 |
| Detail of mobile front axle, with its articulating head having a perforation (red arrow) to allow the insertion of a pin (green) |
 |
| This detail is not described in the manual, but it is easily deduced. The drilling (red) and the pin (green) are "influences" of our friend, Hercule Poirot!! |
 |
| The front axle "pinned" to the chassis of the transport wagon. The front axle swings on the pin, allowing the transport wagon make turns... right view |
 |
| The front axle "pinned" to the chassis of the transport wagon. left view |
 |
| Close-up of the front swing axle in action. left view - turning to left... |
 |
| Close-up of the front swing axle in action... left view - turning to right... |
Time to glue the wheels to their axles. Here, we have a small but big detail: the "flattened" portions of the tires must be positioned strictly downwards,resting on the ground. And, at the same time, the wheels must be PERFECTLY squared and aligned. And all of this is done with cyanoacrylate (superglue, which is usually very fast...). Many things can go wrong at this point.
My recipe was to mark the tires with arrows made with a pencil (red arrows in the pic inserted in the photo, below...) the correct position of the "flattened" tires (green line), so that the tires can be aligned without error, since the metal templates that I will use to square the gluing will hide these "flat" portions.
And, at the same time, I will use a gel superglue, which allows for more work (and realignment) time. But let's go to the pictures, because they are worth a thousand words...
 |
| The tires marked with pencil (internal and external portions) and the tires glued in position, aligned with metal guide blocks. Notice that the flat parts disappear, but the pencil arrows ensure the correct position!! |
 |
| Internal view of the tires in position. Notice the pencil markings |
 |
| The same procedure for the wheels of the movable front axle. |
 |
| And our six wheels PERFECTLY squared and aligned glued on the chassis of the transport wagon. EUREKA!!! |
 |
| Rear view of our build. Note that the metal guide blocks on the front wheels have already been removed. The horizontal and vertical alignment are PERFECT!! |
After ensuring the alignment and initial gluing, I reinforced the gluing with drops of superglue (liquid, not gel) on each hub and axle, reinforcing the entire assembly.
 |
| Note that the flattened tires are in their correct positions (green arrows). I also made the brake compressed air system tubes out of thin electrical wires (electronic scrap). It's a shame that the wires were white, because they "disappeared" in the photos (red arrows)... |
 |
| The brake compressed air system tubes |
 |
| The brake compressed air system tubes (red) and tires in the correct position (green) |
 |
| The brake compressed air system tubes (red) |
With that, I declare our kit ready, and now I'm going to start painting it. I'm going to use Vallejo primer in black. All Blacks rules!!!
 |
| Primer All Black color - right view |
 |
| Primer All Black color - left view |
Painting time, now. The howitzer and its carrier will be painted in olive drab, as was the case with its M33 prime mover. But since the primer is black, I decided to mask the tires to keep the black color.
And now, let's improvise a little: masking tires with duct tape is a pain!! Lots of curves to delimit the edges of the wheels. I'm going to use a homemade liquid mask: a mixture of 70% PVA glue with 30% dish soap. I'm going to put duct tape on the tire treads and apply the liquid mask with a brush. After applying the first coat, wait an hour for it to dry and then apply it again, generously. Once the second coat is dry, the piece can be painted. Once the paint dry, this mask should come off along with the duct tape. Also use wooden sticks, so as not to scratch the lower paint. Let's see what happens...
 |
| Kojak's alchemy time: duct tape and liquid mask, straight made from the backyard!!! Cutting the duct tape...Notice the PVA glue and dish soap at the background... |
 |
| The tape and two layers of the liquid mask in the tires... Kojak is a weird and handy guy!!! Once the mask is dry, we can safely paint... |
 |
| Olive-drab!! right view |
 |
| Olive-drab!! left view |
 |
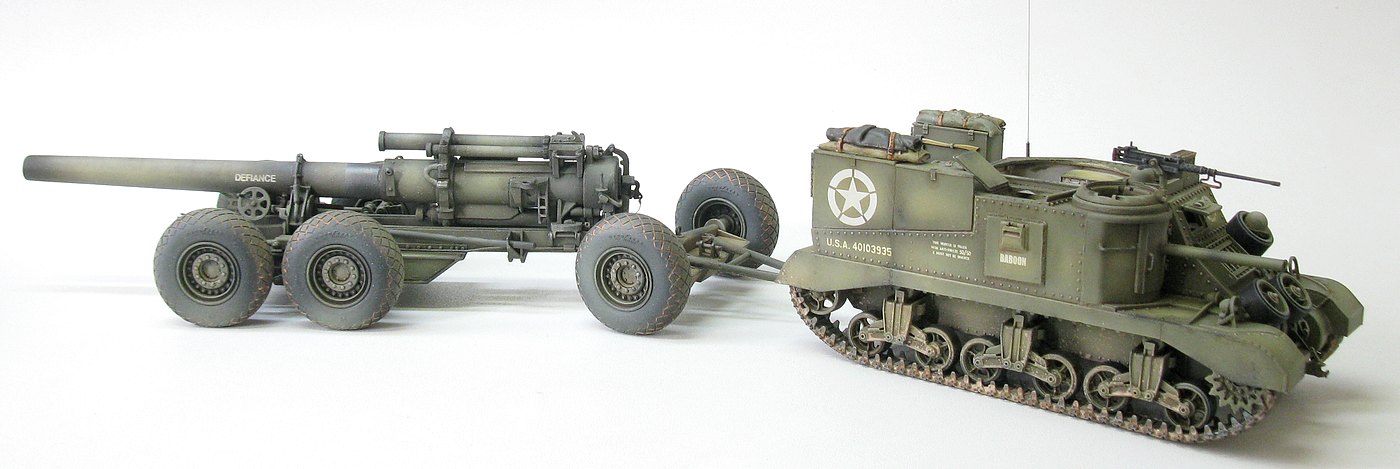
| After the tapes and liquid mask are removed!! Bingo!!! Meet DEFIANCE, a true challenge to the Axis forces!! |
 |
| 240mm M1 DEFIANCE - right view |
 |
| 240mm M1 DEFIANCE - left view |
 |
| 240mm M1 heavy howitzer DEFIANCE, with his M33 prime mover. Now, we can say that the project is almost complete... right view |
 |
| 240mm M1 heavy howitzer DEFIANCE, with his M33 prime mover. close-up view |
And now, a small big detail: Our friend Hervé Charbonneau (Charby) on Facebook, warned us about some bare metal portion at the base of the barrel, result of the recoil of the barrel inside the rear tube, when firing. I was forgetting about that...
 |
| Photograph of a 240mm M1 that Hervé Charbonneau sent us, highlighting the worn area of the barrel... Thanks, Hervé!! |
 |
| And my fault!!! |
Well... let's fix that... Let's mask the howitzer and paint that area in gun metal and aluminum tones... Here's the kit preparation, with masking tape and wet toilet paper (with clean water, please...) making the necessary masks for airbrush painting...
 |
| Wet toilet paper and masking tape leaving the distal portion of the barrel exposed to be painted... left view |
 |
| Wet toilet paper and masking tape leaving the distal portion of the barrel exposed to be painted... right view |
 |
| The 240mm howitzer with the paint on the distal portion of the barrel worn away by the gun's recoil. left view |
 |
| The 240mm howitzer with the paint on the distal portion of the barrel worn away by the gun's recoil. right view |
 |
| Detail of wear on the distal portion of the barrel paint on the 240mm howitzer. Thanks again, Charby!! Notice the the trigger rope of the striker, installed on the breech lever |
And after this little frisson has been resolved, let's get to know the 240mm heavy howitzer M1 "Black Dragon" DEFIANCE disassembled and the barrel portion and recuperators installed in the 6 wheels M3 transport wagon, proving duties to Battery D of the 697th Heavy Field Artillery Battalion, 5th American Army, during the Battles of the Conquest of Monte Cassino, near Mignano, Italy, in late January 1944.
 |
| 240mm heavy howitzer M1 "Black Dragon" DEFIANCE in 6 wheels M3 transport wagon - Battery D 697th Heavy Field Artillery Battalion - 5th American Army Battles of Monte Cassino, near Mignano - Italy. - late January 1944. |
 |
| 240mm heavy howitzer M1 "Black Dragon" DEFIANCE |
 |
| 240mm heavy howitzer M1 "Black Dragon" DEFIANCE |
 |
| 240mm heavy howitzer M1 "Black Dragon" DEFIANCE |
 |
| 240mm heavy howitzer M1 "Black Dragon" DEFIANCE |
 |
| 240mm heavy howitzer M1 "Black Dragon" DEFIANCE |
 |
| 240mm heavy howitzer M1 "Black Dragon" DEFIANCE |
 |
| 240mm heavy howitzer M1 "Black Dragon" DEFIANCE |
 |
| 240mm heavy howitzer M1 "Black Dragon" DEFIANCE |
 |
| 240mm heavy howitzer M1 "Black Dragon" DEFIANCE |
 |
| 240mm heavy howitzer M1 "Black Dragon" DEFIANCE trigger rope detail |
 |
| 240mm heavy howitzer M1 "Black Dragon" DEFIANCE |
 |
| 240mm heavy howitzer M1 "Black Dragon" DEFIANCE with Kojak |
 |
| 240mm heavy howitzer M1 "Black Dragon" DEFIANCE being towed by M33 prime mover |
 |
| 240mm heavy howitzer M1 "Black Dragon" DEFIANCE with his M33 prime mover |
 |
| 240mm heavy howitzer M1 "Black Dragon" DEFIANCE with his M33 prime mover and Kojak. |
 |
| 240mm heavy howitzer M1 "Black Dragon" DEFIANCE with British 7.2-inch (BL) heavy howitzer Mk I, for size comparison. |
 |
| 240mm heavy howitzer M1 "Black Dragon" DEFIANCE in 6 wheels M3 transport wagon - Battery D 697th Heavy Field Artillery Battalion - 5th American Army Battles of Monte Cassino, near Mignano - Italy. - late January 1944. |
 |
| 240mm heavy howitzer M1 "Black Dragon" DEFIANCE and M33 prime mover from 697th Heavy Field Artillery Battalion 5th American Army - Battles of Monte Cassino Mignano - Italy. - late January 1944. |
This project was very good, although I don't recommend this kit for beginners... See you on the next adventure!!

Olá Serra tudo bem? Mais um belissimo modelo meu amigo. Seus trabalhos servem de inspiração.
ResponderExcluirOpa...muito obrigado, Anonimo!! Grande abraço!!
ExcluirGran trabajo, y aprendiendo para casos de tubos doblados, excelente tecnica. gracias
ResponderExcluirHolla, Jose!!! Gracias, hombre!! ¡¡Me alegro que nuestro trabajo haya sido útil de alguna manera!! Gracias por los ánimos y sigue visitándonos... Saludos!!!
ExcluirAbsolutely amazing work.
ResponderExcluirThanks a lot, my friend!!!
Excluir