
Gentlemen!!!
Difficult situations generate ingenious solutions ... and most of the time, simple and effective. And it is precisely one of these examples that we will see here today: let's meet a pioneer: Now let's get to know our "not-so-holiness" Kangaroo Armoured Personal Carrier - The "Defrocked Priest".


 |
| A column of Kangaroos, carrying troops of the 7th Battalion, Argyll and Sutherland Highlanders, 154th (Highland) Infantry Brigade moving toward their ‘forming up point’ for the start of Operation Totalize |
History:
Priest Kangaroo was a Canadian armoured personnel carrier (APC) developed during the Second World War, by the conversion of an AFV chassis. Created as an expedient measure by the Canadian Army, Kangaroos were so successful that they were soon being used by British and Commonwealth forces.
Their ability to maneuver in the field with the tanks was a major advantage over earlier designs, and led to the dedicated APC designs that were introduced by almost all armies immediately after the war. In July 1944, Lieutenant-General Harry Crerar's First Canadian Army was concerned by manpower shortages due to combat losses.
 |
| General Henry Duncan Graham "Harry" Crerar CH, CB, DSO, CD, PC |
 |
| American M3 half-track APC |

The original Kangaroos were converted from 72 M7 Priest self-propelled guns of three field artillery regiments of the 3rd Canadian Infantry Division.
 |
| An american M7 Priest 105mmSPG roaring through Carentan - France, 1944. |
 |
| Canadian M7 Priest - n.4 Gun of Easy Troop, 13th RCA, firing at Carpiquet 28 June from a gun position near Lasson. France Note the additional armour plate added just prior to D-Day to further protect the gun crew |
The Priests were "defrocked", removing their 105mm guns and ammunition stowage to increase the maximum space inside the vehicle, but the .50 Browning MG and his ring was kept.
The vast majority of texts quote that one of the hallmarks of the transformation of Priest into Kangaroo was the installation of additional side armor plates, like the drawing below:
 |
| The two points of transformation of the Priest in Kangaroo... but... |
But researching the subject, I came across Kangaroos without the side plates, such as those used in Italy, in 1945.
 |
Kangaroos carrying infantry into battle near Conselice, Italy, 1945
These Kangaroos don't wearing the side armour plates...
|
The early Kangaroos, used in Operation Totalize by the Canadians and British, featured these additional side plates ... and this was quoted as a typical addition to this transformation.
Two of the 36 ‘Priest’ Kangaroos with side armour plates, allocated to the British, 51st (Highland) Infantry Division
(both of which appear to be empty), travelling ‘down’ the SINATRA route. This route had been cleared
from the 154th (Highland) Infantry Brigade’s rear assembly area, forward to the brigade’s start line,
by the British 274th Field Company, Royal Engineers, of the 51st (Highland) Infantry Division,
prior to the launch of Operation TOTALIZE.
|
But upon further research, I realized that the Priests of the Canadian 3rd Infantry Division had this additional side armor plate BEFORE being converted to Kangaroos.
 |
| Canadian M7 Priest - n.4 Gun of Easy Troop, 13th RCA, firing at Carpiquet 28 June, from a gun position near Lasson. France. Note the additional armour plate added just prior to D-Day to further protect the gun crew |
 |
| Another Canadian M7 Priest firing German positions shortly after landing at Juno Beach. Note the side armour plates covered with the cammo net (red arrows) and the remains of the deep wading gear device on the rear of the vehicle (blue arrow). |
 |
| And now a Kangarro without side armour plates and with deep wading gear in position... Therefore, it is not the presence or absence of the side armor that characterizes the transformation of the Priest into Kangaroo. |
This explains why there are Kangaroos with and without additional armor plates: these plates were not a product of conversion. Only the front plate, which sealed the opening for the 105mm howitzer barrel
 |
| Kangaroo APC without side armour plates |
 |
| Kangaroo APC with side armour plates |
When the three Field Regiments of Canadian Artillery ( the 12tth, 13th and 14th Regiments) of 3rd Canadian Infantry Division was re-equipped with towed 25 pounder guns in late July, their self-propelled tracked vehicles were stripped of their 105mm guns and converted to Kangaroos.
This change of equipment was not very well regarded by the gunners, who considered replacing the 105mm American self-propelled howitzer by the 25-pound towed gun a setback, as we can see in this cartoon drawn by the lieutenant Clay, in the book that tells the story of the 13th Artillery Regiment.
 |
| The gunners crying for your lost Priests...and doubting of the power of the "new" 25 pdr gun ... |
The gun, gun mantlet, crew seats (except driver and mg gunner), and ammunition bins had all been removed, with armour plate welded in position where the gun once was installed.

| A Priest Kangaroo of 209th Self-Propelled Battery, Royal Artillery, transports infantry of 78th Division near Conselice, Italy, 13 April 1945. Notice the absence of extra armour plates in the side of vehicle... |
Upon conversion, the majority of the Kangaroo armoured personnel carriers, retained the markings of the artillery regiments, with which they had served as self-propelled guns, as can be seen in this photo below:
 |
| The markings in the Kangaroo above (‘D1’) and below (‘43’) the right-hand headlamp, indicate that this vehicle saw previous service as No. 1 gun, “D” Troop, 44th Field Battery, 13th Canadian Field Regiment, Royal Canadian Artillery, of the 3rd Canadian Infantry Division. |
During the conversion process, later vehicles had mild steel plates welded in place of armour plate due to a shortage of the latter; sand was used to fill the space between mild steel welded to both the inside and outside of the mantlet gap. Armour plate was also found on abandoned landing craft on the landing beaches, and material was also taken from the Schneider Steel Works in the city of Caen.
Complete engine overhauls were also performed - normally a seven day job, "Kangaroo" managed to do each engine in 100 hours. The majoraty of the Priests Kangaroos retained the .50 calibre Browning anti-aircraft machine gun, and 60% of the vehicles also kept a No. 19 Wireless Set. A total of 76 Priests had been converted by the morning of 6 Aug, completing the initial production of Kangaroos, just in time for his first operational mission: Operation Totalize.
 |
| Kangaroos APC with troops of the 4th Canadian Infantry Brigade, 2nd Canadian Infantry Division aboard, on the evening of 7 August 1944, prior to the launch of Operation TOTALIZE |
The vehicle in general were supposed to carry 8 to 12 soldiers, though similar to the practice of troops riding on tanks, it was more common to simply cram as many as possible as could fit without being at risk of falling off. While 'debussing' - climbing out of the hull and jumping down, potentially under fire - was challenging, the obvious difficulty of getting into a vehicle that was designed to prevent enemy soldiers climbing onto it was quickly appreciated. Accordingly, climbing rungs were soon added as a field modification that also simplified loading the carrying compartment with ammunition, food and other supplies to troops under fire. The main access route during the vehicle's "climb" was from the rear, where there were no additional armor plates.
 |
| Priest Kangaroo of the Canadian 4th Armoured Division into Bergen op Zoom, the Netherlands, 29 Oct 1944 Notice the late heavy-duty bogies, the side armour plates and a improvised rack in the Kangaroo's tail. |
The Priest Kangaroos were first used on 8 August 1944 south of Caen during Operation Totalize with great success and later also in Operation Tractable. The vehicles were very robust: At the end of Operation Tractable, of the 76 ‘Priest’ Kangaroos originally provided, 61 were still ‘battle worthy,’ while the remaining 15 were ‘recoverable vehicle casualties,’ mostly caused by mechanical breakdown.
By 20 Aug 1944, the Canadian squadron of personnel carriers was organized into the 1st Canadian Armoured Personnel Carrier Squadron. The vehicles were used throughout Sep 1944, and were ordered turned over to a British REME workshop near Cassel on 30 Sep 1944. The squadron refitted with Ram Kangaroos in early Oct 1944.
By 20 Aug 1944, the Canadian squadron of personnel carriers was organized into the 1st Canadian Armoured Personnel Carrier Squadron. The vehicles were used throughout Sep 1944, and were ordered turned over to a British REME workshop near Cassel on 30 Sep 1944. The squadron refitted with Ram Kangaroos in early Oct 1944.
 |
| A rear view of troops ‘embussed’ (loaded) in a ‘Priest’ Kangaroo. Note the ‘absence’ of the basic pioneer tools, except for a lone shovel, on the rear deck. This particular vehicle, saw service as the No. 4 gun, “F” Troop, 43rd Field Battery, 12th Canadian Field Regiment - RCA, of the 3rd Canadian Infantry Division. Notice the infantrymen sat directly on the Kangaroo's rear deck. The absence of an armor plate at this location facilitated boarding and disembarking, as well as providing excellent places to sit during transport, |
 |
| Kangaroo armored command post vehicle converted from M7 Priest vehicle in a Dutch town, followed by aRam Kangaroo armored personnel carrier converted from Ram tank, circa 194. This vehicle maybe was first converted from APC to cargo carrier: notice the rear deck of vehicle... |
 |
| A Priest Kangaroo (covered with a large tarp) of the Canadian 4th Armoured Division Bergen op Zoom, Netherlands. end October 1944 |
The Priest Kangaroos served throughout the end of the war, with many field adaptations being made in existing M7 Priest vehicles. They were used as APC, as cargo and ammunition transporters, and as armored Command Posts. In the Canadian and British military, they were gradually replaced by the Ram Kangaroos.
 |
| Ram Kangaroo with markings of 1st Canadian Armoured Carrier Regiment 79th Armoured Division front right: - 157 on green/blue background The Tank Museum - Bovington - England |
The Ram Kangaroo entered service with the Canadians in September 1944, but in December these minor units were combined to form the 1st Canadian Armoured Carrier Regiment, joining the British 79th Armoured Division (whose specialized vehicles were called "Hobart's Funnies"). The first operation for the Ram Kangaroo was the assault on Le Havre, the last the 7th Armoured Division's march into Hamburg on 3 May 1945. But this will be another story ...
 |
| Ram Kangaroos (early and late type) carrying troops from Royal Hamilton Light Infantry Groningen, Netherlands, 13 April 1945. |

| Kangaroo Defrocked Priest APC | |
|---|---|
| Type | Armoured personnel carrier |
| Place of origin | Canada |
| Service history | |
| Used by | Canada - United Kingdon |
| Production history | |
| Manufacturer | Advanced Worksop Detachment "Kangaroo" |
| Produced | 1944 |
| No. built | 72 |
| Variants | Kangaroo APC Kangaroo Command Post |
| Specifications | |
| Mass | 22.000 Kg |
| Length | 6.02 m |
| Width | 2.87 m with sandshields |
| Height | 2.54 m (hull) 2.95 m over AA machine gun |
| Crew | 2+12 soldiers full equiped |
| Armor Armament | 12-62mm 1x.50 cal Browning MG |
| Engine | Continental R-975 C1/C4 340 hp - (254 kW) |
| Suspension Oper. range | VVSS (Vertical Volute Spring) 193 Km |
| Speed | 39 km/h on road 24 km/h off road |
Kits:
For this project, the normal normal would be to use the old, very old Italeri kit Kangaroo Personnel Carrier (#204):
 |
| Pre-cambrian (1980) Italeri kit: Kangaroo with american soldiers(?). A true "Stash-queen" in my closet... |
But the Kangaroo Italeri kit is derived from the old kit (from 1978) Priest (# 206) and represents a Priest of the late version, with many features that don't fit the type I want (early), such as the one-piece transmission cover, deep pulpit and low headlamp placement.
My idea was use some Italeri Kangaroo parts on a more "modern" model that looks more compatible with what I want to reproduce, namely: 3-piece transmission cover, the .50 plain "pulpit" of the early Priest models and a more detailed interior ... And the scrap of old Italeri will be used for another project. I am a believer of the Lavoisier Conservation of Matter Law (applied to model kits): "In modelism, nothing is lost, everything is transformed".
 |
| Old Italeri M7 Priest SPH (#207) |
 |
| M7 Priest SPH - late version. Notice the heavy duty bogies, with raised return rolers arms one piece transmission cover, deep pulpit and headlight in low position in the front glacis. Compare with Italeri's box kit above. |
So, the kit I had in my closet was the Howitzer Motor Carriage M7 Priest, from Academy (#13210). This beauty was released in 2007... Good, not perfect...but light-years better than Italeri one...
 |
| Howitzer Motor Carriage M7 Priest - Academy kit (#13210) |
Gentlemen, start your engines!!! Starting by the hulls and suspensions: You know I love build kits in parallel... I'm going to make this Kangaroo along with the Italeri Jurassic M7 Priest ... I'm thinking on a version for it ... but I'll focus here on the Kangaroo photos ... You will no longer see the Italeri kit (dark blue) very coming soon...
 |
| The two "Priests" togheter. I choose the late suspension (heavy duty bogies) for my Kangaroo Academy. The kit comes with two types of bogies: M3 and M4. The Italeri kit is late bogies. |
 |
| Here you see the age difference between the two kits. The level of detail in the past was much lower... The rivet counters were not born yet !!! Driver station in Academy and Italery kits |
 |
| Let's make a slight improvement on Italeri. The Italian girl looks better with a little makeup ... |
 |
| Side by side. The Academy kit needs a little surgery in the right sponson... |
 |
| Notice the blue "steel cover" from Kangaroo kit... Fits like a glove!! |
One of the flaws of the Academy kit: the wrong rear deck, missing the early model cooling grills. Let's do some minor surgery and use some PE spare grills from my scrap box.
 |
| Planning the surgery |
 |
| I simply love my Dremel!!! |
 |
| The rear deck. Next step, scratch the covers... |
As the Kangaroos were modified from the Priests, the removal of the ammo racks was done in the field with grinders ... And this surgery left scars. Let's make the marks of the removal of the ammo racks with the tip of a hot soldering iron.
 |
| No more ammo racks...only scars!! Right side |
 |
| Left side |
Making the grill's covers in scratch...Much better!!
 |
| Adding details in the tail... |
 |
| Chuck approves...Notice the front armour plate from Italeri Kangaroo kit... Like a glove!!! |
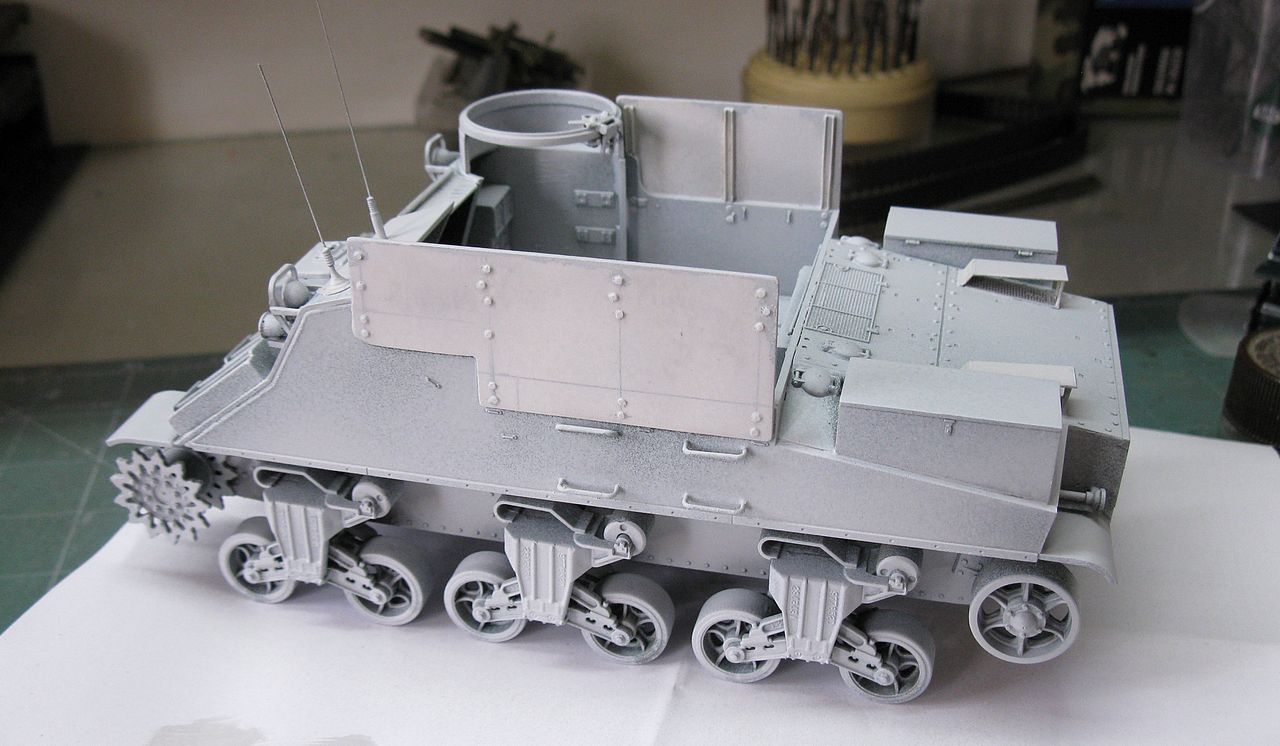
As I chose to make my Kangaroo as one of those who participated in Operation Totalize, I opted to make a vehicle that featured the side armor plates. Here's the cake recipe:

 |
| Side armour plates in position - right side internal view |
 |
| Side armour plates in position - left side internal view |


 |
| Aerials in position. My Kangaroo will have radio!!! |
 |
| Next step: Painting... |
And, as I always try to do, I went to research the Kangaroos of Operation Totalize. and I chose this beauty that was converted from the 13th Field Regiment - Royal Canadian Artillery:

 |
| Scotty...I need more power!!! |
Below, one of the best moments of Engineer Scotty, a Canadian with a Scottish accent:
First of all, primer:
Olive drab, for this girl:


 |
| Sorry ... I'm traditional... I didn't fall for the black primer fad .... |
 |
| Light color primer .... The canvases are white !!! |
 |
| Shades in olive-drab, with Pledge, to prevent silvering... |


 |
| Next step: decals!! |
And now, a short tutorial on how to make decals with your homemade color laser printer. The first thing is to use a computer program that allows vector drawings. I use (or rather try to use ...) the Corel Draw 18.
The first thing to do is to mark the desired actual sizes. I love the metric system ... After measuring the spaces for the markings in the kit, I transfer these measurements in millimeters to my drawings.
The big problem is that I can't print the white color, because I use a regular color laser. Drawings with solid color areas are no problem, as we can make areas the same size as white decal markings as a contrasting background. If we applied the decal printed with the markings directly on the kit, the thing would be "off", because the laser (and ink) print is not so "solid" ... the print is almost transparent on lasers and inkjets. Silkscreen solves this translucency problem, but then the technology is much more complicated ....
But back to the equipment we have at home ... You draw the markings that will be printed in transparent decal and the backgrounds (only the contours) on white decal.
And you ask: Why not print everything in white decal? Simple ... The clipping is very complicated and where the scissors or scalp cut, the color is torn out. The decals have horrible white borders !!!
If you make a background with tenths of a millimeter smaller and on that background you apply a colorful decal with defined printed borders, it gets much more professional. But let's see the images ... They speak to us in a thousand languages !!!
 |
| Print screen of my Corel Draw project. Above, the markings that will be print in transparent decal below, the areas that will be printed in a piece of white decal These countours are tenths of a millimeter smaller than markings |
 |
| The test-print.You test the measurements and the colors... If everything being ok, the next step is to cut pieces of decal sheets. |
 |
| Use small pieces to avoid waste. Do not print on the entire sheet, as the heat of printing would ruin the decal after 2 or 3 prints in a row ... |
 |
| Apply the decal pieces with tape so that the decals completely "cover" the test print. You will return the paper to the same position on your printer and when you command a new print, it will be over the decals. Simple!!! |
 |
| Perfectly executed printing... The monk approves!! |
 |
| The decals after being cut and positioned for comparison purposes. |
Now, things are a little different: the transparent decal with markings you can cut with a small border, which will be invisible after sealing the decal with gloss varnish or Pledge. But the background should be cut EXACTLY in the contours, no more and no less ... If the cut is not precise, this would ruin the aesthetics of the markings.
 |
| Markings with borders and backgrouds cutted with precision... |
 |
| Decal time: water!!! |
 |
| First step: backgrounds decals in white... rear view |
 |
| Front view of backgrounds. Wait few minutes to dries... |
 |
| Time of markings... |
 |
| The markings (transparent decals) over the white background... Perfect!! |
 |
| In the rear of the Kangaroo... |
And Kangaroo Priest is now a Canadian girl, proudly belonging the 3rd Canadian Infantry Division, 13th Field Regiment of Royal Canadian Artillery, Gun number 1, 1st Battery - Abble Troop, in Operation Totalize, near Caen - France, in 8th August, 1944.
 |
| Priest Kangaroo - 3rd Canadian Infantry Division, 13th Field Regiment - RCA, Gun number 1, 1st Battery - Abble Troop - Operation Totalize, near Caen - France 8th August, 1944. |


And the work goes on ... Choosing things to put in the vehicle. I love Value Gear accessories !!

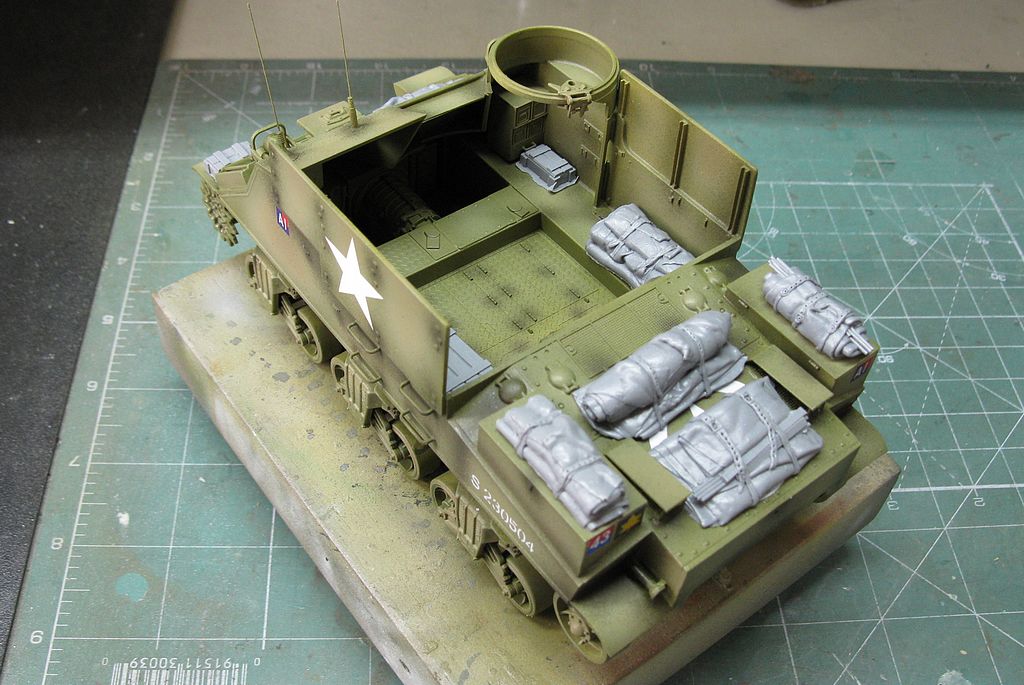 |
| testing...testing... |
 |
| testing..testing.. |
 |
| Front view... |
I really am a lazy guy ... and painting stowage is an almost physical pain ... and since we will suffer, we will suffer at once. Painting things from Value Gear and Legend for my future Priest project ...
 |
| Legend in cream and Value Gear in gray. |
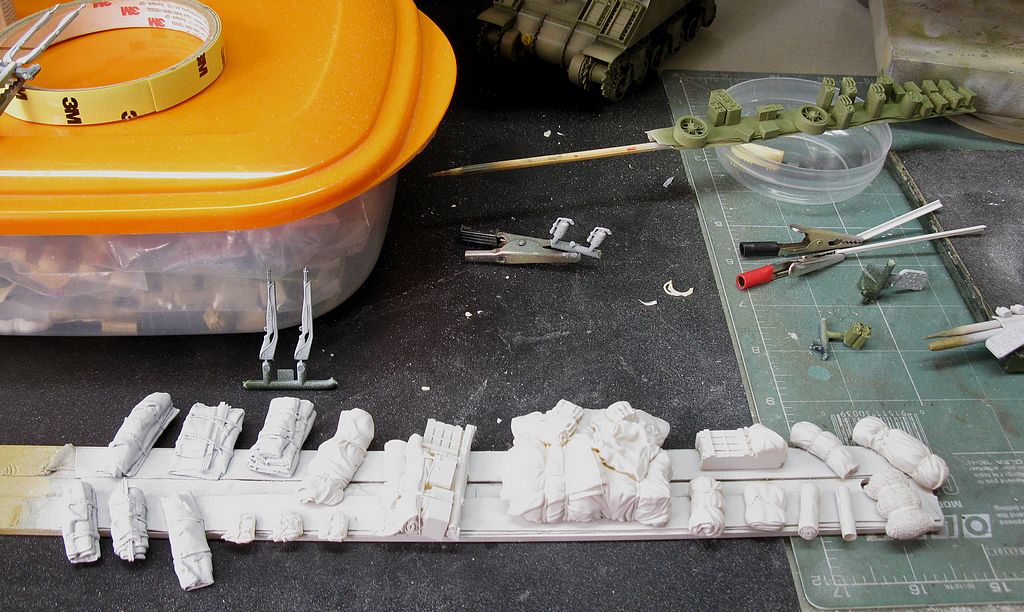 |
| Primer and base coats... |
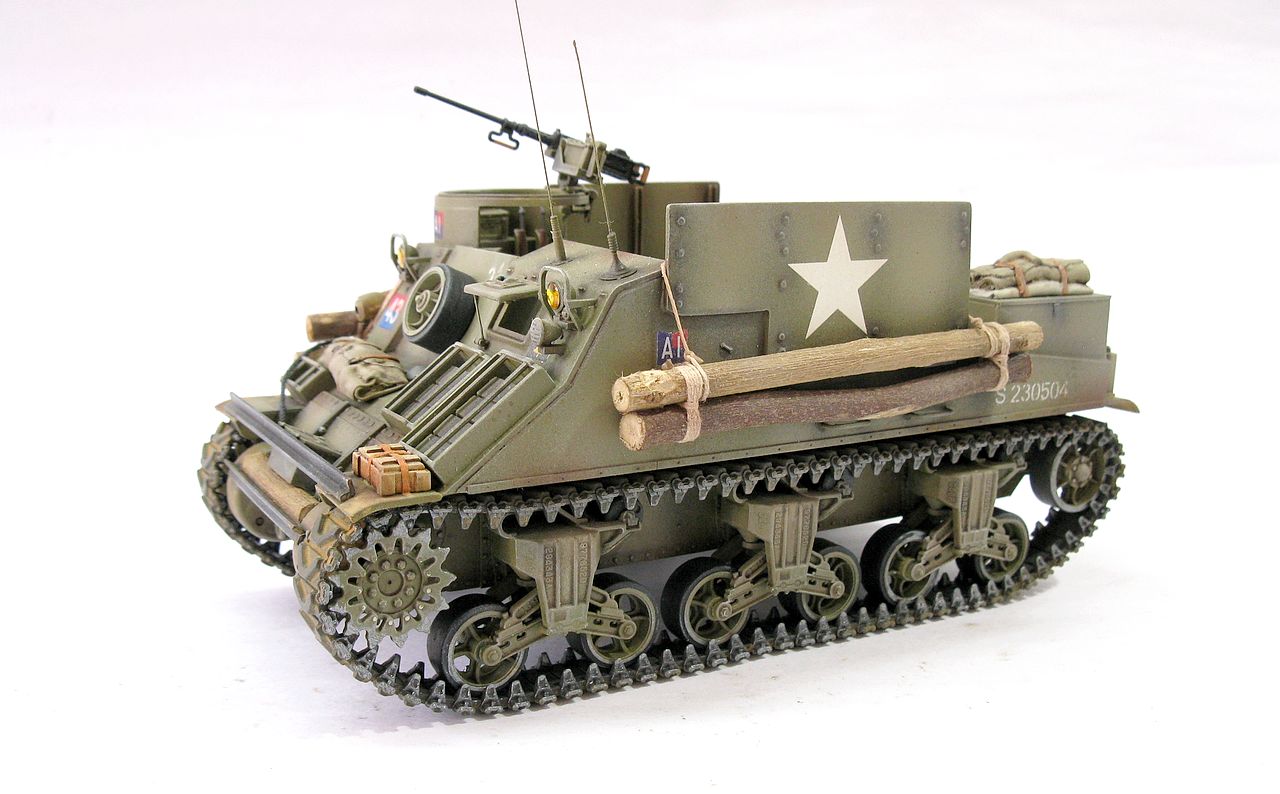
Well, after weathering and painting and bonding accessories, Kangaroo looks like this:
 |
| The wood logs are pomegranate tree branches. The purpose of these logs was to assist the vehicle on very soft ground and not additional armor. |
 |
| Right side... |
 |
| 3/4 front view... |
 |
| 3/4 rear view... Notice the radio in the new front armour... |
 |
| The girl with T48 rubber chevron tracks |

 |
| Now, it-s the final... |
And the Canadian girl was born. Meet the Kangaroo "defrocked Priest" APC with colors of number 1 of the 1st Battery, Able Troop, 13th Field regiment (RCA) from 3rd. Canadian Infantry Division, in August, 8th, 1944, in duties with Operation Totalize.
 |
| Kangaroo APC "defrocked Priest" - vehicle number 1 of the 1st Battery, Able Troop, 13th Field regiment (RCA) 3rd. Canadian Infantry Division, in August, 8th, 1944 - France - Operation Totalize. |


 |
| Interior view - right side |
 |
| Interior view - front |
 |
| Interior view - left side |
 |
| Interior view - bird view |


 |
| Kangaroo APC defrocked Priest with Kojak and Rover, the dog. |

 |
| Kojak is a very lucky guy... |
 |
| Two Canadians girls: Kangaroo APC and Skink AA tank |
 |
| Kangaroo APC "defrocked Priest" - vehicle number 1 of the 1st Battery, Able Troop, 13th Field regiment (RCA) 3rd. Canadian Infantry Division, August, 8th, 1944 - France - Operation Totalize. |
Thank you for following this project, fellas!!
Mais um excelente trabalho, sempre acompanhando. Sempre aprendendo. Marcos Garcia
ResponderExcluirMuito obrigado Marcos Garcia!! Um grande abraço!!
Excluir