Gentlemen...
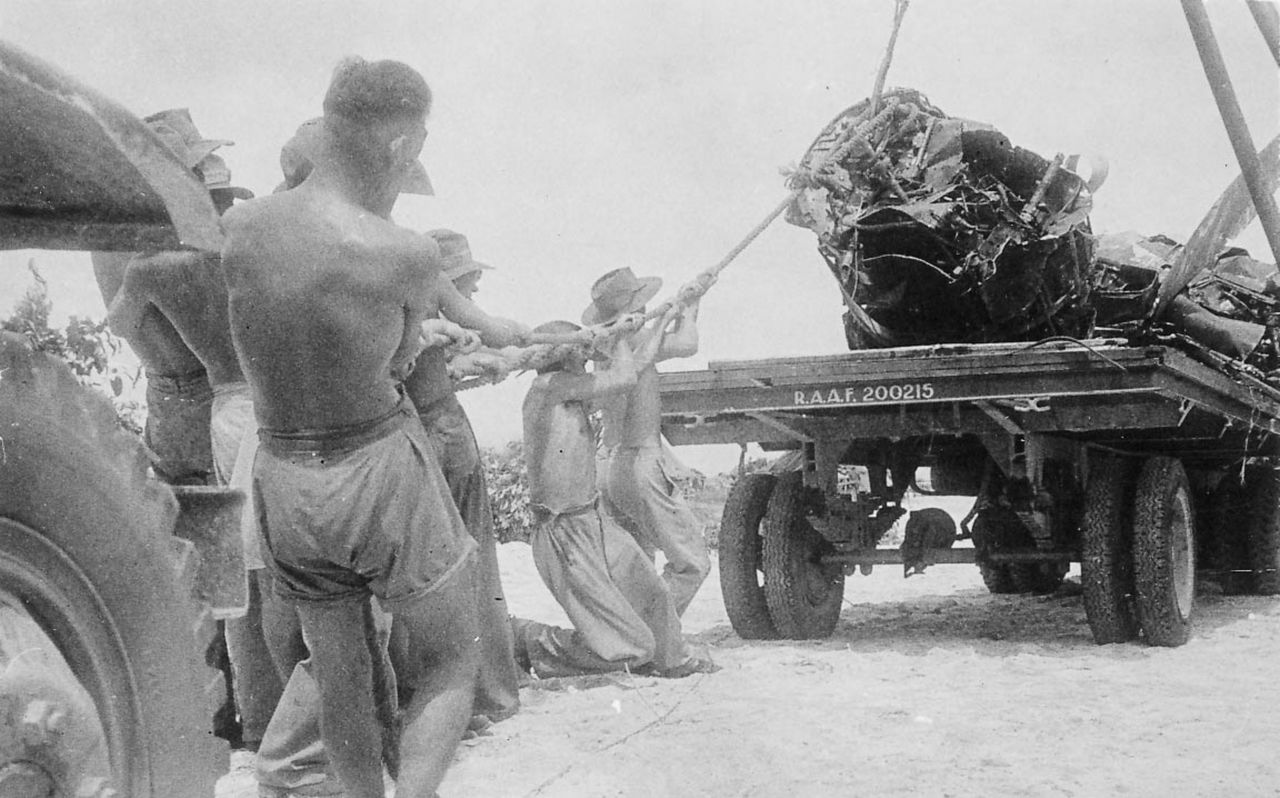
In my travels around the Internet, I stumbled on this picture a few years ago:
You know I like rare and real vehicles, but the big problem for the making of this project was the truck and the plane: The truck, the nonexistence in kits market a Chevrolet truck in this model (the Tamiya model is another type of cabin and it is open..). The other problem was to find a Beaufighter in the correct scale. There is no this plane in 1/35scale, but in 1/32 scale. And even with this discrepancy, the model is rare to find and buy.
But last month I discovered a Beaufighter ( Revell #4660) partially built but in good conditions and cheap to buy.
 |
| Bristol Beaufighter 1/32 Revell kit (#4660) |
Bingo... Now,I started my hunt for the cabin...
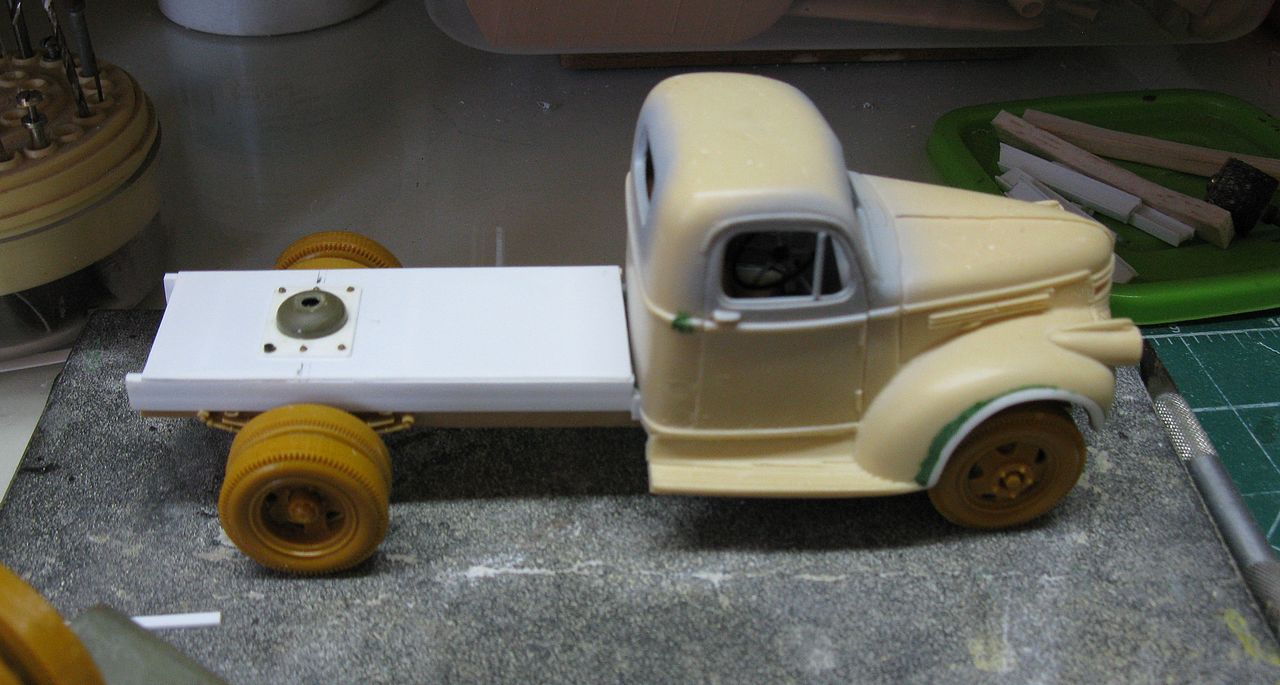
I and my friend Fábio we had mastered a Chevrolet cabin type Holden years ago and thanks to the Gods, Fabio was still the master. The cabin is in 1/32 scale . After make a new silicone form, the Chevrolet cabin reborn for this project.
 |
| Fabio´s 1/32 Chevrolet resin Holden cabin |
Hurrah !!
Let´s start another weird but fun project !!! First of all, improve the actual photo:
 |
Chevrolet Holden cabin 1942 carrying a beaufighter in
an improvised trailer |
History:
The civilian Chevrolet trucks imported into Australia in the late 1930's came from General Motor's Canada factories. As Canada was/is part of the Commonwealth, imports from Canada did not have same level of import duties applied as did imports from the U.S. Thus, GM could compete on price better with Canadian-built products, than American ones.
 |
| Chevrolet 1941 long wheelbase finely restored |
All civilian car & truck production ceased in February 1942 in America, by Government order, as the car factories were turned over to military truck and tank production. Thus, civilian trucks were not produced in 1942.
All trucks produced in 1942 were military trucks. Starting in late 1943, some civilian truck production resumed on a small scale, to supply those civilians who were on a "priority" list, and who were engaged in vital war support work, such as food production.
 |
Chevrolet long wheelbase (160')
from American 1941 catalog |
The "Lend-Lease" Act was passed in early 1941, which Act enabled the Americans to boost supplies of trucks to Allies, without the Allies having to find the money immediately to pay for them.
The trucks and other American military equipment were effectively "lent" to the Allies for the duration of the War.
Accordingly, these 1930's Chev trucks were known as "Maple Leaf" Chevs (the Maple Leaf being the well-known Canadian symbol).
 |
| A Chevy Maple Leaf 1941...sturdy girl! |
These trucks would have been ordered by the Government for War service, and the majority of the drivetrain came from GM Canadian factories in crates, and the trucks were assembled here, with the bodies being built by GMH in the Holden factories.
Project:
The greatest difficulty was to get references and historical material to try to turn this single photo on a model kit as faithful as possible to reality. Achieving cross-references to the topic was one of the most difficult jobs in the history of my Bunker. But I could identify the Beaufighter Squadron, the truck and its colors, as well as some details of the trailers and cradles where these planes were transported.
 |
| An Aussie Beaufighter after a belly landing... |
 |
| Beaufighter cutaway |
 |
| Chevrolet 4408 platform truck - USA version |
 |
| The main protagonists and their colors and markings... |
 |
Another crashed Beaufighter being placed in a carry-cot trailer
(not the same of our project) |
 |
| Notice the different shape of cradle |
 |
Different trucks and trailers. Notice
the headlights in poles for night jobs... |
 |
Rear vision of a very similar trailer of our picture of project.
The trailers were not standardized... |
Well, after that, lets drawing a profile, for guidance and orientation:
Notice the Beaufighter tail disassembled. The absence of the tail is evidenced by shadow in the real photo. The engines were also removed.
The Model kit:
As I said before, the entire project is based on the resin cabin type Holden, casted in polyester. See below some corrections in the front fenders:
 |
Left: increasing the front fenders...
right: standard cabin |
 |
| Making the chassis: using a Ford ICM scrap: 160' wheelbase |
 |
| Improving the cabin... |
 |
| Putty... |
 |
| ...and dental acrylic for strengthen the junctions. |
 |
| Before and after... |
 |
| Interior made with spare parts... |
 |
| Chassis and wheels |
 |
| The cabin's interior painted. Ready to close... |
 |
| Testing the concept ... |
 |
| The Chevrolet truck as tractor... |
 |
| Testing the concept, again... |
And now, starting the trailer...
 |
| Sculpting plastic as wood ... |
 |
| The cargo bed... |
 |
| Testing..testing... |
 |
| The chassis of the trailer...hmmm...something wrong.... |
 |
The front part of the trailer chassil will be cut.(red arrows)
This is based on the image of the original photo ... |
The trailer in its final version.Notice the alignment of the rear springs to the frame
 |
| Dry-fit to align the springs with chassis... |
 |
| side view... |
 |
| The supports for the semi-elliptic springs of the trailer. |
 |
| Testing the tractor and trailer |
 |
| The spare wheel in the trailer...testing... |
 |
| The trailer with details... |
 |
| Trailer axle |
 |
| The Chevrolet truck and trailer. |
 |
| Testing the articulation of the trailer |
 |
| Turning... |
 |
| 90°: articulation total... |
 |
| Test-drive |
 |
| The Chevy belly... |
 |
| The truck is almost there... |
And now, let's scratch the Beau's cradle: I love the Plastruct !!!
 |
| The structure of main cradle...(it lacks some details ...) |
The cradle in the cargo bed...Notice the awful vinyl tires from my spare parts box. Finally they will serve for something !!!
 |
| Cradle in position |
 |
| With the baby in the cradle...Wow !!! |
 |
| I cut of the tail of the Beaufighter... |
 |
| Chuck approves!!! |
And the madness continues...The Revell kit is very old and the panel lines of the plane are in raised lines. Hell .. I'll have to re-scribing all panel lines.
 |
| Re-scribing the panel lines... |
 |
| Adding details with scribing lines.... the kit is awful!!! |
And the interior should also be built ... No details ... And as this girl is tailless, will be possible to see the entire fuselage through behind ... Almost like in a video-colonoscopy !!!
 |
| And the interior being cleaned and prepared ... |
 |
| Other side... |
Now, la pièce de résistance!!! Turn the engine front cowling on the rounded part of the engine cradle base.
The first time that I saw this picture, I thought the fighter was still with the engines.
 |
| No engines... |
But only after I noticed the engines, the side and front cowlings, as well as the cooling flaps had been removed, leaving only the domed portion of rounded portion of the engine cradle.
 |
| Notice the details... |
The (awful) kit no had these details in the front of nacelles, so, let's try to reproduce some parts. Now, la pièce de résistance: Turn the engine's front cowling on the rounded part of the engine cradle base. First of all, let's cut the front part of the nacelle. (the part that was clothed in the kit by the cooling flaps)
 |
Part of the nacelle to be removed...
Dremmel and steel saw (BEWARE THE FINGERS) |
 |
First surgery done. Notice the
plastic plates for the new nacelles. |
 |
| Next step: cut the front cowlings... |
 |
| Done... |
Now, it's time to scratch the two rings for the bristol engines... Rings with seven holes...
 |
Lord of the rings !!! Two plasticards
for the rings!!! |
 |
| Dremel and dental drills...an amazing team... |
 |
| Final touches!! |
 |
| In place... |
 |
| Front view... |
 |
| Dipping the plastic discs in the nacelles. |
 |
| Done !!! |
 |
| It's almost ready... |
 |
| Waiting for the putty dry ... |
 |
| Starting scribing lines in the fuselage... |
Because the aft portion of the fuselage will be open, I decided to outline the details of the interior. Nothing very refined, because when the fuselage is ready and closed, very little will be visible. Sorry rivet counters, but life is short and should be lived to its fullest !!!
 |
Starting the interior...Only details outlined...
Left side |
 |
| Right side |
An obvious feature is the column that controls the rudder. As the oxygen cylinders in the aft portion of fuselage.
 |
| Column of rudder controls. |
 |
| Side panels, navigator seat (turneable...) and other little details... |
 |
| Painting with zinc chromate. |
 |
| Panels and instruments... |
 |
| column rudder controls and oxygen cylinders... |
 |
| Main cockpit... |
 |
| Navigator station |
 |
| Cockpit.. |
 |
| Pilot seat with belts |
 |
| and navigator seat... |
Fuselage glued and tons of putty...
 |
| Putty sanded...Notice the engine cradles... |
 |
| Something like this (blue arrows) |
 |
| Almost there... |
 |
| Returning to Chevrolet... |
 |
The Beaufighter in position.
Notice the undercarriage in the nacelles... |
The Beaufighter performs a belly landing, with landing retracted trains. In the real photo, the landing gears appear inside the nacelles and without guard doors.
 |
| Landing gears inside the nacelles and without guard doors.(see blue arrows) |
Now, a tense step: The real plane shows the absence of the right side panel of the cockpit. How I want to approach me as possible to the real, I must to cut this panel. Delicate surgery with Dremel's circular saw. No margin of error ...
 |
| Cockpit without the side panel... |
Notice that I want to reproduce the fact but not the scene... The upper portion of the cockpit could be represented open (as pictured) or closed, but the side panel does not exist. It must have been lost in the forced landing. The upper portion of the cockpit remains closed ...When the mechanic got off the plane, he closed the hatch ...
 |
| In position... |
 |
| Transparencies are glued and masked to receive painting |
 |
| Protecting the cockpit with paper-tape (internal) |
 |
| Landing gears inside the nacelles and without guard doors. |
Colors!! Something like this:
 |
| 31st Squadron - Royal Aussie Air Force |
Last weekend, I received in my house Danilo Silva, a new friend modeler who came personally to visit this young lady under construction. And Danilo watching the real picture, he thinks that the horizontal stabilizer of the plane (disassembled) could be being transported in parallel with the fuselage, in the rear portion of the trailer. His opinion seems logical ... Let's embrace it !!! Something like this:
 |
| The horizontal stabilizer in the fuselage's side... |
 |
| Something like this...Thanks, Danilo!!! |
Let's painting the horizontal stbilizers..
 |
| In the cradle... |
 |
| Testing..testing.. |
 |
| Future to prevent silvering in the decals... |
 |
| Bristol Beaufighter Mk IC - Royal Australian Air Force - 31st Squadron |
 |
| Chevrolet 4408 tractor |
 |
| Registration number |
 |
| Done!! |
 |
| The trailer's bed cargo... |
 |
| The cradle... |
 |
| Testing...testing... |
 |
| Trailer rear... |
 |
| Beaufighter glued in the cradle...Testing the positioning ... |
 |
| Testing the stabilizers in the trailer |
 |
| Almost... |
 |
| Hydraulic lines and wiring in the engine nacelles - left |
 |
| ...and right ! |
And continuing the built... The real picture does not show, but a logical thing to do with delicate items such as stabilizers would support them with spare tires. And even use two of them to not occur friction between the stabilizer and the fuselage.
 |
| Notice the spare tires used as cushions |
 |
Tires in closed vision...
Developments on Danilo's idea... |
 |
| Testing...testing... |
 |
| Stabilizer in place... |
 |
| Tying the stabilizers and mounting the antenna wire ... |
 |
| Rear view. Notice the brake light in the trailer |
 |
| Top view |
Updating the profiles of the project:
 |
| Side view |
 |
| Colors |
The truck, now...
 |
| Weathering the tractor... |
 |
| Notice the Value Gear folded tarps in the back of the cabin. |
 |
| Notice tail lights... |
Time to make the connection between the air tanks and pneumatic trailer brakes. On the tractor, the air tank has a hole ...
 |
| The air tank with his hole (red arrow)... |
 |
| And the air hose in the trailer... |
 |
| Air connection between the tractor and the trailer |
 |
| 99% done !!! |
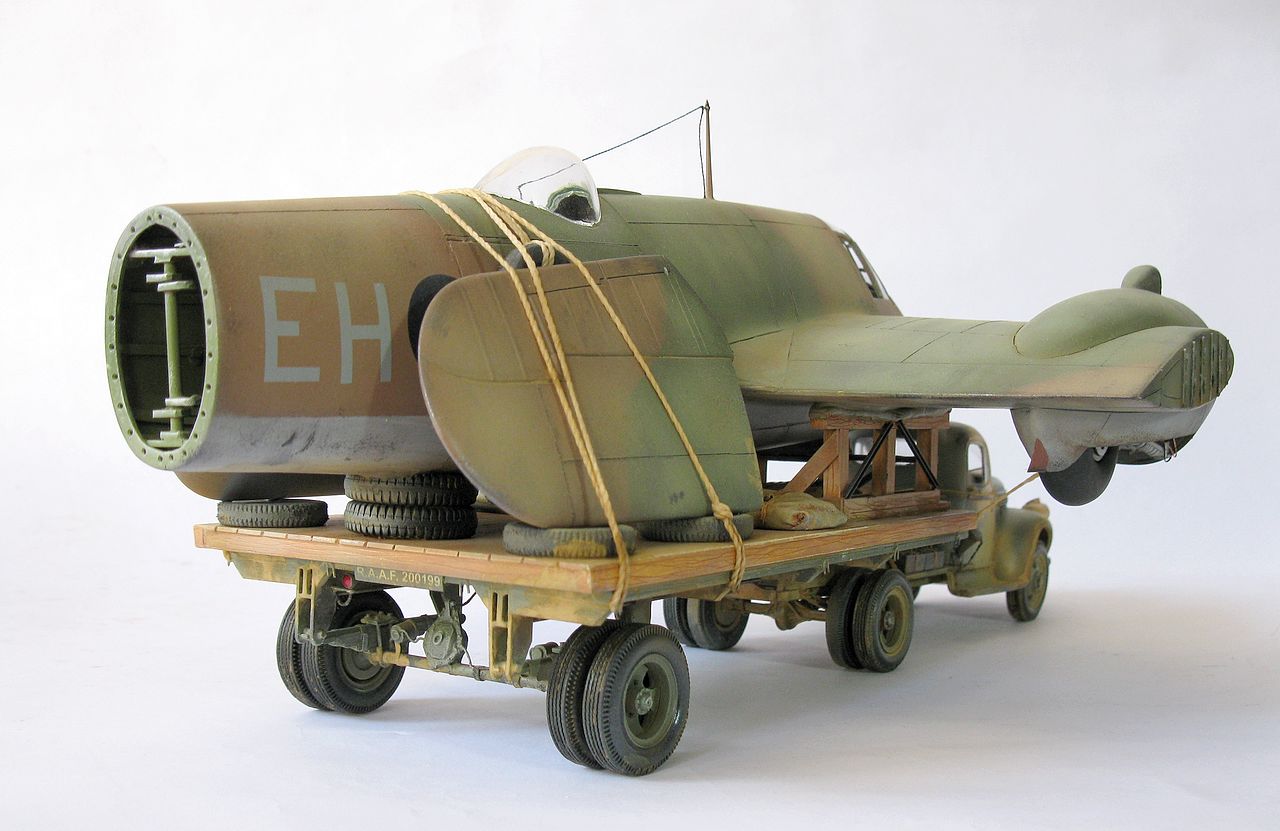
And the Aussie girls were done: Australian Chevrolet 4408 - Holden cab 1942 modified as aircraft carrier with damaged (after belly landing) and partially disassembled Bristol Beaufighter Mk IC from 31st RAAF Squadron, Australia, 1943.
 |
Chevrolet 4408 - Holden cab 1942 with Bristol Beaufighter Mk IC
from 31st RAAF Squadron - left side |
 |
Chevrolet 4408 - Holden cab 1942 with Bristol Beaufighter Mk IC
from 31st RAAF Squadron - right side |
 |
Chevrolet 4408 - Holden cab 1942 with Bristol Beaufighter Mk IC
from 31st RAAF Squadron - rear view |
 |
Chevrolet 4408 - Holden cab 1942 with Bristol Beaufighter Mk IC
from 31st RAAF Squadron with Kojak and Rover, the dog. |
 |
Chevrolet 4408 - Holden cab 1942 with Bristol Beaufighter Mk IC
from 31st RAAF Squadron with Sherman M4, for size comparison |
 |
| Chevrolet 4408 with Sherman M4, for size comparison |
 |
Chevrolet 4408 - Holden cab 1942 with Bristol Beaufighter Mk IC
from 31st RAAF Squadron - Australia, 1943. |
The real and the kit.
 |
| The real... |
 |
| ...and the Panzerserra's model kits. |
The objective of this project was not to reproduce the photo, but the rescue action of the fighter aircraft. I think I came close ... take me long time to be able to realize this plan, but I think it was worth it; The girls were pretty in my collection.
I hope you enjoyed it ... I had so much fun!!!
Aussie, Aussie, Aussie... Oy, oy, oy !!!