Soldaten!!!
Today we're going to talk about a silent hero, who very quietly and almost anonymously contributed to Germany's logistics efforts in a decisive way throughout WWII. This brave and tireless worker is the Einheitsanhänger 5t Baumuster E5, the standard trailer 5 ton., model E5.
History:
The Einheitsanhänger 5t Baumuster E5 (standard trailer 5 ton, model E5) was the military standard medium 2 axle trailer of the Germany throughout the WWII.
The chassis is welded from steel profiles, the floor is made of wood and the structure is made of wood and profiles. The front wall is fixed, the side and rear walls can be folded down. The maximum permissible speed of the trailer is 80 km/h. A spare wheel on the trailer floor can be lowered or picked up with a hand spindle without much work.
 |
| 3 ton trucks pulling trailers Einheitsanhänger 5t Baumuster E5 loaded with furniture and boxes. These trailers were extremely versatile. Russian front - 1943 |
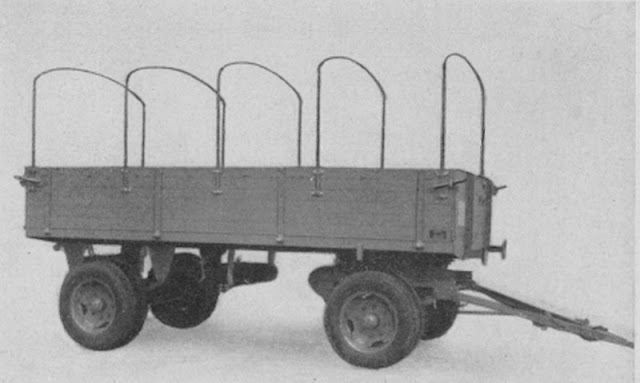
The trailer featured a payload of the 5.000 kg, with a dead weight of 2.275 kg. The cargo platform measured 4.5 meters in length and 2.1 meters in width. The sides were 60 cm tall, which could be opened by means of hinges on the sides and at the rear (the front portion was fixed). On the side walls of the trailer's cargo area, 5 metal arches could be mounted, for the installation of a canvas cover to protect the load.
 |
The simple and robust lines of the Einheitsanhänger 5t Baumuster E5 Notice the rear coupling system |
 |
| Einheitsanhänger 5t Baumuster E5 with the metal arches installed in the side wall supports. |
 |
| ...and with the canvas installed over the arches. |
The trailer was very maneuverable, thanks to the robust front axle steering system. The trailer was pulled by means of an A-frame installed in this system. The coupling system provided the movement for activating the trailer's brakes in the four double wheels. The brake system is a single-line, single-circuit compressed air brake and acts on all 4 wheels. The air reservoir was installed at the rear of the front axle steering system.
 |
| The steerable front axle of the trailer with leaf spring suspension, A-frame towbar and air reservoir. |
The rear axle was very simple, with robust semi-elliptical springs and double wheels. There were no shock absorbers.
On the platform cargo water tanks, weapons and devices could be installed. Particularly well studied, the trailer had a coupling system fixed to the rear spar which allowed it to be coupled to another trailer, forming a composition.
 |
| Two trailers Einheitsanhänger 5t Baumuster E5 covered with tarpaulin coupled together in a composition, pulled by a truck. |
For its simplicity, robustness and reliability, the trailer could be found on all the fronts where the Germans fought, throughout WWII.
 |
| A trailer Einheitsanhänger 5t Baumuster E5 stuck up to its axles in the fearsome Rasputitsa mud. Vehicles were pushed to their limits in these conditions. Russian Front. |
It was tough enough to transport many kinds of cargo, including fuel and munitions. It was used by several branches of the German army, including the Wermacht, Luftwaffe, Kriegsmarine, Organisation Todt, and others.
In the end, after the conflict ended, many of the surviving trailers were used for civilian purposes in the task of rebuilding war-torn Germany.
Specs:
| Einheitsanhänger 5 t Baumuster E 5 | |
|---|---|
| Type | standard medium 5 ton. trailer |
| Place of origin Used by | Nazi Germany Wermacht Luftwaffe, Kriegsmarine, Organisation Todt |
| Service history | |
| Wars | WWII and after |
| Specifications | |
| Empty weight Payload | 2.275 - 2.600Kg 5.000Kg |
| Length (trailer) | 6.405mm |
| Width (trailer) | 2.295mm |
| Height (trailer) Length (cargo area) Width (cargo area) Height (cargo area) Wheelbase Wheel track | 1.750mm 4.500mm 2.100mm 600mm 2.940mm 1.735mm (front &rear) |
| Axes Maneuverability | 2 (double wheels) Steerable front axle |
| Suspension Towing system Brakes Max. speed | Leaf springs Frontal A-frame Pneumatic (4 wheels) 80 Km/h. |
Kit:
As I already reported in the article about the Mercedes Benz L4500A AA truck, this trailer was ordered to work togheter with the German armored anti-aircraft truck. The kit chosen was the excellent Das Werke Einheitsanhänger 5t (#DW-35006).
 |
| Kojak with Mercedes Benz L4500A AA truck and Einheitsanhänger 5t trailer |
 |
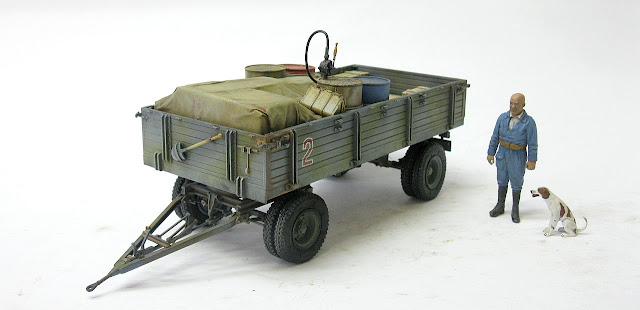
| Kojak ( and Rover, the dog...) with the trailer... |
Well, let's, as always, start at the beginning: according to Das Werke's very well done instruction booklet, the first step is the tyres. They are made of injected styrene plastic (Hurrah!!), but with a lot of burrs and injection defects (Boooo!!). These delicate parts are extremely annoying to clean, but it is something that must be carried out with great care, as the presence of any irregularity compromises the final result of the piece.
 |
| Tire slices and their defects... Man, cleaning these defects is very boring... |
 |
| A close-up view... |
 |
| The steerable device is very well injected. All parts fit perfectly. Notice the delicacy of the A-frame tow bar. |
 |
| The steerable front axle assembly is almost ready. |
 |
| Now yes, totally ready!! right view |
 |
| Steerable front axle ready. left view |
The booklet now has the rear leaf springs built on the corresponding axle. But the possibility of misalignment is very high if we do it at this stage, without any reference. I chose to build the loading platform, in order to have the spring supports in position so that we could use these structures as aligners for the suspension springs.
 |
| The loading platform and rear axle... The burrs on the semi-elliptical springs have not yet been removed (red arrows) |
 |
| The loading platform with the spring supports glued in position (right). Notice the steerable device (left) and the crank for the spare wheel (mid) |
 |
| Now I can install the springs and the rear axle, without the danger of making a mistake... Notice the rear coupling system. |
 |
| A belly view of the trailer, almost complete... |
 |
| The kit is excellent...Everything fits perfectly and easily (with the exception of the tire slices...which really sucks to build...) |
 |
| Checking the alignment of the suspensions... Everything perfect!!! |
 |
| Installing trailer sidewalls... right view |
 |
| Installing trailer sidewalls... left view |
For the sake of aesthetics, I decided to paint the trailer in the panzer-gray late pattern, that is, with green stripes applied over the common panzer-grey. A nice contrast to the truck's striped yellow camouflage pattern. It was a common procedure among the Germans not to worry too much about camouflaging "second line" vehicles, if we can put it that way. These vehicles were usually kept in the factory colors, and in our case, the soldiers striped them with green, for conscience sake...
 |
| Applying panzer-gray as a base color. Don't be scared by the bluish aspect... this will be reduced with the following steps... Notice the truck with white primer in the background. |
Oops...I almost forgot about the Panzerserra Color & Marking Guide. As this girl will be pulled by the Mercedes Benz L4500A AA truck of the 12 SS Panzer Division, nothing more normal than the trailer having the same marks of this brave Panzer Division.
 |
| Panzerserra Color & Marking Guide |
 |
| Applying tonal variations over panzer-gray left view |
 |
| Tonal variations over panzer-gray right view |
 |
| Testing the movement of the front axle... All ok!! A good trick: apply graphite powder to surface in contact with your fingertip... |
 |
| Painting and installing the wheels in their respective locations Notice the bulging position of the tires and the green stripes painted over panzer-gray. |
 |
| Testing...testing... |
 |
| Sooooo cute!! Panzer-gray late cammo!! left view |
 |
| Trailer almost ready... Perfect ground alignment... right view |
But an empty trailer is like pizza without mozzarella... totally bland and heretic!!
 |
| Heresy!! |
So... let's fill this girl with some junk!!! The first thing that comes to mind is of course: FUEL DRUMS!!! And the AFV Club comes to the rescue with its German fuel drum kit (#AF35266 ).
 |
| Fuel!!! The spring of society!!! |
 |
| And, of course, the Value Gear details cannot be left out of this load!!! Ammo crates!!! Testing placement... |
But our girl has a capacity of 5 tons... So, let's put more stuff inside this trailer: how about a load covered by tarpaulin??!! Panzerserra technique of sculpted styrofoam covered with tracing-paper wetted with water + PVA glue. First, the cargo...
 |
| Sculpted styrofoam as cargo... Testing volume and placement... |
 |
| Making the canvas with tracing-paper dipped in PVA glue diluted in water... Easy, fast, light and convincing... |
 |
| The tracing-paper (canvas) after drying, painted with Khaki color and its tones... left view |
 |
| The tracing-paper (canvas) after drying, painted with Khaki color and its tones... right view |
 |
| And the load, placed all together, inside the trailer... |
Really, everything was ok and historically correct... even militarily speaking, everything was very cohesive... But as we are building scale models, the whole thing became very boring... the color tones overlap, in a tremendous monotony ...
 |
| Boooooring!! |
I immediately thought of gasoline drums "requested" in France...something a little more colorful, to "up" the look of the composition. And Miniart has a kit like that on the market!!! But the Devil is that it's easier to find an honest politician who finds a kit like that available out there....
 |
| Miniart accessory kit French Petrol Station (#35616). |
Man, I was already imagining these civil drums in red and blue, with the French brand AZUR on the sides, breaking the aesthetic monotony of my trailer and, unfortunately... not accessible, at least for now...
But, as the ancients said: "All roads lead to Rome!" So... let's recreate the MiniArt kit, because what really interests me are the fuel drums. And these drums are sold in the American kit, which I have.
 |
| I have this kit in my closet...I need two fuel drums... but not the decals...yet!!! |
All that's missing is the AZUR markings for everything to work out... and the decals I'll make on my laser printer.
 |
| After making the graphic art in Corel Draw, print some samples... I liked some and others, no... I'm going to use some of the ones I approved!!! |
 |
| And here are two drums: American in origin but French in their final aspect.... |
 |
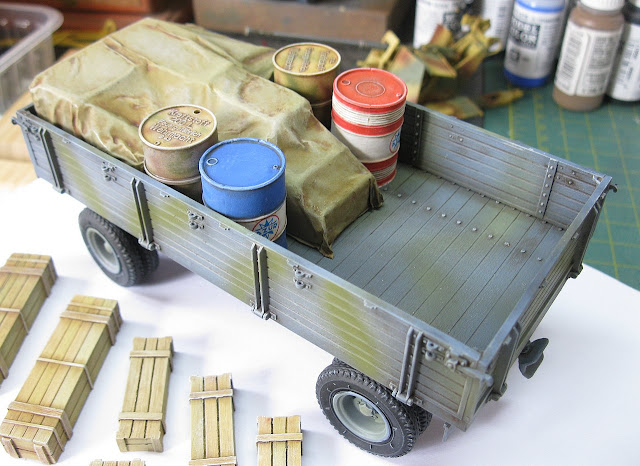
| And the fuel drums ready for transport... The Germans AFV Club and French MiniArt drums. Notice the cammo painted on German drums... |
 |
| And to complete the team, Value Gear stuff!!! |
 |
| At least it wasn't so monotonous... And most importantly: Historically accurate!!! |
 |
| Building the hand pump and fuel hose... |
 |
| Final result of inserting the detail... Notice that I already applied the decals... |
 |
| The copper wire skeleton allows me to position the hose over the load, simulating its weight and the action of gravity. Modeling is also Physics!!! |
 |
| The fuel pump gave a really charming detail to the whole thing!!! |
 |
| The load became more colorful, without being exaggerated... Aesthetics is something to be sought and improved... |
 |
| I liked the end result!! |
And a preview of the end of the project:
 |
| The Mercedes and the trailer, side by side... Tião Macalé is happy!!! |
And after a light dirt treatment, I call this girl ready!! Behold the Einheitsanhänger 5t Baumuster E5 (standard trailer 5 ton. model E5) number 2, providing services with SS FlaK Abteilung 12, in the 12. SS-Panzer-Division Hitlerjugend, in the critical times of the Overlord Operation, Normandy, France, in June 1944.
 |
| Einheitsanhänger 5t Baumuster E5 (no.2) (standard trailer 5 ton. model E5) SS FlaK Abteilung 12 - 12. SS-Panzer-Division Hitlerjugend Normandy, France - June 1944. |
 |
| Einheitsanhänger 5t Baumuster E5 left view |
 |
| Einheitsanhänger 5t Baumuster E5 rear left view |
 |
| Einheitsanhänger 5t Baumuster E5 up left view |
 |
| Einheitsanhänger 5t Baumuster E5 up right view |
 |
| Einheitsanhänger 5t Baumuster E5 up rear view |
 |
| Einheitsanhänger 5t Baumuster E5 right view |
 |
| Einheitsanhänger 5t Baumuster E5 front right view |
 |
| Mercedes Benz L4500A Schwere Geländegängiger Lastkraftwagen als Flakwagen für 3.7cm FlaK 36/37 and Einheitsanhänger 5t Baumuster E5 |
 |
| Mercedes Benz L4500A Schwere Geländegängiger Lastkraftwagen als Flakwagen für 3.7cm FlaK 36/37 towing the Einheitsanhänger 5t Baumuster E5 |
 |
| Mercedes Benz L4500A Schwere Geländegängiger Lastkraftwagen als Flakwagen für 3.7cm FlaK 36/37 towing the Einheitsanhänger 5t Baumuster E5 with Kojak and Rover, the dog. |
 |
| Einheitsanhänger 5t Baumuster E5 with Kojak and Rover, the dog. |
 |
| Einheitsanhänger 5t Baumuster E5 (no.2) (standard trailer 5 ton. model E5) SS FlaK Abteilung 12 - 12. SS-Panzer-Division Hitlerjugend Normandy, France - June 1944. |
Thank you for following all the steps!!!
See you soon!!


