
Achtung, Soldaten!!!
The objective of this report is to show you another product of German ingenuity: the Maultier trucks. Let's get to know the least famous and least numerous among them, but without a doubt, the most robust and beloved by soldiers, in its class: Let's talk about the Klöckner-Humboldt-Deutz KHD S3000/SSM Maultier (Sd.Kfz 3c)
 |
| Expectations and reality... A soldier with his KHD S3000/SSM Maultier Sd.Kfz 3c |
History of the vehicle
One of the characteristics of the Second World War was the mobility of the armies involved, compared to the First World War. Most nations involved in the conflict since the outbreak of hostilities had a large number of vehicles to support their armies on the move. And Nazi Germany stood out among all in this regard. The vast majority of trucks employed by the Germans were 3-ton rear-wheel drive vehicles (generally designated as S models) and 4x4 trucks were designated as A models.
An example of these trucks was the KHD S3000, produced since 1940 at the Klöckner-Humboldt-Deutz factory in Ulm. This truck was a 4x2 like most of its Opel and Ford siblings, but featured a robust Deutz 4-cylinder diesel engine, which was quite strong and economical, and was very popular with soldiers.
 |
| Klöckner-Humboldt-Deutz KHD S3000 Wermacht 4x2 truck |
The KHD S3000 4x2 trucks were widely used by all German arms until the end of the war, in all Theaters of Operations: North Africa, Russian front, in Italy, France, until the defeat in Berlin.
During 1941 German Army discovered that their wheeled transport vehicles were unsuitable for the muddy rasputitsa conditions that marked the beginning and the end of the Russian winter. Only halftracks like Sd.Kfz 250 and Sd.Kfz 251 were able to operate in these conditions, but removing them from their operational purposes for supply duties would have been unworkable.
 |
| Sd.Kfz 250 Ausf. A |
 |
| Sd.Kfz 251 Ausf. B |
Instead, Germany began to build half-tracked versions of their 3 ton trucks Opel, Ford, Klöckner-Humboldt-Deutz and 4,5 ton truck Mercedes-Benz by removing their rear wheeled axles and replacing it with a sub-chassis with tracked suspension, adapted to the normal "wheeled" chassis.
In the case of 3-ton trucks (Opel, Ford and KHD), this sub-chassis featured in its anterior portion the adaptation of the truck's original differential with sprockets adapted to the brake drums of the original wheels (to allow the service brakes to be maintained), suspension bogies copied from the British Horstmann type suspensions, used by Universal Carriers and a idler wheel at the rear. The front axle was connected to the normal gearbox using a very shortened card axle, minimizing adaptation and production costs. The vehicle used tracks from the (now discontinued) Panzer I light tanks, which made logistics and maintenance even easier. These 3 ton trucks with rear tracked undercarriage were officially designated Lkw 3t' mit Gleiskette SSM Maultier (Mule) in the German army, with the designations Sd.Kfz. 3a (Opel), Sd.Kfz. 3b (Ford) and Sd.Kfz. 3c (KHD).
 |
| Opel Maultier S3000/SSM - Sd.Kfz 3a |
 |
| Ford Maultier V3000/SSM Sd.Kfz 3b |
 |
| KHD S3000/SSM Maultier Sd.Kfz 3c |
The Mercedes-Benz 4,5 ton trucks they used a more robust suspension (with wheels and tracks), derived from the Panzer II, with the designation Mercedes-Benz L4500 R Maultier - Sd.Kfz. 3/5 or Sd.Kfz. 4.
 |
| Mercedes-Benz L4500 R Maultier - Sd.Kfz. 3/5 |
They were extremely useful in extreme terrain conditions, both due to irregularity and quality. During these periods, the logistical issue almost collapsed, as single-traction trucks and even 4x4 or 6x6 trucks struggled just to move, making it almost impossible to transport supplies and goods to the armies. The Maultiers moved slowly, with the top speed was around 35 kilometers per hour. In order to preserve and save the rear drives, the drivers usually drove even slower.
Klöckner-Humboldt-Deutz built somewhere between 1,740 and 2,500 haltracks vehicles (sources are not exact as to the number), using the normal 4x2 KHD S3000S truck as the basis for this conversion. All KHD Maultier were produced between 1942 and 1944, under the designation Klöckner-Humboldt-Deutz KHD S3000/SSM Maultier - Sd.Kfz 3c.
 |
| Propaganda efforts: In order to demonstrate the effectiveness of German armaments, the monthly production figures were publicly demonstrated in the crisis year of 1943. Germany - Ulm. July, 1943. |
 |
| The same vehicle as in the photo above, left side view. Note that the vehicle identification stencil is only present on the left door. |
As is well known, the Klöckner-Humboldt-Deutz has proven itself well with its low-speed, high-torque and insensitive and robust diesel engine.
 |
| A KHD S2000/SSM Maultier stuck somewhere on the Russian front. The Russian mud doesn't even forgive vehicles with tracks... |
 |
| A KHD S2000/SSM Maultier on a desolate Russian road, with a hippomobile vehicle close behind. The photo was taken in the 11th Panzer Division area. Russian Front - winter of 1943-44. |
 |
| A KHD S2000/SSM Maultier troop carrier with its occupants resting. But prudence dictates that at least one person keeps watch. Note the rear suspension running system with solid wheels stamped with holes. |
 |
| A KHD S2000/SSM Maultier troop carriercurled up between bushes, next to a forest. Perhaps the driver wanted to avoid mines on the road, but the ravine option was also problematic. |
 |
| Indeed, it appears that the KHD S2000/SSM Maultier was made in response to the challenges of the Russian Front. Two Germans with their truck, in the freezing winter of the East Front.. |
The KHD S3000/SSM Maultier had a ground clearance of 25 cm. It could wade through waters up to a depth of 70 cm. The five litres four-cylinder diesel engine generated a continuous power of 70 HP. For a short time, a maximum power of 80 HP could be reached.
 |
| Germans at rest - Russian front - 1944. Notice the KHD S2000/SSM Maultier in the foreground of the vehicles. |
Specs

| Klöckner-Humboldt-Deutz KHD S3000/SSM Maultier - SdKfz-3c | |
|---|---|
| Type | Half-track |
| Place of origin | Nazi Germany |
| Service history | |
| In service | 1942 - 1945 |
| Wars | World War II |
| Production history | |
| Designed | 1941 |
| Produced | 1942-1944 |
| No. built | 1.740 to 2.500 (?) |
| Specifications | |
| Curb weight Payload Gross vehicle weight | 6.650 Kg 2.000 Kg 4.650 Kg |
| Length | 6,12 m |
| Width | 2.,22 m |
| Height Ground clearance | 2,80 m front: 25 cm rear: 49 cm |
| Crew | 2 |
| Armor | none |
| Engine Gearbox | 3F4 M513 -4 cyl. diesel - water cooled 4.942 ccm -70 hp @ 2.250 rpm ZF Faks 40 (5+R) |
| Maximum speed Fuel capacity Fuel consumption Range | 36 - 38 km/h 70 liters 3,5 Km/liter 245 Km |
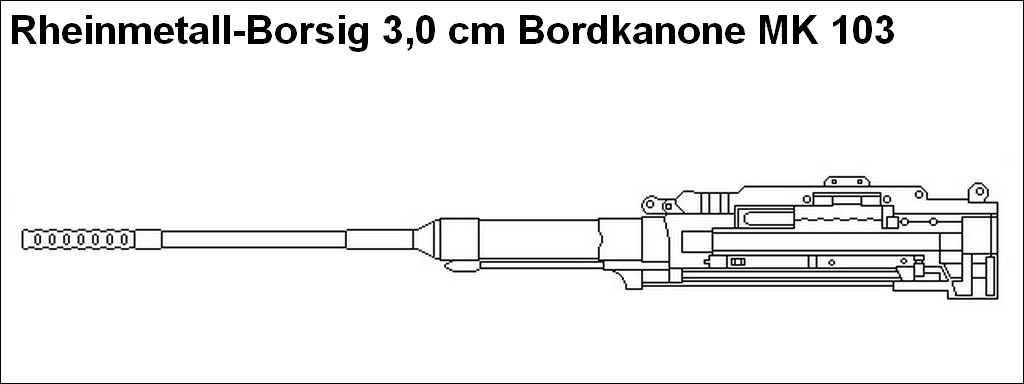
History of the 3,0 cm Rheinmetall-Borsig MK 103 Bordkanone
The Rheinmetall-Borsig MK 103 ("MK" - Maschinenkanone) was a German 30 mm caliber autocannon that was mounted in German combat aircraft during World War II. Intended to be a dual purpose weapon for anti-tank and air-to-air fighting, it was developed from the MK 101. Although, as the name suggests, it was developed to be an aircraft "on-board gun" (Bordkanone), it was also widely used as a light anti-aircraft weapon, thanks to its high muzzle velocity, high rate of fire and accuracy, in addition to being a low weight weapon (due to its aeronautical origin) being easily adapted to different mounts and land vehicles.

Compared to the MK 101, the 3,0 cm Bordkanone MK 103 was faster firing, and was originally intended to develop a higher muzzle velocity than the MK 101. Unlike the MK 101, the MK 103 used a belt feed, allowing it to potentially carry a larger ammunition load.
 |
| Gunsmiths loading the 3,0 cm Bordkanone MK 103 installed in a gondola in the belly of a Henschel Hs 129 from 10.(Pz)/SG 9 (Schlachtgeschwader 9) on the Eastern Front. |
 |
| Sequence from the previous photo: 3,0 cm Bordkanone MK 103 installed in a Henschel Hs 129. |
The MK 103 used electrically primed rather than percussion-primed ammunition. The operating mechanism differed from the recoil-operated MK 101 in that it used a combination of gas and recoil operation. After firing, gas pressure served to unlock the breech, while barrel recoil was used to cycle the action (eject spent cartridge and load a fresh one).
 |
| Right, top and left sides of MK 103 Bordkanone |
 |
| MK 103 with front and rear bearings |
Because of a combination of lower grade steels and lighter components, the mechanism of the MK 103 was not as strong as the MK 101. To counteract this weakness, HE ammunition with a reduced load of propellant was used, resulting in a loss of about 100 m/s in muzzle velocity compared to the MK 101, but the rate of fire was increased. The MK 103 entered service in 1943 as the main armament of the Hs 129 B-2 ground-attack/tank-destroyer aircraft, mounted on the underside of the fuselage in a conformal gun pod.
 |
| Diagram of Henschel Hs129 B-2 with 3,0 cm Bordkanone MK 103 installed in a ventral gun pod |
 |
| Loading the 3.0 cm Bordkanone of the Henschel Hs129 B-2 in the field. |
The original specification for the MK 103 called for it to fit inside an aircraft's engine mounting (possibly as a Motorkanone, firing through a hollow propeller hub), but it proved to be too large and heavy to fit into small fighters like the Bf 109. If mounted elsewhere, such as in the wing, the asymmetric force of the cannon's recoil tended to yaw the aircraft's nose to one side.
The only known usages of the MK 103 in a Motorkanone installation were in the Dornier Do 335 Pfeil and the Focke-Wulf Ta 152 C3 .
 |
Dornier Do 335 A-0 Pfeil diagram Notice the MK 103 gun in red, firing in the centerline, through the propeller shaft |
 |
| Dornier Do 335 A-1 Pfeil color profile |
 |
| Focke-Wulf Ta 152 C3 diagram, showing the fuel tanks and armament. Notice the MK 103 gun, firing in the centerline, through the propeller shaft |
 |
| Focke-Wulf Ta 152 H-1 color profile |
The 3,0 cm MK 103 gun was also tested in the unsuccessful Messerschmitt Me 410 Hornisse heavy fighter, in dual mounting in the nose of the aircraft, but it was not accepted as standard armament.
 |
| Two 3,0 cm MK 103 guns emerging from the belly nose of a Messerschmitt Me 410 B-2 Hornisse |
Projectile weights for the MK 103 3,0 cm guns were 330 g for the HE/M ammunition and 355 g for APCR ammunition. The armour penetration for APCR ammunition was 42 - 52 mm / 60° / 300 m or 75 - 95 mm / 90° / 300 m.

The design of the weapon is quite simple and reliable. But as we saw before, the main disadvantage was the strong shock loads during the operation of automation and excessive recoil, which limited the use of 30 mm guns as part of the armament of single-engine fighters. Production of the MK.103 was carried out from mid-1942 to February 1945, and a significant number of unclaimed 30-mm guns accumulated in the warehouses of the Luftwaffe, which became the reason for their use in anti-aircraft installations, being installed on various stands, bases, land vehicles, boats and ships, using single or quadruple mounts.
 |
| Anti-aircraft gun 3,0 cm Flak 103/38. A compact, robust and low-profile weapon sharing the adapted base of the Flak 2.0/38 |
 |
| 3 cm Bordkanone Mk 103 behelfslafette "Baumaffe" the improvised "tree monkey" stand, made with a tree log and three wooden beams. Never say never!!! |
 |
| Anti-aircraft gun 3,0 cm Flakvierling 103/38 manned by sailors from Kriegsmarine |
 |
| The need for aerial coverage generating field improvisation: 3.0 cm Flak 103/38 in the back of a Steyr 2000A truck |
 |
| Modified from box art from Leadwarrior Resin Kits (#35030) |
Another field adaptation, this time more sophisticated, with the use of a self-propelled gun 38(t) Ausf. M Grille to install a 3,0 cm MK 103 gun. Of course, its use is not anti-aircraft, but to support infantry.
%20auf%20Selbstfahrlafette%2038(t)%20Ausf.%20M%20%20Grille%20-%20Prague%20Uprising%20-%20Wenceslas%20Square%20-%209%20may%201945.jpg) |
| 3 cm MK 103 (Rheinmetall-Borsig) auf Selbstfahrlafette 38(t) Ausf. M Grille Prague Uprising - Wenceslas Square - 5 - 9 May, 1945 |
%20auf%20Selbstfahrlafette%2038(t)%20Ausf.%20M%20%C2%AB%20Grille%203.jpg) |
| The same vehicle as in the photo above, still with the camouflage of tree branches hooked to its side armor. 3 cm MK 103 (Rheinmetall-Borsig) auf Selbstfahrlafette 38(t) Ausf. M Grille Prague Uprising - 5 - May, 1945 |
The 3,0 cm MK 103 Rheinmetall-Borsig gun was also used as main weapon of the strange and futuristic AA prototype tank 3,0 cm Flakpanzer IV Kugelblitz ("ball lightning").
 |
| Flakpanzer IV (3 cm) 'Kugelblitz' Dragon kit (#6889) box art |
Specs
 |
| Thanks a lot, Emanuel Zeke!!! You are the man!! |
| Rheinmetall-Borsig MK 103 kanone | |
|---|---|
| Type | single-barrel automatic cannon |
| Place of origin | Germany |
| Service history | |
| In service | 1943-1945 |
| Used by | German Armed Forces (airborne and land based) |
| Wars | World War II |
| Production history | |
| Manufacturer | Rheinmetall-Borsig |
| Specifications | |
| Mass | 141 kg |
| Length | 2,335 mm |
| Barrel length | 1,338 mm |
| Cartridge | 30x184B |
| Cartridge weight | 800 g HE/M |
| Caliber | 30 mm |
| Action | Gas/Recoil. |
| Rate of fire | 380 (HE/M) to 420 (APCR) rounds/min |
| Muzzle velocity | 860 m/s HE/M 940 m/s APCR |
The kits
My intention is to build a KHD S3000/SSM Maultier with a light anti-aircraft gun in the cargo area, as a field adaptation. The idea would be to locate our vehicle on the German front, in the desperate days of the Spring of 1945, when the Allies dominated the skies and the need for aerial protection was of utmost urgency. The chosen gun is a 3 cm Bordkanone MK 103, mounted on a naval stand and adapted for use on this nice diesel half-track. I made a profile of the project concept:
 |
| The ultimate goal of the project... |
To do this, we will use the following "cake recipe":
 |
| KHD S3000/SS M Maultier - WWII German Semi-Tracked Truck Kit box art from ICM (#35453) |
 |
| 3cm Bordkanone MK 103 Behelfslafette "Baumaffe" oder Standlafette Kit box art from 16.02 Model Kits (#VK35002) |
 |
| Ammo Boxes for the 3cm MK 103 & 3cm Flak 103/38 Kit box art from 16.02 Model Kits (# VK35003) |
 |
| The fearless bald one, with his newest challenge!!! Kojak rules!!! |
 |
| Following the booklet... |
 |
| Gentlemen, start your engines!!!! The diesel powertrain is big! |
 |
| Building the chassis... Man, the squaring is essential here... |
And now, the first frisson: in my kit, one of the jerry-can racks was missing (the left one). The bag with the sprues came sealed and without the part inside. I think the loss was at the time of packaging, at the factory. But there's no point in crying... let's do something from scratch...
 |
| The part G34 is missing!! Lets scratch one!! |
 |
| Plasticard and patience (with a sharp n° 15 scalpel and metal ruler...) |
 |
| Now, we can transport our precious reserve diesel!!! |
 |
| Building the front parts of the truck... |
 |
| And, again, everything is well aligned and squared... |
 |
| Engine in position!!! |
Building the rear suspension structure. Interesting how the Maultiers used the rear wheel as a structural part of the drive sprockets. The use of drum brakes is a touch of genius, when it comes to use and simplicity...
 |
| KHD Maultier chassis. Belly view Notice the front axle and the "rear" axle, connected with gearbox by a short cardan shaft. |
 |
| Drive sprocket being installed on the brake drums, following the markings. One thing that's bothering me are the vinyl tires... too much like a toy.. |
The wheels on the Horstmann bogies are correct, but they are those of the spoked model, more commonly found on early models. And I would like something more late, end of the war. The pressed wheels are more from that period of maximum production... In the photo below, you can see a comparison between the spoked wheels of the kit and the pressed wheels I would like to use...
 |
| Comparison between the spoked wheels and the pressed wheels |
I remembered a resin conversion kit manufactured here in Brazil, which I acquired a few years ago and was forgotten somewhere in my catacombs... After a dusty and exciting search, I found the little kit from Electric Products. The kit consists of two complete front wheels, with military-style tires, eight pressed-type wheels and two pressed-type idler wheels. Bingo!!!
 |
| The conversion kit from Electric Products. Designed for Panzerwerfer 42 |
 |
| A comparison between the Electric Products and ICM undercarriage system... |
 |
| We have a winner!!! Bye-bye ICM...hello Electric Products!!! The Horstmann bogies with pressed-type wheels. |
 |
| Installing Horstmann bogies on the rear subframe. I installed vinyl tires in the front just to keep the truck horizontal, as the fittings on the plastic wheels are much better than the resin ones... |
 |
| Horstmann bogies glued on the rear subframe. Notice the ICM front wheels being used as "levelers", due to their easy fit... |
 |
| And our girl with the new "feet"... The drive sprocket is already installed, in perfect alignment... left view |
 |
| Right view of the new feet... Notice the new front wheels in resin, glued in position... |
 |
| The shoe store provided by ICM... |
The instructions call for two 8 LBL segments to be made for the sprocket drive and idler wheel curves. But I'm going to make a small modification to this sequence, as it's possible that I need another link to the track: I decided to simulate the weight of the track on the return rollers, as nothing is more unrealistic than a track tense like a ruler with the vehicle stopped... Even more so with this type of suspension. The idea is to simulate the fit using the weight of the upper portion of the track (L&L of 30 links). Here is the methodology:
 |
| Track segments that we will use. I will glue 7 LBL together, with one more "waiting" for its turn to enter the system. As I use plastic welder cement, I keep a certain flexibility in these LBL segments... |
The first thing I do is glue a 6-link L&L segment to the front portion of the 20-link L&L segment. Pay close attention to the direction of the links on the track!!! After this gluing (at an approximate angle of 45°, I support this union on the front curvature of the front wheel of the front Horstmann bogie. This is to match the junction of two straight segments in the "curvature" of the wheel. See the photo:
 |
| The 6 L&L segment (red arrows) fitting perfectly into the curve of the wheel, glued to the front portion of the 20 L&L segment. A small amount of superglue between the resin wheels and the plastic links makes everything stable... Fitting the front portion of the 6 L&L onto the teeth of the sprocket drive is essential... |
 |
| The two L&L segments in position (yellow) We need 8 links LBL for perfect adaptation to the sprocket drive (green). This "limit" is important for the step we are going to do now: simulating the weight of the tracks on the return rollers... |
In short, after gluing the 20 L&L segment with the 6 L&L segment (step 1) and the 8 individual links (8) onto the sprocket drive (step 2) ,we fit the 30-link L&L segment to the edge of the track on the sprocket drive. With the segment resting on the return rollers, we mark with a marker the portions of the links that rest on the return rollers (step 3). These markings (green in the diagram below) are the indicators where we will make the curvatures on the L&L track. I used the handle of a normal brush to simulate the presence of the return roller (step 4) and "curved" the two ends of the 30 L&L track downwards (step 5). I did this at the two markings on the return rollers and between these "folds", I used the tips of my fingers to shape the track upwards(step 5, again), making the characteristic snake shape (step 6). This now heavy-looking track was glued to the previous portion of the last link of the sprocket drive and to the idler wheel, at the rear, in addition to small portions of glue on the return rollers. See the diagram below and the subsequent photos:
 |
| Panzerserra method of transforming an L&L track into LBL, heavy... Easy as slapping a drunk!!! |
 |
| In real life: The 30 L&L segment folded into the return roller markings (green circles)... I just used a little pressure, without needing hot water or anything... |
 |
| Detail of the markings where the track "bears all the weight". |
 |
| Comparison between the worked segment 30 L&L (red arrow) and the standard (straight and boring: blue arrow...). The front end is already glued in place, with the rear part of the track awaiting the installation of the idler wheel... |
 |
| Idler wheel glued in position (red arrow) |
 |
| Now, I glued the 6 L&L segment and the final LBL parts... Franz and Fritz are very, very satisfied with the end result!! |
 |
| And now, repeat the entire process on the right side of the Maultier: notice how the straight and stretched 30 L&L segment looks unnatural... |
 |
| The markings of the return rollers in the 30 L&L segment |
 |
| After forcing the plastic a little as per the instructions... |
 |
| The "snake" segment glued to the suspension wheels, maintaining the weight aspect... |
 |
| ...and preparing the final links for the "closing" of the track! 8 LBL and the 6 L&L segment. |
 |
| Superior German Engineering!!! Plastic tracks very similar to Friuls!!! Franz almost didn't believe that this would be possible... |
 |
| ...but Fritz was confident! He knows Kojak's tricks!! |
And just to complement the task, we will take care of the cabin, so that it can be painted...
 |
| Cabin, under construction. |
Well, while the truck rests a bit, let's build the Bordkanone MK 103. It's my first experience with this manufacturer, the 16.02 Model Kits, but the kit is very detailed and well injected. Let's follow the instruction booklet....
 |
| Building the 30mm gun is simple and quick... |
 |
| The pieces are delicate and therefore very fragile... |
 |
| It may seem repetitive, but squaring is essential!!! |
One flaw (in my opinion...) is that the cannon does not have the possibility of vertical or horizontal drift movement. I tried to do something with these two axes, but the gun's damping system (the springs...) prevent vertical movement. I even made springs with copper wires, but the space and small size of the parts involved and the space available in the weapon prevented my poor attempts. What was left was the trunion of the gun being replaced by a steel wire (see pic below). At least it became more resistant. The solution here would be for the manufacturer to send a very thin steel spring, like AFV does with its Churchill AVRE mortars, but I think this is very difficult to do.
 |
| Replacing the trunion with a metallic wire. The cannon moved vertically, but... |
Now, the horizontal drift is another thing: I replaced the conical base pin with a hole and made a through pin, with a rivet-like head made with the heat of a flame, passing through the base of the weapon and being able to be cemented into the conical base. of the weapon. As a result, our Bordkanone had a 360° drift.
 |
| The "standard" pin in the top of the conical base... Hmmm...not good!! |
Converting the conical base from "male" to "female". Removing the pin and opening a hole in its place. The new pin in green and the male pin of the conic base, in red...
 |
| Note the flat head of the pin (green), shaped with a heated tool. |
 |
| The base pin, cut and in its place, a perforation (red right) with the same diameter as the Plastruct pin (green). The base of the gun was also drilled and countersunk (red left), so that the head of the pin is not so prominent (green circle)... |
 |
| Pin inserted through hole in gun base and conical base. I placed a drop of glue inside the conical base, to avoid any risk of glue running onto the gun bases. The head of the pin was almost flat, thanks to countersinking... |
 |
| And the cannon with 360° drift. Kojak is a hardworking guy... |
And speaking of base, I resisted the temptation to use the flat circular base of the weapon's conical strut. As this conical "neck" features nuts connecting this cone to the circular base, I thought what it would be like in real life: the circular base would be cast into a concrete base, almost impossible to remove...But the conical neck could be detached of this concreted circular base. Therefore, we will provide a spare steel plate (a remnant of schürzen, which some Stug lost somewhere...) with good thickness, cut it with oxyacetylene and install the conical neck on it by bolts, so that everything can then be screwed onto the body of our Maultier. Simple and coherent!!!
 |
| The new scratch base (green) and the kit base, suitable for concrete (red). |
 |
| And a dry-fit of the gun in the cargo bay of our Maultier. Notice the wooden boards (rectangular pieces of Plastruct), closing the spaces on the sides of the cargo body (red arrows), to prevent the gunners from putting their feet in these spaces, when the sides are lowered and transformed into shooting platforms... |
Now, let's decide on the colors and markings for our Maultier, as we have to paint the cabin so it can be closed. As I said, at the beginning of the project, the idea would be to place our Maultier at the end of World War II, as a weapon adapted against the massive presence of Allied aviation in the skies over Germany. And here's what we decided to do: Klöckner-Humboldt-Deutz KHD S3000/SSM Maultier (Sd.Kfz 3c) mit 3.0 cm Bordkanone MK 103, belonging to the 11. SS-Freiwilligen Panzergrenadier-Division "Nordland" (11th SS-Volunteer Panzergrenadier Division "Nordland"), fighting in the Battle of Berlin, in the last desperate days of April, 1945.
 |
| Panzerserra Color & Markings profile |
Therefore, the base color will be the typical German dark yellow, with wavy green and brown camouflage. Let's get to painting now...
 |
| German dark-yellow base color... |
 |
| The cabin, painted and closed... Notice the dashboard, very well executed thanks to ICM decals. |
 |
| Starting the weathering in the cabin's interior... |
 |
| And the cabin, glued in place... left view |
 |
| right view |
 |
| rear view |
 |
| Replacing the infamous and brittle width markers by metal clothe pins. These plastic wide markers break immediately after gluing to any kit. Using metal pins prevents this headache!!! |
 |
| New (and strong) width markers in position |
 |
| A good way to prevent headaches and myocardial infarction!!! |
 |
| Tonal variations in yellow, before the camouflage stripes... |
 |
| Testing the paint and camouflage on the MK 103 gun... |
 |
| The 30mm gun from 16-02 Model Kits is very well made!!! |
 |
| The 360° drift working wonderfully |
 |
| Cammo in the truck and in the gun. Notice the accessories: jerry-cans (MiniArt) and ammo boxes with 30mm shells (16-02). |
 |
| Two boxes with High-explosive shells and one box with fragmentation-tracer shells Green and gray projectiles... |

 |
| The ammo in the boxes... |
 |
| The right jerry-can... dry-run... |
 |
| ...and the left one... dry-run. |
 |
| Testing the gun in the Maultier (dry-fit) |
 |
| left view |
 |
| right view |
 |
| Details in the 30mm gun... right view |
 |
| Details in the 30mm gun... left view |
After the thin layers of Future (Pledge) have dried, we will apply the decals, from my invaluable Reserve Decal Box (with it, the Power and the Glory!!). With you, Klöckner-Humboldt-Deutz KHD S3000/SSM Maultier (Sd.Kfz 3c) number 3, with 3.0 cm Bordkanone MK 103, belonging to the 11th SS-Volunteer Panzergrenadier Division "Nordland".
 |
| KHD S3000/SSM Maultier n° 3 11th SS-Volunteer Panzergrenadier Division "Nordland" front left view |
 |
| KHD S3000/SSM Maultier n° 3 11th SS-Volunteer Panzergrenadier Division "Nordland" left view |
 |
| KHD S3000/SSM Maultier n° 3 11th SS-Volunteer Panzergrenadier Division "Nordland" rear view |
 |
| KHD S3000/SSM Maultier n° 3 11th SS-Volunteer Panzergrenadier Division "Nordland" right view |
 |
| KHD S3000/SSM Maultier n° 3 11th SS-Volunteer Panzergrenadier Division "Nordland" top rear right view |
 |
| KHD S3000/SSM Maultier n° 3 11th SS-Volunteer Panzergrenadier Division "Nordland" front right view |
 |
| KHD S3000/SSM Maultier n° 3 11th SS-Volunteer Panzergrenadier Division "Nordland" with 3.0 cm Bordkanone MK 103 left view |
As the next step is the weathering stages, we will make the masks for the windshield, using an adapted compass with a 15C scalpel blade
 |
| Windshield masks made with masking tape. |
 |
| Windshield masks in position. |
And our brave Mule stood ready: Before you, the Klöckner-Humboldt-Deutz KHD S3000/SSM Maultier (Sd.Kfz 3c), belonging to the 11. SS-Freiwilligen Panzergrenadier-Division "Nordland" (11th SS-Volunteer Panzergrenadier Division "Nordland"), fighting in the Battle of Berlin, Germany, in the last days of the Third Reich, in April, 1945.
 |
| Klöckner-Humboldt-Deutz KHD S3000/SSM Maultier (Sd.Kfz 3c) 11. SS-Freiwilligen Panzergrenadier-Division "Nordland" Battle of Berlin, Germany - April, 1945. left front view |
 |
| Klöckner-Humboldt-Deutz KHD S3000/SSM Maultier (Sd.Kfz 3c) right front view |
...and the claws of our peaceful girl, who will now become armed and dangerous: 3,0 cm Rheinmetall-Borsig MK 103 Bordkanone (Behelfslafette), on a stand adapted from a naval base.
 |
| 3,0 cm Rheinmetall-Borsig MK 103 Bordkanone (Behelfslafette) right view |
 |
| 3,0 cm Rheinmetall-Borsig MK 103 Bordkanone (Behelfslafette) left view |
 |
| 3,0 cm Rheinmetall-Borsig MK 103 Bordkanone (Behelfslafette) front right view |
 |
| 3,0 cm Rheinmetall-Borsig MK 103 Bordkanone (Behelfslafette) top front right view |
 |
| 3,0 cm Rheinmetall-Borsig MK 103 Bordkanone (Behelfslafette) top rear right view |
 |
| 3,0 cm Rheinmetall-Borsig MK 103 Bordkanone (Behelfslafette) rear left top view |
And finally, the complete project: meet the Klöckner-Humboldt-Deutz KHD S3000/SSM Maultier (Sd.Kfz 3c) mit 3.0 cm Bordkanone MK 103 (Behelfslafette), with the markings of 11. SS-Freiwilligen Panzergrenadier-Division "Nordland" (11th SS-Volunteer Panzergrenadier Division "Nordland"), fighting in the Battle of Berlin, in the final days of the Nazi Germany, in April, 1945.
 |
| Klöckner-Humboldt-Deutz KHD S3000/SSM Maultier (Sd.Kfz 3c) mit 3.0 cm Bordkanone MK 103 (Behelfslafette) 11. SS-Freiwilligen Panzergrenadier-Division "Nordland" Battle of Berlin - Germany - April, 1945. |
 |
| Klöckner-Humboldt-Deutz KHD S3000/SSM Maultier (Sd.Kfz 3c) mit 3.0 cm Bordkanone MK 103 (Behelfslafette) left view |
 |
| Klöckner-Humboldt-Deutz KHD S3000/SSM Maultier (Sd.Kfz 3c) mit 3.0 cm Bordkanone MK 103 (Behelfslafette) rear left view |
 |
| Klöckner-Humboldt-Deutz KHD S3000/SSM Maultier (Sd.Kfz 3c) mit 3.0 cm Bordkanone MK 103 (Behelfslafette) rear left view |
 |
| Klöckner-Humboldt-Deutz KHD S3000/SSM Maultier (Sd.Kfz 3c) mit 3.0 cm Bordkanone MK 103 (Behelfslafette) rear right view |
 |
| Klöckner-Humboldt-Deutz KHD S3000/SSM Maultier (Sd.Kfz 3c) mit 3.0 cm Bordkanone MK 103 (Behelfslafette) right view |
 |
| Klöckner-Humboldt-Deutz KHD S3000/SSM Maultier (Sd.Kfz 3c) mit 3.0 cm Bordkanone MK 103 (Behelfslafette) top right view |
 |
| Klöckner-Humboldt-Deutz KHD S3000/SSM Maultier (Sd.Kfz 3c) mit 3.0 cm Bordkanone MK 103 (Behelfslafette) top left view |
 |
| Klöckner-Humboldt-Deutz KHD S3000/SSM Maultier (Sd.Kfz 3c) mit 3.0 cm Bordkanone MK 103 (Behelfslafette) front top left view |
 |
| Klöckner-Humboldt-Deutz KHD S3000/SSM Maultier (Sd.Kfz 3c) mit 3.0 cm Bordkanone MK 103 (Behelfslafette) front right view |
 |
| Klöckner-Humboldt-Deutz KHD S3000/SSM Maultier (Sd.Kfz 3c) mit 3.0 cm Bordkanone MK 103 (Behelfslafette) with Kojak, inspecting the gun. |
 |
Klöckner-Humboldt-Deutz KHD S3000/SSM Maultier (Sd.Kfz 3c) mit 3.0 cm Bordkanone MK 103 (Behelfslafette) from Brazilian Expeditionary Force - FEB, in size comparison. |
 |
| Klöckner-Humboldt-Deutz KHD S3000/SSM Maultier (Sd.Kfz 3c) mit 3.0 cm Bordkanone MK 103 (Behelfslafette) 11. SS-Freiwilligen Panzergrenadier-Division "Nordland" Battle of Berlin - Germany - April, 1945. |
See you, soon!!
