
Attention, armored forces engineers!!
Today we're going to talk about two girls who evolved from combat tanks to recovery tanks. These charming machines were the true guardian angels of tank crews with mechanical problems. We are talking about the Sherman V (M4A4) ARV Mark I and Mark II.

,%20REME,%2079th%20Armoured%20Division,%20Summer%201944.jpg) |
| Sherman V ARV Mk.I of the 79th Armoured Division 30th Armoured Brigade Workshop France - Summer 1944 |
History:
Combat vehicles are exposed to operational damage, whether from enemy fire, the harshness of the terrain they face or even mere mechanical breakdowns. And these same vehicles are very expensive, whether due to their economic value or their tactical importance on the Battlefield. And vehicles on the combat front that are unable to move under their own power, run the risk of being more easily destroyed by the enemy (generating a total loss, both economically and tactically) or, even worse, run the risk of being captured, revealing their qualities and deficiencies that are more secret and, even worse, can be used against their former operators. Based on this premise, any vehicle that suffers damage considered repairable should not be abandoned on the battlefield. The recovering or towing these damaged vehicles has been a concern of the British Army since the first machine crawled across the battlefield, against the Germans, in the pioneering days of WWI.
 |
The British Army salvaging important parts from damaged tank Western Front, 1914-1918 Chinese Labour Corps men and British soldiers removing parts from a Mark IV tank at the Central Stores of the Tank Corps Teneur, France - spring 1918. |
But with the end of hostilities in 1918, all these ideas and developments entered a justified period of latency.
With the outbreak of WWII, the topic of recovering rolling stock was once again debated in the British Army. In the initial stages of the conflict, wheeled tractors with all-wheel drive, such as the Scammell SV2S, were used to recover disabled combat vehicles.
 |
Right side view |
These tractors/tugs provided very good service when used on more regular terrain, such as that found in the campaigns of North Africa and the French plains, but the need for recovery vehicles that could have better traction capacity and mobility soon became evident. on uneven and/or flooded terrain and to recover increasingly heavy armored vehicles, even under enemy fire. The need for tracked and armored recovery vehicles was a reality.
 |
Two Scammels, a SV2S heavy breakdown tractor in background rescuing a Matilda II tank back to the workshops for overhaul. African desert - 3 August 1942 font: IWM E 15182 |
At the beginning of 1942, the Royal Electrical and Mechanical Engineers (REME) began work on converting tanks into Armored Recovery Vehicles (ARVs). These projects took place at the Arborfield facility, in Berkshire. These recovery vehicles were to accompany armored formations in forward areas of attrition and combat. And due to their armored protection and track traction, they would be able to maneuver on all types of terrain, with the same speed and performance as the combat vehicles in the armored formation. These ARVs were to be able to recover damaged or bogged tanks and transport them to the rear, where they could be loaded onto transporters or trailers to be taken to workshops for repair. If the repairs were minor, the ARVs would carry the necessary equipment and tools so that work on the damaged tank could be done in the field, by the ARV crew. With this, the tank could be put back into active service without delay and without overloading the rear maintenance workshops. For the initial conversion work to the ARV standard, REME employed tanks that were being used by Armored Divisions, such as the Crusader, Grant and Churchill, in the facilities at Arborfield.
 |
Crusader ARV with A-frame jib and twin Bren AA mount REME facilities in Arborfield, 04-03-1943 font : IWM H 27696 |
 |
Crusader ARV with A-frame jib and twin Bren AA mount - rear view REME facilities in Arborfield, 04-03-1943 font : IWM H 27697 |
 |
Crusader ARV with A-frame jib REME facilities in Arborfield, 04-03-1943 font : IWM H 27693 |
 |
Grant ARV Mk I with twin Bren AA mount. Notice the Crusader ARV in background. REME facilities in Arborfield, 04-03-1943 font : IWM H 27559 |
 |
Grant ARV Mk I with twin Bren AA mount. REME facilities in Arborfield, 04-03-1943 font : IWM H 27557 |
 |
Grant ARV Mk I with twin Bren AA mount - rear view REME facilities in Arborfield, 04-03-1943 font : IWM H 27554 |
 |
| Churchill ARV Mk. I at Aborfield Berkshire - England 23 April 1943 Notice the Canadian Ram tank in background font:IWM H 29358 |
 |
| Churchill ARV Mk. II Notice the dummy gun, like the QF 75mm font:IWM MH 9818 |
 |
| Crew of Churchill ARV Mk I works on a disabled Churchill Mk.IV tank. 14 August 1944 - France font: IWM B 9162 |
In late 1942, as American Sherman tanks began to be increasingly numerous in active service with the British Army, the R.E.M.E. also began convert Sherman tanks as ARVs. Two versions of the Sherman ARV were produced: the Mk I, which was almost an armored tug with a collapsible hoist and the Mk.II, much more equipped and specialized.
Sherman ARV Mark I
This vehicle was produced with the removal of the turret and normal internal tank storage, with the turret ring closed with a fixed steel armor plate, incorporating two simple hinged hatches for crew access.
 |
| Sherman V ARV Mk I - top view Notice the steel armor plate, with two simple hinged hatches, the 30 meters steel cable and other details. |
 |
| Sherman V ARV Mk I and other specialised armour of the 79th Armoured Division approaching the banks of the Rhine, in preparation for crossing. North of Xanten, Germany - 24 March 1945 font:IWM BU 2080 |
 |
| The colorized version of the picture above: Sherman V ARV Mk.I of the 79th Armoured Division 30th Armoured Brigade - 2nd Armoured Regiment 1st Lothians and Border Horse and behind that, a Churchill Mk.IV AVRE (T 172523) of the 1st Assault Brigade (RE) 42nd Assault Regiment (RE), also of the 79th Armoured Division. font: WW2 Colourised Photos |
Storage for tarps and camouflage nets was available on the vehicle's upper-deck. The bow .30 Browning machine gun remained in use and an adaptation of .30 Browning M1919, .50 Browning M2 or even .303 Bren machine guns could be found in the vicinity of the upper access hatch, for close-in or anti-aircraft fire. These weapons were normally adapted by crews in the field.
 |
| Sherman V ARV Mk I towing a crippled Sherman by the ruined streets of Bourguebus, five miles south of Caen, on the road to Falaise. Notice the .50 Browning M2 heavy machine gun installed after the upper hatches France - 09 August,1944 font:IWM B 8910 |
 |
| Sherman ARV Mk I from 27th Armoured Brigade workshops move up cautiously next to the German Panzer Mark IV before taking it in tow. Notice the .303 Bren light machine gun ready for action, in the hands of a crew member and the big hinged hatch. Somewhere in France - 1944. |
A reinforced rotating drawbar was installed in the lower rear part of the hull, and was used to pull and tow vehicles using drawbars. A 30 meter steel cable, together with ground stakes, holding fast anchors and a 1.5 ton pole were also part of the ARV equipment, for use in towing armored vehicles by direct or indirect traction.
 |
| Sherman V ARV Mk I (T148322) of the Workshop Company 10th Armoured Cavalry Brigade -1st Polish Armoured Division crossing by Gilze, Netherlands, late October 1944. Notice the rotating drawbar installed in the rear lower corner of the hull font:IWM HU 128173 |
 |
| Sherman ARV Mk I passing by a Sturmtiger, captured by the Americans. Notice the steel cables extended from the front of the vehicle and the vice installed on the left side of the transmission cover. 28 February 1945. |
Repair equipment included a vice fitted on the left front of the ARV, oxy-acetylene cutting and welding plant and a jib for use with a 3-ton chain-operated hoist could be erected on the hull. The hoist was used to remove large and heavy parts, such as tank engines and transmissions. When not in use, the rectangular-section steel lances were carried in supports on the sides of the ARV's hull. The hoist pulleys were stored in a special box, installed in the front portion of the transmission cover, in front of the tank hull. (see these details in the pictures above and below).
 |
| Sherman ARV Mk I operated by Canadians, dragging a captured German StuG III Ausf. G, like war booty. |
%20of%20the%202nd%20Canadian%20Armoured%20Brigade%20Authie,%20Normandy,%20France%20July%201944..jpg) |
| One of the rare Sherman III ARV Mk. I, roaring through the ruins of a French village. 27th Armoured Regiment (Sherbrooke Fusiliers) 2nd Canadian Armoured Brigade Authie, Normandy, France - July 1944. |
 |
| A Sherman ARV Mk I, towed anti-tank guns and other vehicles queue to cross the bridge over the Souleuvre river during the advance to Vire, Normandy. 2 August 1944. font: IWM B 8489 |
 |
A Sherman ARV towing an intact German PzKpfw IV tank captured near Cagny, Normandy. 19 July 1944. font: IWM B 7762 |
 |
| Two Sherman ARV Mk I arrive to recover a disabled Sherman tank, with track was broken. Notice the destruction of the Church in the village of Cagny, Normandy. 19 July 1944. font: IWM B 7756 |
%20after%20battle%20on%20le%20havre,%20september%201944..jpg) |
| Two Sherman V ARV Mk I recovering a Sherman V Crab from 1st Lothians and Border Horse - 30th Armoured Brigade 79th Armoured Division, after Operation Astonia, on Le Havre. France, September 1944. Notice the .50 Browning in the turret plate and a German helmet as "decoration item" on the front of the tank. |
 |
| Sherman ARV Mk I and Firefly tanks of the 1st Polish Armoured Division taking a shadow of a windmill at the village of Terheijden, six km north of Breda, Netherlands. October 1944. font: IWM HU 106422 |
 |
| Not only did the damaged tank crews love the sight of a Sherman ARV: Look at the joy of these Dutch children, with Saint Nicholas arriving on top of a Sherman V ARV Mk I, in Saint Nicholas Day. Rucphen, near Roosendaal, Netherlands, 06 December 1944. Saint Nicholas stands on a Shermie ARV belonging to the B Squadron, 1st Northants Yeomanry - 33rd Armoured Brigade. font - IWM B12586 |
Sherman ARV Mark II
The Mark II was an evolution of the Mk.I. Its main feature was a large fixed box-shaped casemate, with the vertical faces featuring 40mm of armor and the roof with 14mm. Two cupolas with hinged hatches gave access to the hull through the roof of the casemate, these cupolas being cylindrical in some vehicles and hexagonal in others.
 |
| Sherman V ARV Mark II with hexagonal cupolas 3/4 front left view font:IWM MH 3668 |
 |
| Sherman V ARV Mark II with cylindrical cupolas 3/4 front left view. Notice the discreet differences between the equipment carried by the tanks. There was no true standardization between these vehicles. R.E.M.E. Experimental Establishment - near Wokingham, England. |
 |
| Sherman V ARV Mark II with cylindrical cupolas 3/4 front right view - the same vehicle above. R.E.M.E. Experimental Establishment - near Wokingham, England. font:IWM H 39923 |
 |
| Sherman V ARV Mark II with cylindrical cupolas left view R.E.M.E. Experimental Establishment near Wokingham, England. - summer 1944. |
A two-speed winch was installed inside the hull, beneath the rear portion of the casemate. The winch cable passed out of the casemate through a rectangular opening in the rear of this fixed turret, via rotating cylinders.
 |
| Sherman V ARV Mark II - rear view Notice the rectangular opening in the rear of the turret, just below the two shovels font:IWM H 39936 |
A dummy gun barrel (a steel tube) was welded to the front portion of the turret, installed with a slight shunt to the left, so as not to interfere with the winch cable when it was being used from the front of the ARV.
 |
| Sherman V ARV Mark II (hexagonal cupolas) Notice the small detour to the left of the dummy cannon. |
 |
| Sherman V ARV Mark II (cylindrical cupolas) Notice the small detour to the left of the dummy cannon. |
A fixed jib was mounted on the upper rear portion of the hull, which, together with the winch, could be used for lifting work or towing vehicles.
 |
| Sherman V ARV Mark II - 3/4 rear left view Notice the fixed jib in the rear upper deck, with articulated earth spade, resting just below the jib. Notice on the various equipment, on the sides of the hull and rear upper deck. font:IWM MH 3670 |
 |
| Sherman V ARV Mark II - 3/4 rear right view Notice the fixed jib in the rear upper deck, with articulated earth spade, resting just below the jib. Notice on the various equipment, on the sides of the hull and rear upper deck. font:IWM MH 3669 |
A strong hinged spade-type earth anchor was installed below the jib. This anchor-type sword was lowered into the ground for greater stability. And to further increase this stability, when on non-rocky terrain, the vehicle went in reverse, burying the tips of the sword in the ground and "lifting" the rear of the ARV, burying the anchor blade vertically in the ground, giving enormous stability vertically and horizontally to the tank.
 |
| The rear spade-anchor is now lowered, just resting on the ground. Note that the ends of the anchor, the double fork type, are already buried in the soft ground. R.E.M.E. Experimental Establishment - near Wokingham, England. font: IWM H 39928 |
 |
| The Sherman V ARV Mk II has already reversed, with the weight of the tank vertically burying the anchor in the ground. Notice how the rear of the vehicle is a little suspended... R.E.M.E. Experimental Establishment - near Wokingham, England. font: IWM H 39930 |
 |
| Sherman V ARV Mk II - close-up vision of the rear spade, vertically buried in the ground. R.E.M.E. Experimental Establishment - near Wokingham, England. font: IWM H 39929 |
In the same way as on the Sherman ARV Mark I, an articulated jib (composed of jib booms that are carried on the sides of the hull) could be raised at the front of the vehicle, but in this case the jib had a lifting capacity of 7 tons and was used in conjunction with the winch.
These jib booms had tubular profiles, made of reinforced steel. All other recovery, repair equipment and tools were generally the same as those carried on the Sherman ARV Mark I.
 |
| Installing the front jib in the nose of Sherman V ARV Mark II The crew is passing the steel cable of the turret winch through the front pulley. R.E.M.E. Experimental Establishment - near Wokingham, 23-8-1944 font: IWM H 39924 |
 |
| Sherman ARV Mk II with front jib erected. right side view R.E.M.E. Experimental Establishment - near Wokingham, England. 23-8-44 font: IWM H 39926 |
 |
| The front jib erected in the nose of Sherman V ARV Mark II. Notice the front jib, fitted with screws, in the joints of the tank's front glacis. The damaged skirt on the right front fender is proof of the uselessness of this accessory in this type of vehicle. R.E.M.E. Experimental Establishment - near Wokingham, England. 23-8-44 |
The Churchill and Sherman ARVs carried virtually the same recovery and repair equipment and tools. Churchill ARVs were initially used in Tunisia and the Italian Campaign and northwestern Europe, supporting divisions and brigades equipped with Churchill Infantry tanks.
 |
| Churchill ARV Mark II notice the similarity between the Shermans nd the Churchills ARV Mk.II font:IWM H 39906 |
The British Army converted 52 of its Sherman III (M4A2 diesel) into Beach Armored Recovery Vehicles (BARVs) prior to the Allied invasion of France on June 6, 1944. Their intended role was to rescue any tracked or wheeled vehicles that became stuck in the surf during the beach landings. With a waterproofed hull and superstructure, the vehicle could wade through 9 feet of water to push or pull stranded vehicles out of the surf onto a beach.
,%20Earls%20Court,%20London,%208%20February%201944%20IWM%20H%2035624.jpg) |
| Sherman BARV (Beach Armoured Recovery Vehicle) Earls Court - London. This vehicle is under construction: notice the open rear upper deck 8 February 1944 font: IWM H 35624 |
 |
| Sherman BARV tows a disabled Bedford articulated lorry and trailer off the beach. Normandy, France - 14 June 1944 font: IWM B 5578 |
ARV tanks were so successful that many versions were built in other countries, even after the war and to this day. They are relatively cheap and easy to build vehicles, in addition to being extremely versatile and highly efficient, making them machines of great tactical value on the battlefield.
 |
| Modern Challenger Armoured Repair and Recovery Vehicle (CRARRV) Tank Show - 2012 |
Specs:
%20ARV%20Mark%20I%20specs.jpg)

| Sherman V ARV Mk.I (M4A4) | |
|---|---|
| Type | Armoured Recovery Vehicle |
| Place of origin | USA (standard tank) UK (conversion) |
| Service history | |
| Wars | World War II |
| Production history | |
| Produced | July 1942 - November 1943 Chrysler Corp. |
| No. built | 29 Sherman III ARV Mk I 189 Sherman V ARV Mk I |
| Specifications | |
| Mass | 27 tons |
| Length | 6,45 m |
| Width | 2,62 m |
| Height | 1,99 m |
| Crew | 4 to 5 |
| Armor | 50,8 mm front hull 38,1 side hull |
Main armament | none |
Secondary.armament | 1×.30-06 Browning M1919A4 machine gun 4,750 rounds |
| Engine | Chrysler A57 multibank (30 cylinder) gasoline engine - 370 hp (276 kW)@ 2,400 rpm |
| Power/weight | 13.70 hp/tonne |
| Suspension | Vertical Volute Spring Suspension (VVSS) |
| Ground clearance | 430 mm |
| Fuel capacity | 605 L |
Operational range | 160 km |
| Maximum speed | 40 km/h - brief level |
The kits:
For this dual/parallel project, I had it in my stock two old Shermans M4A4 75mm from Dragon - Cyber-Hobby (#9102) as tank-hosts and as conversion kits, the excellent Resicast Sherman ARV Mark I conversion (#351134) and Resicast Sherman ARV Mark II conversion (#351214) kits.
 |
| Dragon - Cyber-Hobby Sherman M4A4 75mm (#9102) box art |
 |
| Resicast Sherman ARV Mark I conversion resin kit (#351134) box art |
 |
| Resicast Sherman ARV Mark II conversion resin kit (#351214) box art |
And our unstoppable, tireless, skilled, courageous and bald friend in front of the kits for this project. Get to work!!!
 |
| Kojak, the true da man!!! |
Well, as always, let's start at the beginning... and no matter how much the years weigh on us, we like to follow the construction steps suggested by the manufacturers. And as we are going to make the two versions in parallel, the Mk I and Mk II versionss, we are going to inaugurate a real assembly line: the M4A4 bogies, aka Sherman V!!
 |
| Sherman bogies... I kept the wheels turning to make painting easier, later... |
 |
| The bald one, in full swing!!! |
 |
| The sprockets and idler wheels, freshly cut. One of Kojak's lovely assistants will take care of the trimming... Don't be scandalized, please... |
 |
| Putting it all together... |
 |
| Easy, Salieri...Kojak is really fast!!! |
 |
| These Dragon-girls are old but very beautiful!!! |
 |
| But let's choose one of them and focus on the Mark I version: following the hierarchy of things!!! |
First thing: test the armour plate of the turret hole and carry out the necessary plastic adaptation surgery.
 |
| Hmmmm... we have to mark this excess plastic to make the necessary cuts... |
 |
| Markings made with pencil: this area will be deleted! |
 |
| Making the surgical cuts with a serrated disc tool on my beloved Dremel (may the Gods protect and maintain it...). BE VERY CAREFUL WITH YOUR FINGERS. |

And gluing the armored plate over the turret opening: be careful with the correct positioning of the piece: superglue does not forgive mistakes!!!
 |
| The tank is turning into ARV!!! I put the hatch half-open: I'm going to lean something back there, then... |
 |
| Following the Resicast manual, we will make the racks for the grousers that were installed on the track links. |
 |
| Seven racks for the grousers... three on each side and one on the front glacis |
 |
| The Resicast kit is very well detailed: the butterfly nuts are really cute!!! The blue one points a little butterfly that flew!! I'm going to work on the glue!!! Grousers racks in the left side |
 |
| Grousers racks in the right side. |
 |
| We will now build the two Hollebone draw bar: rounded plastic profiles supplied by Resicast, with resin pieces. BEWARE OF THE CARPET MONSTER!! It's their favorite diet!!! |
One Hollebone draw bar is smaller than the other: the shorter one was indicated for towing American made AFVs and the longer one for AFVs built in the United Kingdom. This is explained because the towing points were more spaced out on American vehicles. Normally, the smallest was fixed to the side of the hull and the other was generally installed at the rear of the ARV.
 |
| The smallest Hollebone draw bar (for British vehicles) will be installed on the left side of the tank. Note the rectangular left boom of the front jib installed on the transport rack, in the lower portion of the hull sponson |
 |
| Using my sandpaper glass-plate to grind the rear tank rack. |
 |
| Ah, those Dragons tanks... another plastic surgery: removing the bases of the original racks... Piece of cake!!! |
 |
| Plastic surgery performed: the tank's rear armor is smooth, with its center marked |
 |
| We marked the half of the rear luggage rack too, for perfect gluing. Don't forget that superglue is instant and immediate!!! |
 |
| Installing the first aid box (red arrow), the intercom phone box (blue arrow), the fire extinguishers (green arrows) and the rear towing hook (yellow arrow), all parts very well cast by Resicast! |
 |
| A dry-run of the positioning of the wooden planks (I'll paint them separately, later...) on the upper rear deck (red arrow). Note the rectangular boom of the forward jib, attached to metal hooks on the lower left side of the hull (yellow arrow) |
 |
| Adding details on the Mark I girl (in the foreground) while the Mark II girl patiently waits her turn in the background. |
 |
| How beautiful this early girl is becoming!!! |
 |
| Adding fenders to the rear (blue arows) and I decided to provide my girl with some sharp teeth: a .50 Browning heavy machine gun (from the Dragon kit - green arrow) and its pedestal (in scratch). I confess that I based it on the historical photos, just above... This way, the girl has more attitude!!! Notice the long Hollebone draw bar (for American vehicles) installed in the rear, too |
 |
| Browning . 50 rules!!! |
And now, a small BIG problem: my Resicast Mark I kit does not have the earth spikes and holdfast anchors parts. I'm lucky that the Mark II version kit has some holdfast anchors so I can make scratch parts. The earth spikes will be replaced with some parts left over from my Leyland Retriver trucks (In model making, nothing is lost, everything is used...) I love my scrap box!!! But let's build aas holdfast anchors with Plastruct
 |
| The holdfast anchors from Mk II Resicast kit |
 |
| And holdfast anchors made by Panzerserra, with Plastruct!!! solid tubes (red) , perforated tubes (yellow) and type I bars (green) Ufff... I made 4 sets... |
Now, let's make the 30 meter (30.000 mm) main steel cable of the Sherman ARV Mark I. It carries this steel cable on the periphery of the turret hole armor. 30.000 mm of lenght is 850 mm in 1/35 scale. I cut this length from a waxed thread I have here, which ideally reproduces thick steel cables like this.
 |
| My 850mm lenght of steel cable, with resin parts glued in the tips. |
 |
| The steel cable in position (green arrow). Notice the antenna base (red) that I took from the extra parts of my Churchill tanks. |
 |
| Making another steel cable, only smaller (green). Same method, but passing the cable through several hooks on the ARV's hull. Notice the antenna base in the front glacis from RB Model and the Note holdfast anchors (in white). The details on this conversion kit are great... |
 |
| Antenna wires made with acupuncture needles... |
 |
| Details such as pulleys (red), tie-down hooks (blue), the incredibly detailed vise in front of the transmission cover (green). This kit is very beautiful!!! |
 |
| Really, this project is really fun to do!!! |
 |
| Some dry-run parts, for viewing... |
 |
| Front view |
 |
| Right view... |
 |
| Rear view. |
 |
| Other missing parts: spikes and metal bars for anchoring and levers (red). All made with wires and metal bars, in scratch... |
And with that, I can consider the ARV Mark I practically ready. Now, it's time to focus on the Mk II...
 |
| The late girl: Mark II!!! |
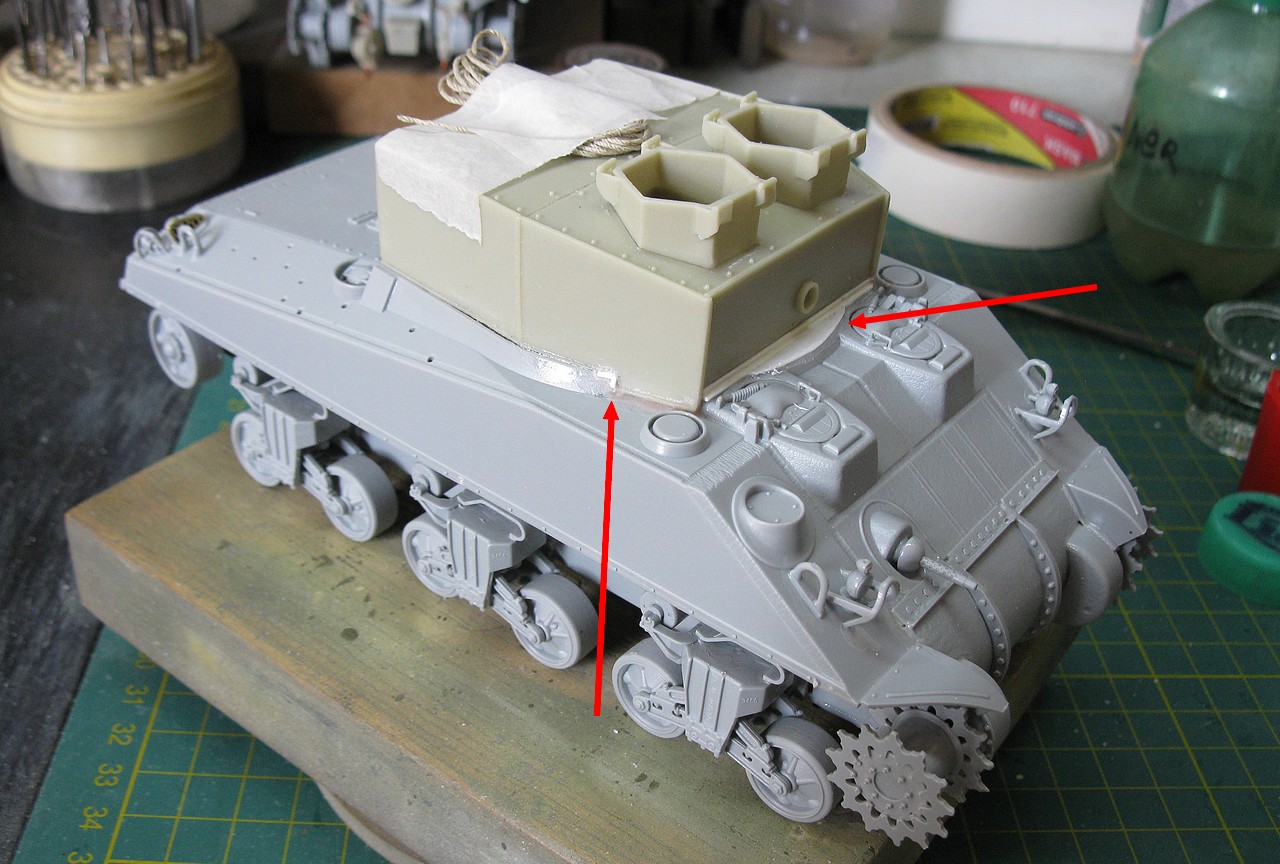
Continuing with the construction, time to install the casemate on the hull, in the turret hole. Here's a small problem: the Resicast kit was designed for the hull of the Tasca/Asuka kit, but I'm using the Dragon kit. And the Dragon kit has a slightly larger hull than the Tasca/Asuka... The difference is minimal, but to avoid the appearance of gaps, I did some cosmetic surgery, applying small portions of plasticard to fill these gaps... Look at the photos :
 |
| The fixed turret (or casemate) glued onto the hull. On the front portion, I glued a portion of thin Plastruct "L" profile, 0.3mm wide, closing the space with a 0.2mm ultra-thin plasticard plate. Notice that I also filled some side gaps with stretched sprue... left view |
 |
| The same procedure, seen from the right side. |
 |
| Filling the gap. with stretched sprues... Old-school technology!! The thread is supplied by Resicast. |
 |
| My girl with two ears: left toolbox |
 |
| Right toolbox in the turret. |
 |
| A simple solution to prevent "sinking" of the suspension arms, on the front and rear bogies, when the vehicle is lifting weights: movement limiters!! |
 |
| Adding handles to hatches (PE supplied by Resicast) |
 |
| Adding details to the turret... |
 |
| The dummy gun is twisted slightly to the left... It's still funny... |
 |
| The function of the dummy gun is to impose a certain amount of respect when the vehicle is seen from afar... |
 |
| Improving the tower winch cylinder (the resin kit part came full of bubbles...) and adding the two fire extinguishers |
 |
| The holdfast anchors and Hollebone draw bar installed on the left side armor of the hull. Notice the toolbox and some wooden planks just above. |
 |
| Front right view: notice the amazing vice in the transmission cover, the pulley, antenna and other details... |
 |
| Right view: the long "american" Hollebone draw bar, pulleys, hooks made in metal (red) and other little tings... |
And since we're dealing with crane components, let's build the fixed jib at the rear of the ARV Mk.II. First, the jib booms: resin parts and Plastruct (provided by Resicast):
 |
| The two rounded boom for the rear jib... |
Here, alignment between the parts is essential: the ideal is to mark the positions of the parts and do a dry test before using the superglue.
 |
| Building the rear jib - left view |
 |
| Building the rear jib - right view |
 |
| With the jib built, it's time to build the earth spade!! EXCALIBUR!! |
But back to the kit, installing the cylindrical guides for the turret winch steel cable. The instructions are confusing here...
 |
| Cylindrical guides for the turret winch steel cable. left view |
 |
| Cylindrical guides for the turret winch steel cable. rear top view |
 |
| Cylindrical guides for the turret winch steel cable. right view |
And with the addition of a few more details, I consider the ARV Mark II girl to be ready for paint.
 |
| Sherman V ARV Mark II ready for painting right view |
 |
| Sherman V ARV Mark II ready for painting rear right view |
 |
| Sherman V ARV Mark II ready for painting rear left view |
 |
| Sherman V ARV Mark II ready for painting left view |
 |
| The two girls, ready for painting... Kojak is a busy guy!! |
 |
| Vallejo light gray primer... Shermie V ARV Mk II right side |
 |
| Vallejo light gray primer... Shermie V ARV Mk II left side |
 |
| Vallejo light gray primer... Shermie V ARV Mk I left side |
 |
| Vallejo light gray primer... Shermie V ARV Mk I right side |
As I usually do, I try to create a profile with the colors and markings of my model. After researching the time, place and use of the equipment, we have:
- Sherman V ARV Mark I, particularly called "BUS": Serving with 79th Armoured Division (Hobart's Funnies), 30th Armoured Brigade (Sherman Crabs), 2nd Armoured Regiment - 1st Lothians and Border Horse, in its advance through Germany in 1945.
 |
| Panzerserra's markings profile for Sherman V ARV Mk I |
- Sherman V ARV Mark II: Serving with 79th Armoured Division (Hobart's Funnies), with Royal Electrical and mechanical Engineers (REME), in the 30th Armoured Brigade Workshops, possibly in Germany in 1945.
 |
| Panzerserra's markings profile for Sherman V ARV Mk II |
 |
| The two girls, with base colors |
After using some tonal variations in the base color, we applied several thin layers of glossy varnish to apply the decals. The important thing is to avoid the infamous silvering...
 |
| Decals in position...left view |
 |
| Meet our girl "BUS", a Sherman V ARV Mk.I serving with 79th Armoured Division (Hobart's Funnies) 30th Armoured Brigade (Sherman Crabs)2nd Armoured Regiment - 1st Lothians and Border Horse, Germany, 1945. |
 |
| Sherman V ARV Mk I BUS right view |
 |
| Sherman V ARV Mk I BUS rear right view |
 |
| Sherman V ARV Mk I BUS rear left view |
 |
| Sherman V ARV Mk II left view |
 |
| Sherman V ARV Mk.II, with 79th Armoured Division (Hobart's Funnies) Royal Electrical and mechanical Engineers (REME) in the 30th Armoured Brigade Workshops. Germany - 1945. |
 |
| Sherman V ARV Mk.II right view |
 |
| Sherman V ARV Mk.II rear right view |
 |
| Sherman V ARV Mk.II rear left view |
 |
| The two ARV girls, after sealing the decals with glossy varnish and applying several thin layers of matte varnish, to begin the final detailing and weathering |
 |
| ...and the painting of many, many small parts that characterize the ARV versions. This step will take a little time... |
Now, things will narrow down: we will work with both girls at the same time... Adding the details that were painted separately and painting the details that were already glued to the kits... and, at the same time, starting the wash and the weathering...
 |
| First and following the age hierarchy, the youngest sister, Mark I Lots of details and little pieces... |
 |
| A laid-back girl, but full of charm... |
 |
| A delight to build... |
 |
| And now, the older sister, the Mark II: much more equipped and turbocharged... |
 |
| Hmm...I don't like the "red" tone in the tracks...what an ugly thing!!! I'll have to fix this... |
 |
| Another thing that is bothering me is this steel cable in the fixed rear jib... |
 |
| This cable is supplied by Resicast, but I find it very "hairy"... In short: horrible!!! |
After cutting the "hairy cable", I replaced it with a waxed, bald cable, like our friend Kojak... I think things got a little better...
 |
| Professor Severus Snape is pleased with the result... |
 |
| ...and even more so, after painting and characterizing... |
After these final repairs, I consider the work on these two girls who worked on recovering the vehicles on the battlefield complete. First, let me introduce "BUS", a Sherman V ARV Mark I, working with 79th Armoured Division (Hobart's Funnies), 30th Armoured Brigade (Sherman Crabs), 2nd Armoured Regiment - 1st Lothians and Border Horse, in its advance through Germany in 1945.
 |
| Sherman V ARV Mark.I "BUS" 79th Armoured Division (Hobart's Funnies) 30th Armoured Brigade (Sherman Crabs)2nd Armoured Regiment - 1st Lothians and Border Horse, Germany, 1945. |
 |
| Sherman V ARV Mark.I "BUS" front left view |
 |
| Sherman V ARV Mark.I "BUS" left view |
 |
| Sherman V ARV Mark.I "BUS" rear left view |
 |
| Sherman V ARV Mark.I "BUS" rear right view |
 |
| Sherman V ARV Mark.I "BUS" right view |
 |
| Sherman V ARV Mark.I "BUS" right top view |
 |
| Sherman V ARV Mark.I "BUS" right front view |
 |
| Sherman V ARV Mark.I "BUS" |
 |
| Sherman V ARV Mark.I "BUS" with Kojak, for size comparison |
 |
| Sherman V ARV Mark.I "BUS" 79th Armoured Division (Hobart's Funnies) 30th Armoured Brigade (Sherman Crabs)2nd Armoured Regiment - 1st Lothians and Border Horse, Germany, 1945. |
And now, the older sister. The markings are hypothetical, as I was unable to get any photos of this vehicle on the battlefield, but if it was used, without a doubt, it must have been with the brave REME guys of the 79th AD. So with you, Sherman V ARV Mark II: Serving with 79th Armoured Division (Hobart's Funnies), with Royal Electrical and mechanical Engineers (REME), in the 30th Armoured Brigade Workshops, possibly in Germany in 1945.
 |
| Sherman V ARV Mark II 79th Armoured Division (Hobart's Funnies) Royal Electrical and mechanical Engineers (REME) 30th Armoured Brigade Workshops Germany - 1945 (?). |
 |
| Sherman V ARV Mark II front left top view |
 |
| Sherman V ARV Mark II left view |
 |
| Sherman V ARV Mark II rear left top details |
 |
| Sherman V ARV Mark II left rear view |
 |
| Sherman V ARV Mark II right rear view |
 |
| Sherman V ARV Mark II top rear view |
 |
| Sherman V ARV Mark II right view |
 |
| Sherman V ARV Mark II front right view |
 |
| Sherman V ARV Mark II front left view |
 |
| Sherman V ARV Mark II with Kojak |
 |
| Sherman V ARV Mark II top front view |
 |
| Sherman V ARV Mark II 79th Armoured Division (Hobart's Funnies) Royal Electrical and mechanical Engineers (REME) 30th Armoured Brigade Workshops Germany - 1945 (?). |
 |
| The two Sherman ARV sisters, side by side... What fantastic girls!!! |
What a delightful project... truly, a pleasure to reproduce such fantastic machines...
A privilege that our hobby allows!!
 |
| Girls from Women's Reserve Camouflage Corps painting camouflage on a tank mock-up in New York City (USA) - 1916 |