
A new year, a new postage. I'll introduce you guys to something very uncommon, but it was built.
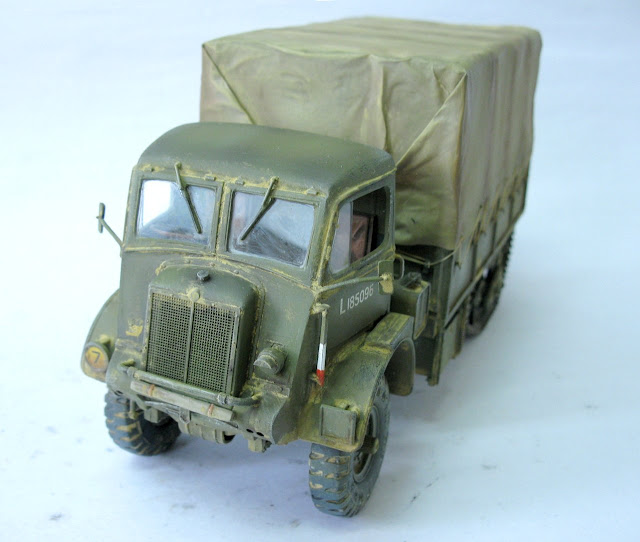
A Bedford "Bren prototype". This truck was an attempt to install tracks in a Bedford QL. The prototype showed excellent performance in the tests, but was not put into production. The single prototype was built later reconverted to the normal pattern and disappeared.
History:
If you want to know more about Bedfords, visit this article about Bedford QLR wireless, here at Panzerserra Bunker.
I found this beast in the excellent book "Bedford to Berlin and Beyond (Trucks)" , from Robert Coates (see image above).
 |
| Bedford halftrack picture from the book "Bedford to Berlin and Beyond (Trucks)" - Robert Coates |
The book's description:
"With the threatened drying,up of supplies of rubber after the capture of Singapore, and in a general attempt to save raw materials. The Ministry of Supply carried out an experiment in which a Bren-gun carrier's running gear was mated to a standard QL cargo lorry. Surviving photographs indicate that, as with the “Giraffe”, a QLD chassis was used but it was, nevertheless, most certainly a ‘special type’. The track and suspension assembly from the Bren carrier was modified, mainly by shortening it and exhaustive tests were carried out at the WVEE.
This hybrid QL performed even better than had been hoped, and certainly better than existing halftracks . unlike lhe earlier marques, the QL had a driven front axle. Several reasons combined to prevent the design going into full production: its initial cost was obviously higher than two simple wheels; it was far more, complex than an axle with wheels and, of course, huge strides had been made in developing synthetic substitutes for rubber which, effectively removed the reason for developing the idea in the first place."
 |
Bedford halftrack prototype - Bedford Bren I found this better pic in internet |
Well, to do my model, I follow the recipe from original prototype: Pick up a Bedford and a Bren carrier and mix the two ...Bingo !!!
Specs:
Specs:

| Bedford QL - standard version | |
|---|---|
| Place of origin | United Kingdom |
| Service history | |
| Used by | British Armed Forces |
| Wars | Second World War |
| Production history | |
| Manufacturer | Bedford (General Motors) |
| Produced | 1941-1945 |
| No. built | 52,247 |
| Variants | QL1, QLB, QLC, QLD, QLR, QLT & QLW |
| Specifications | |
| Weight | 3,277 kg (empty) 6,985 kg (loaded) |
| Length | 5.99 m |
| Width | 2.26 m |
| Height | 2.54m |
| Crew | 1 (driver) |
| Armour | none |
| Engine | Bedford, 6cyl 3,519 cc petrol 72 hp (54 kW) |
| Payload capacity | 3 tons |
| Suspension | Wheel, 4x4 |
Operational
range | 250 km |
The kits:
As I said, the kits were:
 |
| Italeri's Bedford plus Tamiya's Universal Carrier (notice the bag kit from Accurate) |
 |
| Accurate Armour conversion kit |
The first thing I did was this template to guide me through the constructive steps ....
 |
| Bedford halftrack in detail |
The job in progress: Transforming the truck´s rear suspension in halftrack. I could not get details about the rear axle of the Bedford prototype, but I opted to use the Bedford's rear axle for two reasons:
- 1st: The synchronization of the front and rear drives (do not forget that the front wheels ALSO have traction, ie the gear box of the rear axle of the truck has the CORRECT GEARS for this synchrony ...).
- 2nd: The robustness of the rear axle gearboxes. Although the empty weight of the two vehicles is similar (Bren Carrier and Bedford weigh 3,200 kg empty), the maximum capacity of the Bren was 3,700 kg and the Bedford (because it was a cargo truck ...) was 7,000 Kg... That is, more than double...
If the Bren's rear gearbox were used, the front and rear axes would have different spins ratios and the Bren's rear gear box would not withstand the excess load coming from the work of a truck.
If we compare the size of the gearboxes of the two axles (Bren and Bedford) we will notice the different size and sturdiness.
 |
| Rear suspension - notice the size difference between Bren and Bedford gearboxes and the two plasticards discs
to transform the sprocket wheels.
|
 |
| plastic surgery in the sprocket wheel |
 |
| the italeri's transmission axle with Tamiya's sprocket wheels |
 |
| in detail... |

 |
| The rear suspension in place. Notice the awful gap between the door and cabin frame |
 |
| Notice the cooper wire, for cargo canvas. The vinyl tracks are Tamiya. |
I fixed the flaw of the door with putty and made a new chute door with stretched sprue ....
 |
| fixing the door's gap |
 |
| fixing the defect - left door |
 |
| fixing the defect - right door |
 |
| the rear suspension |

 |
| the girl with primer |
 |
| and painted in green... |

 |
| tonal variations and details... |

 |
| Decals...I love that part !!! |


After markings, I started the canvas, using tracing paper with diluted white glue

 |
| superglue to stabilize the canvas in position... |
 |
| and the white glue... |
 |
| done !!! |
 |
| Bedford halftrack - belly view |
But my friend Alan McNeilly warned me that the canvas folds were wrong. The correct was...
 |
| Bedford QL with folded tarp |
 |
| Notice the folds...So, I made a new tarp above the older one Now, with the correct folds...Thanks a lot, Alain !!! |
 |
| The tarp made with tracing paper, again... |
 |
| Tarp under construction |
 |
| Tarp under painting.... |


 |
| Weathering.... |


And I stretched the tarp with ropes:


And the story ended here ... But one thing that bothered me was that I built this model using the cabin with the opening in the ceiling, and in the original photo, the cabin is the closed type, with no opening.
 |
| The right and wrong |
At the time, the only cabin was the open type and was the one I used. But after everything was ready, I blamed myself for not having closed that opening, something that would be relatively easy ... Just like the appointments, made at random, without the slightest research. But I always said to myself, "Then I close ... then I fix it ..." But none of that happens. Well ... the other day looking at this beauty on the shelf, she gave me remorse: Why did a girl so beautiful, so unique and so cool, have to present herself so wrong ??? I took the maiden from the shelf and took her to the Surgical Center: Time for Plastic Surgery and a new makeup !!! After all, she deserves the best !!
 |
| Starting roof repair: closing the opening with plasticard |
 |
| Leveling and adjusting curves with putty ... |
 |
| The reconstructed cabin roof and the spurious markings eliminated ... Retouching the makeup ... ops ... the painting !! |
 |
| No wrong markings on the girl's back !! |
 |
| Now, let's start the weathering... |
And the new look of this Bedford...I took advantage of the upgrade process and cleaned the windshields ... they were very dirty. She became more beautiful with the brightest glasses !! After all, she is unique !!
 |
| Lorry, 3 ton, GS Bedford half-track - Bedford-Bren - prototype |
But even so, there are still things to be corrected: the prototypo didn't have the "tray" for the gas detector (red arrow), the headlights followed the black-out pattern (green arrows), the front wheels didn't have the devices circular hoists (purple arrow) and I’ll take the opportunity to correct the defects in the resin, just below the left windshield (blue arrow).
 |
| The flaws: gas detector (red arrow), the headlights (green arrows), the front wheels (purple arrow) and the defects in the resin (blue arrow). |
 |
| Bedford QL halftrack prototype |


 |
| Bedford QL halftrack prototype right view |


 |
| Bedford QL halftrack prototype rear view |
 |
| Bedford QL halftrack prototype left view |
 |
| Bedford halftrack prototype with Kojak and Rover, the dog. |
 |
| Bedford halftrack prototype with 6 pdr.AT gun A possible use if this lorry had gone into production |
 |
| Bedford halftrack prototype with Bedford 6 pdr. gun portee |
 |
| Bedford QL halftrack prototype |
Well, Lads...
Thanks and all the best !!
Nicely done! And very unique subject... I really like it. Happy New Year!
ResponderExcluirIt's great....Well done...:)
ResponderExcluirHakan
Mr Dyzio and Stug:
ResponderExcluirThanks, Gents !!!
Cheers !!
another winner!
ResponderExcluiroriginal and so british, congrats
ResponderExcluirhubert
Yep that's a realy cool conversion!
ResponderExcluirThierry
Thanks, Tankers >>>
ResponderExcluirall the best !!!
I realise the previous comments are from 2013, but I have just come across the article after looking at the Wikipedia Bedford TK entry and from looking at its predecessors. I drove TK horse boxes in the 1960s in England, and I knew the RL from my 1958-1964 army days in the Royal Engineers. I wondered what the tray was in front of the driver's window. How did the gas detector work? What other vehicles had one fitted? Eric Hayman ecdh5348@gmail.com
ResponderExcluirHi Eric!! Welcome, my friend!! A true Bedford driver??!! wow... be proud!!! About the gas detectors, these "trays" were painted with a paint (khaki color) that chemically reacted with mustard gas, evidencing the presence of gas in the region, changing the color. It was used a lot by the British in trucks and even airplanes, with areas of the wings painted with this "displayer". Thank the Gods, the use of gas was not repeated in WWII, and by the end of the war these panels were largely in disuse. But its use was not, shall we say, standard. All the best and thanks for your visit!! Mi casa es tu casa!!!
Excluir