
Tankers !!!!
Let's see another tank: This time, it´s this rare version (in scale) of the M3 Lee medium tank: the version M3A1 with casted upper hull. In my opinion, the most beautifull of the all Lees. The version M3A1 never entered in combat, unless the version CDL, the T10 Leaflet.
 |
| M3A1 under construction |
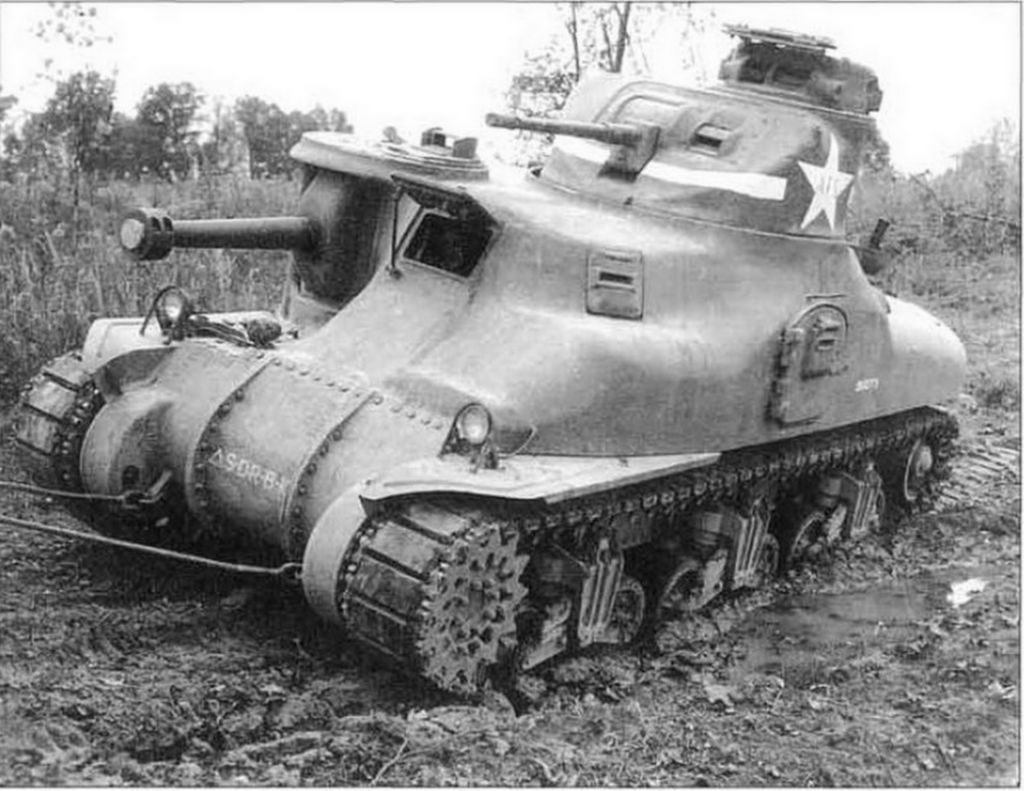 |
| A bogged M3A1 training in the Armored Force School (AFS) at Fort Knox, 1942 |
The Medium Tank M3 was an American tank used during World War II. In Britain the tank was called by two names based on the turret configuration. Tanks employing US pattern turrets were called the "General Lee", named after Confederate General Robert E. Lee. Variants using British pattern turrets were known as "General Grant", named after U.S. General Ulysses S. Grant.
 |
| M3 Lee with American Forces - Tunisia |
 |
| Grant - Notice the turret |
Design commenced in July 1940, and the first M3s were operational in late 1941. The U.S. Army needed a good tank and coupled with United Kingdom's demand for 3,650 medium tanks immediately, the Lee began production by late 1940. The M3 was well armed and armored for the period, but due to design flaws (high silhouette, archaic sponson mounting of the main gun, below-average off-road performance) it was not satisfactory and was withdrawn from front line duty as soon as the M4 Sherman became available in large numbers.
In 1939, the U.S. Army possessed approximately 400 tanks, mostly M2 Light Tanks, with less than a hundred of the discontinued M2 Medium Tanks. The U.S. funded tank development poorly during the interwar years, and had no infrastructure for production, little experience in design, and poor doctrine to guide design efforts.
 |
| An M2A1 Medium Tank (late). |
The M3 was the solution. The design was unusual because the main weapon — a larger caliber, low-velocity 75 mm gun — was in an offset sponson mounted in the hull with limited traverse. A small turret with a lighter, high-velocity 37 mm gun sat on the tall hull.
A small cupola on top of the turret held a machine gun. The use of two main guns was seen on the French Char B, the Soviet T-35, and the Mark I version of the British Churchill tank. In each case, two weapons were mounted to give the tanks adequate capability in firing both anti-personnel high explosive ammunition and armor-piercing ammunition for anti-tank combat. The M3 differed slightly from this pattern having a main gun which could fire an armor-piercing projectile at a velocity high enough for efficiently piercing armor, as well as deliver a high-explosive shell that was large enough to be effective. Using a hull mounted gun, the M3 design was produced quicker than if a turret mounted gun design had been manufactured. It was understood that the M3 design was flawed, but Britain urgently needed tanks.The M2 series medium tank was typical of armored fighting vehicles (AFVs) many nations produced in 1939. When the U.S. entered the war, the M2 design was obsolete with a 37 mm gun, 32 mm frontal armor, excessive machine gun secondary armament and a very high silhouette. The Panzer III and Panzer IV's success in the French campaign led the U.S. Army to immediately order a new medium tank armed with a 75 mm gun in a turret. This would be the M4 Sherman. However, until the Sherman was in production, an interim design with a 75 mm gun was urgently needed. See this film, below: is a bit long, but worth it: shows the steps of building an M3. In Youtube, select the HD option (720p):
A small cupola on top of the turret held a machine gun. The use of two main guns was seen on the French Char B, the Soviet T-35, and the Mark I version of the British Churchill tank. In each case, two weapons were mounted to give the tanks adequate capability in firing both anti-personnel high explosive ammunition and armor-piercing ammunition for anti-tank combat. The M3 differed slightly from this pattern having a main gun which could fire an armor-piercing projectile at a velocity high enough for efficiently piercing armor, as well as deliver a high-explosive shell that was large enough to be effective. Using a hull mounted gun, the M3 design was produced quicker than if a turret mounted gun design had been manufactured. It was understood that the M3 design was flawed, but Britain urgently needed tanks.The M2 series medium tank was typical of armored fighting vehicles (AFVs) many nations produced in 1939. When the U.S. entered the war, the M2 design was obsolete with a 37 mm gun, 32 mm frontal armor, excessive machine gun secondary armament and a very high silhouette. The Panzer III and Panzer IV's success in the French campaign led the U.S. Army to immediately order a new medium tank armed with a 75 mm gun in a turret. This would be the M4 Sherman. However, until the Sherman was in production, an interim design with a 75 mm gun was urgently needed. See this film, below: is a bit long, but worth it: shows the steps of building an M3. In Youtube, select the HD option (720p):
The M3 was tall and roomy: the power transmission ran through the crew compartment under the turret cage to the gearbox driving the front sprockets. Steering was by differential braking, with a turning circle of 11 m. The vertical volute suspension units included a return roller made with self-contained and readily replaced units bolted to the chassis. The turret was power-traversed by an electro-hydraulic system — an electric motor providing the pressure for the hydraulic motor. This fully rotated the turret in 15 seconds. Control was from a spade grip on the gun. The same motor provided pressure for the gun stabilizing system.
 |
| Cutway of M3 Lee |
The 75mm was operated by a gunner and a loader. Sighting the 75-mm gun used an M1 periscope — with an integral telescope — on the top of the sponson. The periscope rotated with the gun. The sight was marked from zero to 2,700 m with vertical markings to aid deflection shooting at a moving target. The gunner laid the gun on target through geared handwheels for traverse and elevation.
 |
| The 75mm sponson gun |
The 37mm was aimed through the M2 periscope, though this was mounted in the mantlet to the side of the gun.
It also sighted the coaxial machine gun. Two range scales were provided: 0-1,400 m for the 37-mm and 0-910 m for the machine gun.
 |
| 37mm high velocity gun in the turret of Lee |
 |
| An M3A1 in full speed, splashing water |
The prototype was completed in March 1941 and production models followed with the first British specification tanks in July. The British cast turret included a bustle at the back for the Wireless Set No. 19 radio. It had thicker armour than the U.S. one and removed the U.S. cupola for a simple hatch.


Both U.S. and British tanks had thicker armour than first planned. The British design required one fewer crew member than the US version due to the radio in the turret. The U.S. eventually eliminated the full-time radio operator, assigning the task to the driver. The British realized that to meet their requirement for tanks both types would be needed. The British ordered the M3 when they were refused permission to have their tank designs (the Matilda infantry tank and Crusader cruiser tank) made by American factories. British experts had viewed the mock-up in 1940 and identified several flaws — the high profile, the hull mounted gun, radio down in the hull (instead of turret), smooth tracks, riveted and insufficient armour, and little attention to splash-proofing the joints. The British agreed to order 1,250 M3, to be modified to their requirements - the order was subsequently increased with the expectation that when a superior tank was available it could replace part of the order. Contracts were arranged with three U.S. companies, but the total cost was approximately 240 million US dollars. This sum was all of the British funds in the US and it took the Lend-Lease act to solve the financial problems.


Both U.S. and British tanks had thicker armour than first planned. The British design required one fewer crew member than the US version due to the radio in the turret. The U.S. eventually eliminated the full-time radio operator, assigning the task to the driver. The British realized that to meet their requirement for tanks both types would be needed. The British ordered the M3 when they were refused permission to have their tank designs (the Matilda infantry tank and Crusader cruiser tank) made by American factories. British experts had viewed the mock-up in 1940 and identified several flaws — the high profile, the hull mounted gun, radio down in the hull (instead of turret), smooth tracks, riveted and insufficient armour, and little attention to splash-proofing the joints. The British agreed to order 1,250 M3, to be modified to their requirements - the order was subsequently increased with the expectation that when a superior tank was available it could replace part of the order. Contracts were arranged with three U.S. companies, but the total cost was approximately 240 million US dollars. This sum was all of the British funds in the US and it took the Lend-Lease act to solve the financial problems.
The U.S. military used the "M" (Model) letter to designate nearly all of their equipment. When the British Army received their new M3 medium tanks from the US, confusion immediately set in, as the M3 medium tank and the M3 light tank were identically named. The British army began naming their American tanks, although the U.S. Army never used those terms until after the war. The M3 tanks with the new turret and radio setup received the name "General Grant", while the original M3s were called "General Lee", or more usually just "Grant" and "Lee". The M3 brought much-needed firepower to British forces in the African desert campaign.
The chassis and running gear of the M3 design was adapted by the Canadians for their Ram tank. The hull of the M3 was also used for self-propelled artillery and recovery vehicles.
In combat:
European and Mediterranean Theaters:
Of the 6,258 M3s produced by the U.S., 2,855 M3s were supplied to the British Army, and about 1,386 to the Soviet Union. Consequently, one of the American M3 medium tank's first actions during the war was in 1942, during the North African Campaign. British Lees and Grants were in action against Rommel's forces at the disastrous Battle of Gazala on 27 May that year.
They continued to serve in North Africa until the end of that campaign. A regiment of M3 Mediums was also used by the U.S. 1st Armored Division in North Africa. In the North African campaign, the M3 was generally appreciated for its mechanical reliability, good armor and heavy firepower.
 |
| Grant and Lee tanks of 'C' Squadron, 4th (Queen's Own) Hussars, 2nd Armoured Brigade, El Alamein position, Egypt, 7 July 1942. |
They continued to serve in North Africa until the end of that campaign. A regiment of M3 Mediums was also used by the U.S. 1st Armored Division in North Africa. In the North African campaign, the M3 was generally appreciated for its mechanical reliability, good armor and heavy firepower.
 |
| M3 tank in training exercises, Fort Knox, Kentucky |
In all three areas, it was able to fight German tanks and towed anti-tank guns. The tall silhouette and low, hull-mounted 75-mm were severe tactical drawbacks, since they prevented the tank from fighting from hull-down firing positions. The use of riveted armor led to a problem called "spalling," whereby the impact of enemy shells would cause the rivets to break off and become projectiles inside the tank. Later models were welded to eliminate this problem. The M3 was replaced by the M4 Sherman as soon as these were available, though several M3s saw limited action in the battle for Normandy as armored recovery vehicles (M31) with dummy guns.


 |
| M31s in Normandy, France, 1944. |
Over 1,300 diesel-engined M3A3 and M3A5s were supplied to the USSR via Lend-Lease in 1942-1943.
All were the Lee variants, although they are sometimes referred to generically as Grants. The M3 was unpopular in the Red Army, where its faults showed up in engagements with enemy armor and anti-tank weapons, with the Soviets bestowing it the nickname of "БМ-6 — братская могила на шестерых" that could be translated as "collective grave for six people" or sometimes "coffin for six brothers", although the official designation was "М3с" ("М3 средний", M3 medium) to distinguish them from "М3л" ("М3 лёгкий", M3 light) Stuart tanks.
Few were seen in combat after about mid-1943, though some M3s were used on the Arctic Front in the Red Army's offensive on the Litsa front towards Kirkenes in October 1944. The Germans had on this front only relatively few obsolete French Hotchkiss H35 and Somua S35 tanks that they had acquired during occupation, consequently the M3's inferior tank-to-tank capabilities were of limited importance.
 |
| An M3A3 in soviet hands |
 |
| Two M3A3 diesel powered Lees with russian operatos |
 |
| "М3с" ("М3 средний", M3 medium) lead an "М3л" ("М3 лёгкий", M3 light) Stuart tank in battle |
Pacific and China-Burma-India Theaters:
The Pacific War was an ocean war fought primarily by the naval fleets of the U.S. and the Empire of Japan. Tank warfare played a secondary role as the primary battles were between warships and between aircraft. Within the Pacific Theater of Operations, the U.S. Marine Corps deployed all six of its tank battalions; the U.S. Army deployed only a third of its 70 separate tank battalions, and none of its armored divisions, in the Pacific.
During the Battle for Tarawa island in 1943, the U.S. Army attacked nearby Makin Island, which was considered a less costly operation. The army was supported by a platoon of M3A5 Lee medium tanks from the U.S. Army's 193rd Tank Battalion, making this battle the only U.S. Army combat use of the M3 in the Pacific Theater.
The U.S. Marine Corps did not use M3 Lees; their light tank battalions were equipped with M3 Stuarts through early 1944 when they were replaced by M4 Shermans.
 |
| M3A5 belonged of 193 rd Tank Battalion - Makin Atoll -1943 |
When the British received their new M4 Shermans from America, it quickly transferred approximately 1,700 M3s to the China-Burma-India (CBI) theater, deploying about 800 M3s to Australian forces and about 900 M3 tanks to Indian forces.
British Lees and Grants were used by the British Fourteenth Army from the fall of Rangoon, performing admirably until the end of the war. In the Far East, the M3's main task was infantry support. It played a pivotal role during the Battle of Imphal, during which the Imperial Japanese Army's 14th Tank Regiment (consisting of mostly captured British M3 Stuart light tanks and their own Type 95 Ha-Go light tanks) encountered M3 medium tanks for the first time. Despite their lower-than-average off-road performance, the M3s performed well as they traversed the steep hillsides around Imphal.
 |
| Lee I in Burma. Notice the absence of the commander turret |
 |
| Another Lee I in Burma without comm turret. It was very common in the british Lees at CBI theater |
Declared obsolete in April 1944, the General Lee fought on against Japan until the end of the war. In the end, the M3 in the CBI theater performed the mission its original designers had intended it to do: that of supporting the infantry.
Overview
Overall, the M3 was able to cope with the battlefield of 1942. Its armor and firepower were the equal or superior to most of the threats it faced. Long-range, high velocity guns were not yet common on German tanks in theatre. However, the rapid pace of tank development, and amongst other things its riveted armour meant that the M3 was very quickly outclassed. By mid-1942, with the introduction of the German Tigers, the up-gunning of the Panzer IV to a long 75-mm gun, and further in 1943 the appearance of the Panthers, along with the availability of large numbers of Shermans, the M3 was withdrawn from service in the European Theater.
Variants:
US variants / British designations in parentheses
- M3 (Lee I/Grant I):Riveted hull, high profile turret, gasoline engine. 4,724 built.

- M3A1 (Lee II): Cast (rounded) upper hull. The last variants don't have the side doors. 300 built.

 |
| M3A1 cast hull in plant. Notice the absence of side doors in the hull. |
- M3A2 (Lee III):Welded (sharp edged) hull. Only 12 vehicles produced.

- M3A3 (Lee IV/Lee V): Twin GM 6-71 diesel variant of welded hull. Side doors welded shut or eliminated. 322 built.

- M3A4 (Lee VI): Stretched riveted hull, 1 x Chrysler A-57 Multibank engine, made up of 5 4.12 litre 6-cyl L-head car engines (block upwards) mated to a common crankshaft, displacement 21 litres, 470 hp @ 2700rpm. Side doors eliminated. 109 built.

- M3A5 (Grant II) :Twin GM 6-71 diesel variant of riveted hull M3. Despite having the original Lee turret and not the Grant one, was referred by the British as Grant II. 591 built.

- M31 Tank Recovery Vehicle (Grant ARV I):Based on M3 chassis, with dummy turret and dummy 75 gun. 60,000 lb (27,000 kg) winch installed.

- M31B1 Tank Recovery Vehicle: Based on M3A3.
- M31B2 Tank Recovery Vehicle: Based on M3A5.
- M33 Prime Mover: M31 TRV converted to the artillery tractor role, with turret and crane removed. 109 vehicles were converted in 1943-44.

- 105 mm Howitzer Motor Carriage M7 (Priest):105 mm M1/M2 howitzer installed in open superstructure. Gunless version was the OP (observation post vehicle)

- 155 mm Gun Motor Carriage M12: Designed as the T-6. A 155 mm howitzer on M3 chassis.

- M30 Cargo Carrier: Ammo carrier based in a gunless M12 GMC. Almost identical to M12 except no gun. There was on M30 for each M12. The crew primarily traveled in the M30. There was a tailgate to help unload the ammunition. A ring mount for a .50 cal MG was installed in the rear. There was a canvas cover over the crew area.

British variants:
- Grant cruiser tank: the normal "gun tank" based in M3 Lee, but with casted turret

- Grant ARV Grant I and II: Grant with turret and guns removed and replaced by armored recovery vehicle equipment.

- Grant ARV Grant II: Based in american M31 TRV, with guns removed and replaced by armored recovery vehicle equipment.

- Grant Command: Grant fitted with map table and extra radio equipment and having guns removed or replaced with dummies.

- Grant Scorpion III: Grant with 75 mm gun removed, and fitted with Scorpion III mine flail, few made in early 1943 for use in North Africa.

- Grant Scorpion IV: Grant Scorpion III with additional motor to increase Scorpion flail power.

- Grant CDL: From "Canal Defence Light"; Grants with the 37 mm gun turret replaced by a new turret containing a powerful searchlight and a machine gun. 355 were also produced by the Americans, who designated it the T10 Leaflet Tractor (based in a M3A1 chassis). See my T10 model here.


Designs based on chassis:
- Medium Tank M4 Sherman
- Tank Cruiser, Ram - see article for full list of variants
- 105 mm Self Propelled Gun, Priest
- Kangaroo armoured personnel carrier
- 25pdr SP, tracked, Sexton Mark I - Sexton Mark II was on a Sherman type chassis
- M12 M12 Gun Motor Carriage
Specs:

| Medium Tank M3A1 | |
|---|---|
Type
| Medium tank |
Place of origin
| United States |
| Service history | |
Used by
| Australia, Brazil, Canada New Zealand, Philippines Soviet Union, United Kingdom; USA. |
Wars
| World War II |
| Production history | |
Produced
| August 1941–December 1942 |
Number built
| 6,258 |
Variants
| numerous, see text |
| Specifications | |
Weight
| 31,5 short tons (28 t) |
Length
| 6,12 m |
Width
| 2.71 m |
Height
| 3.12 m |
Crew
| 7 (Lee) or 6 (Grant) |
| up to 51 mm Steel | |
Main armament
| 1 × 75 mm Gun M2/M3 in hull 46 rounds 1 × 37mm Gun M5/M6 in turret 178 rounds |
Secondary
armament
| 2-3–4 × .30-06 Browning M1919A4machine guns 9,200 rounds |
Engine
| Wright (Continental) R975 EC2 400 hp (300 kW)/340 hp (250 kW) |
Transmission
| Synchromesh, 5 speeds forward, 1 reverse |
Suspension
| vertical volute spring |
Ground clearance
| 18 in (0.46 m) |
Fuel capacity
| 662 liters (175 US gallons) |
Operational range
| 193 km (119 mi) |
Speed
| 26 mph (42 km/h) (road) 16 mph (26 km/h) (off-road) |
Steering system
| Controlled differential |
The kit and the project:
After long, long time hoping and praying that someone casting the Lee M3A1 cast hull, Formations presented us in 2010 this wonderful piece. Thanks, again, Rob Ervin...


 |
| The perfect cast of Formations. M4A1 upper hull. |
I was so desperate in this version that Rob sent me one of the first pieces sold. Therefore, the instruction manual was a small mistake, but it was promptly corrected later.
 |
| The hull is the early version and the booklet shows the late version of upper hull hatch |
As host, I used the M3 Lee Academy, like recommended by Formations. The Academy Lee kit (everyone knows...) presents the bogies units wrongs, too high! Luckily, I have an old Formations conversion kit to correct this anomaly ...
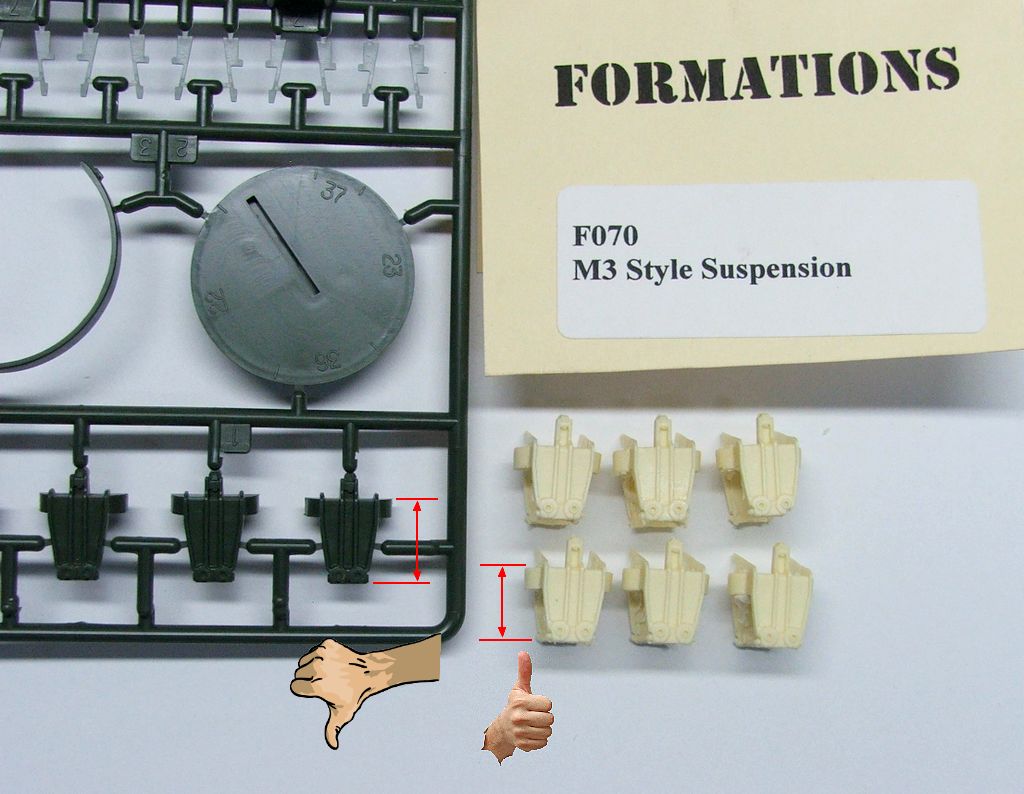 |
| Formations M3 bogies |
 |
| A close view of bogie unit |
But I'll use Academy´s arms and wheels for the bogies. They are identical to the resin and I'm a lazy guy ...
 |
| Formations and Academy bogie's parts |
Cleaning the wheels with my mini-lathe (A tool worthy of the Gods ...):

 |
| bogie wheel before... |
 |
| ...and after sanding. Voiláá |
My conversion (suspension) kit presents a plastic rod of 1.5 mm diameter, but the ideal would be that it was 2mm. Plastruct time:

As this conversion kit suspension is old, the "legs" of bogie's castles bent ... I'll try back legs with a heat source ...

To do this, I used this tool: Dremel mini torch ...This small torch is fantastic to straighten resin parts. I totally recommend. One of the most useful tools that I have in my bunker ... And I have no commercial engagement with the brand. I used it to correct any warpage in parts of resin, to welder, to make zimmerit, etc ...
So...Fire in the hole!!!
 |
| Bogies corrected with Dremel torch. |
In the front hull, some modifications... I make new suspension holes, to compensate the height of the Formations bogies:

And installing the Formations transmission, part of the conversion kit:

 |
| Adapting the Academy's floor... |
And a dry-run, because my belly-worms are killing me:
 |
| Casting parts...wonderful view !! |
Nice !!!
But, let's take care of drive sprockets, now ... I did a 2mm diameter hole in the resin part . It´s will serve to receive a metal pin of the same diameter. After that, I cut the pin of the Academy part and drilled its entire length with the same 2mm drill. It´s will serve as a "glove" to the drive sprocket... But pictures are worth a thousand words ... check the sequence:


Now, it's suspension time...The alignment is very, very important ...

Super-glue wiyh tons and tons of care... and...On your feet, Soldier!!!

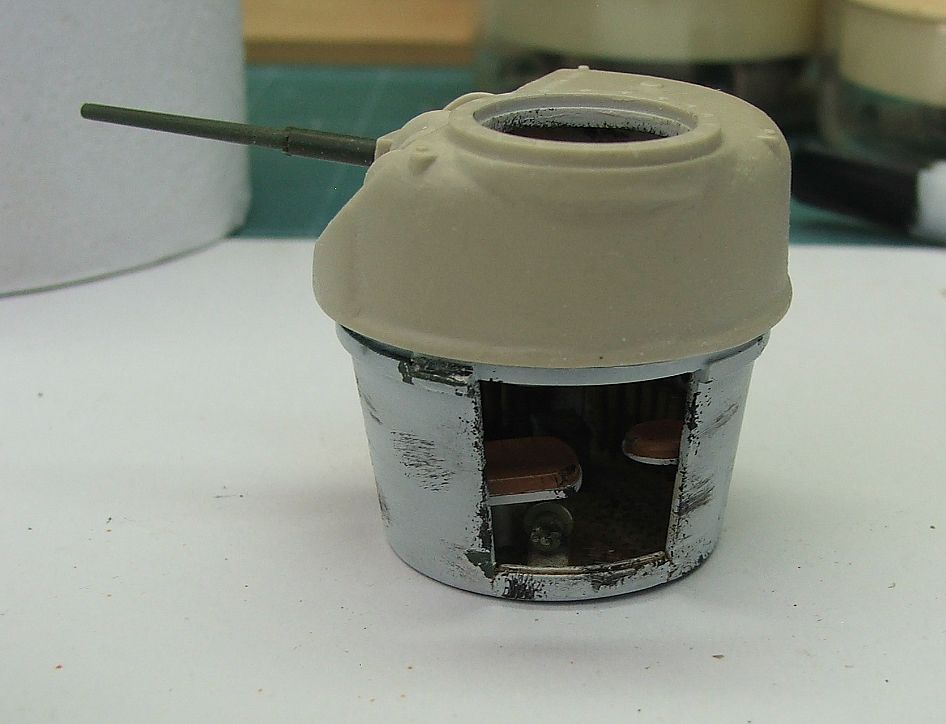
 |
| Building the interior (Academy) |
 |
| Cleaning the 75mm rotor area... |
 |
| The gun's rotor free to move... |
 |
| The fire-wall needs our attention, because the different contour of the interior of the cast hull: Wear made with Dremel |
 |
| Another view (look the resin rear plate, glued in position) |
 |
| The chassis: side view |
 |
| The hull fits right!!! Another dry-run...Some parts had to be modified within the tank, because the cast hull is tighter ... |

 |
| Rear view |
 |
| The Girl is growing... |
Now, I will start the interior detailing ... Although the Formations hull does not have the option to open the hatches (and I do not think making this radical surgery ...), the interior can be seen through the hole turret and the driver´s hatch. I'll glue the hull to the chassis (I hate demountable kits ...); Therefore, the detailing of the interior is to have a nice visual effect only, no hype or crazy work. Well, after that commitment (or justification ...), here we GO:
Setting the .30s caliber support of the hull... I had to cut the tip of the Academy part for the necessary fitting ...( The paper tape is to keep the .30 in a position ...)
 |
| .30s caliber support of the hull glued with super glue ... |
After removing the .30, I made a lateral reinforcement with a piece of sprue ...(poetical license...). I reinforced the joints with dental acrylic. After that, I did, with a strip of styrene, the support of the instrument panel (I´ll use the Academy panel)
 |
| The .30 support |
 |
| The panel instruments base... |
 |
| Panel in place...testing..testing... |
Now, the interior in white, to reduce claustrophobia of the crew...

Building the 75mm gun...Gun barrel, counter-wight and rotor shield from Formations. The rest, Academy parts. All parts fits perfectly...
 |
| 75mm gun ready for action... |
 |
| Hull with gun. The 75mm remained with their movements... |
 |
| Internal view of the gun position... |
One thing that was bothering me was the gap between the rear fire wall and hull´s ceiling. To fix this gap, I thought of adding a material directly into the gap, perfectly filling the defect.
The best material for this is dental acrylic. The problem is that it attacks the styrene (monomer of the acrylic, or the liquid part, is an excellent welder ...). I solved the problem by isolating the fire wall with a sheet of aluminum ...
Here is a photo of acrylic applied to the hull ...
 |
| Fixing the gap... |
To apply the acrylic, I used two ways:
- Mixed powder and liquid in equal parts and waited for him to begin to gel ... With aspatula, I applied this "goo" in the gap (glass bootle, in the picture below...)
- Before the acrylic hardens, I was stroking and applying more acrylic with a brush dippedin liquid acrylic. The technique of applying acrylic with brush is to moisten the brush in acrilic liquid and touch the powder with the brush tip moistened.
The brush captures a small amount of powder (which dissolves in the liquid brush ...) and you apply this paste in the desired location with the brush. I used caps from PET bottles as containers of powder and liquid. They are disposableand practice ...
 |
| Dental acrylic |
 |
| Fixing the gap... |
After drying acrylic (Attention: it releases heat in an exothermic reaction ...), the result is as follows:

 |
| Excesses in the posterior portion of the adjust (red arrows) were removed with Dremel |
Well... Now, a very crazy approach...

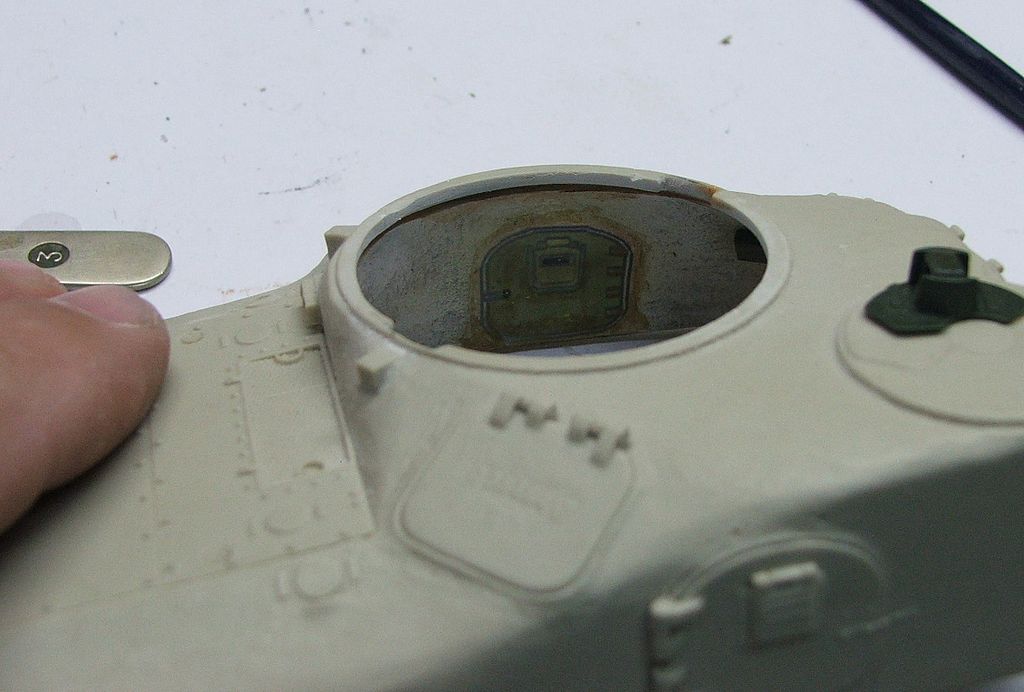
While I repaired the gap of the firewall, I was looking at the result of my efforts through the turret hole in the hull ... And I noticed that the hull, although fantastic, was not prepared to detail the interior. That is, through the turret hole I saw the inside, but not the details of the hull hatches. The hull is presented necessarily closed (all hatches are blown in the hull).
But there is the option to left open the driver's hatch ... and through it (and the hole turret ..) the interior is partially visible ... Based on this premise (Interior partially visible), I had an idea:
Why not make some visual effects to simulate the hatches??
Bingo !!! Decal !!!
I can almost see the purists with renal colic and barking, with foaming mouths and eyes rolling:

But what I really want is a visual effect, with minimal work ... I know that the ideal would be to dig and sculpt the inner portion of the hull, but after one month of work, which would be visible would be a rough picture of a hatch ...
And life is too short for this! IMHO !!! For me, model kit is a hobby, not a religion!
But enough about philosophies and justifications, and we practice the sin!!
The Idea in practice:
I drew the interior portion of the side hatch in Corel Draw (who want the designs, just write ...) and printed on paper, for a test drive...In Black and white, to be cheaper...
The exterior and interior of the hull;

The visual effect, through the hole in the hull. For me, is enough ...

 |
| Printing the decals in base color, because the interior of the hatches were the color of the hull, not in white .... |
 |
| Protecting the decals with gloss varnish |
While the varnish in decals dries, I will make some texture in inside of the hull, to disguise the repair of the firewall: Putty diluted in acetone, applied with an old brush ... Notice that the local of the side hatches I left without the texture ...
 |
| The interior upper hull with casting texture |
 |
| The wrinkled texture will be painted in white, again ... |
 |
| In the hatches path and chassi floor, some "putty mud" |
 |
| In white again... |
 |
| The gap finished!!! |
 |
| Hatches in position... |
Like Sauron´s eye: I see you !!!
 |
| The effect of the hatches in decals... |
 |
| Left side... |
 |
| Heresy was consummated!! |
I quite liked the final result ... Now, let weathering a bit ....


 |
| Dirty, very dirty Girl... |
 |
| The hatches, final view.. : Left side |
 |
| Right side... |
 |
| Front view... |
 |
| The hull, before glue the upper hull. |
Welding the upper hull with super-glue and dental acrylic:

 |
| The internal views: |


 |
| The turret and her basket... |
And all the subsets, together:


 |
| Metal pins... |
 |
| Done !!! |
Tons of super-glue...


Uops... I was forgetting the support straps of the hatches:


Welding, definitely, the hatches of the commander and the driver in his positions:

And now, the best part: Paint Time!!!
I modified a profile of an M3A1 to serve as as model of the markings of my girl: The tank "Effect" is coming ...

I used the stars and stripes from an old decal sheet from Lee Tamiya kit, the blue marks of Academy and markings of the AFS (Armored ForceSchool) I did with my Laserjet:
 |
| Decal recipe... |
Olive-drab in differents shades: (Notice the lamp wiring: red arrow)


A coat of Future and the decals applied, sealed with more Future ...


Weathering:


 |
| The headlights for this Girl... |
 |
| M3A1 Medium Tank Lee "EFFECT"- Armored Force School Kentucky, USA - 1942 - right view |

 |
| M3A1 Medium Tank Lee "EFFECT"- Armored Force School Kentucky, USA - 1942 - front view |

 |
| M3A1 Medium Tank Lee "EFFECT"- Armored Force School Kentucky, USA - 1942 - left view |
 |
| M3A1 Medium Tank Lee "EFFECT"- Armored Force School Kentucky, USA - 1942 - rear view |


And in good company: two casting girls !!!


 |
| M3A1 and M4A1 |
 |
| M3A1 Medium Tank Lee "EFFECT"- Armored Force School Kentucky, USA - 1942 |
See you, soon, Boys !!!

Good morning.
ResponderExcluirCan't say much only this : Perfect !!
I admire that you are to dig up all of that history (once again).
I've got it easy, because I have two books.
One of the best and the Red Armour, which deals with all the main features of the armor and the production, allies and germany, and russian manufacture all history to tanks.
Hi, Maximex...Thanks for the incentive...
ResponderExcluiri love books and history, too...
Take care, my friend !!!
The best book / Punaiset panssarit. (1918-1945)
ResponderExcluirRed Army armored forces (+ genesis/development)
Includes a very extensive history of the emergence of the Soviet Union beginning.
Writer Pekka Kantakoski (only Finnis).
How to buy :) dental acrylic material.
Who sells. Pharmacy, perfumery, dental tecnician?
I suspect that it is we do not have free sale.
Dental technician who prepared new teeth?
Did you know that the United States was started by tanks, high-production (only) after French surrender. Understood the use of only separate tanks.
ResponderExcluirEarly 1940, the United States had only 494 light-class carriages that were similar european with.
Only 94 were Hortskiss, Panzer III, Vickers or T-26 level armor.
Rest tanks M1 ja M2 malleja mostly, and same bottom plate like M3 versions.
Guderian tanks the attack on France and adhere and followed to doctrines De Gaulle.
ResponderExcluirDe gaulle was trying to get the French army to learn his method , but the French army did not accept the methods.
Wow, Maximex...Tons of information...Thanks again, my Finn friend !!!
ResponderExcluirbig hug !!!
Maravilhoso trabalho. Parabéns.
ResponderExcluirObrigado, Paulo...A casa é sua !!!
ResponderExcluirum abraço
Forced to correct my mistake.
ResponderExcluir464 says to my book, the number of U.S. tanks at the beginning of 1940.
Dr. Marcos, mais uma vez, um show de técnicas, uma aula de história interessante também, sempre!
ResponderExcluirParabéns ! Uma aula de plasti, prazerosa como sempre !
Vleu, Maximex e Fernando...Um grande abraço !!!
ResponderExcluir