Artillery Men !!!
Today our subject is the rare and armoured version of one of the most famous German artillery tractors: our today's starlet is the SdKfz 8 DB10 12t Gepanzerte.
 |
Sd.Kfz.8 DB 10 Gepanzerte 12t (armored artillery tractor) - chassis 441280
Unique in the world. |
 |
Sd.Kfz.8 DB 10 Gepanzerte 12t (armored artillery tractor) - chassis 441280
This vehicle was excavated from the Pilica River in 1999 and restoration was completed in 2005
Exposed at Pilica Open Air Museum - Polen
She's in running conditions. |
History:
The SdKfz 8 (
Sonderkraftfahrzeug 8) (special motorized vehicle 8) was a German half-track that saw widespread use in World War II. Its main roles were as a prime mover for heavy towed guns such as the 21cm Mörser 18, the 15cm and
17cm Kanone 18, the 12,8cm FlaK 40 and the 10.5cm FlaK 38, however it was also capable of serving as an infantry transport. Approximately 4,000 were produced between 1938 and 1945. It was used in every campaign fought by the Germans in World War II, notably the Invasion of Poland, the Battle of France, the Balkans Campaign, the Eastern Front, the North African Campaign, the Battle of Normandy and the Italian Campaign.
 |
| SdKfz 8 DB10 12 t - standard version |
Description
The Sd.Kfz. 8 had a
ladder frame chassis. The power was provided by a
Maybach 12-cylinder, water-cooled, 8.52 litre HL 85 TUKRM gasoline engine of 185 horsepower.
 |
| SdKfz 8 chassis |
 |
SdKfz 8 engine bay showing the Maybach 12-cylinder, water-cooled
8.52 litre HL 85 TUKRM gasoline engine.
Notice the two airfilters in the firewall top. |
It had a semi-automatic
ZF transmission with four forward and one reverse gears. The driver selected the desired gear and initiated the shift by depressing the clutch. It had two fuel tanks, one of 40 litres and the other of 210 litres capacity.
Both tracks and wheels were used for steering. The steering system was set up so that shallow turns used only the wheels, but brakes would be applied to the tracks the farther the steering wheel was turned. The drive sprocket had rollers rather than the more common teeth. The rear suspension consisted of six double roadwheels, overlapping and interleaved in the usual Schachtellaufwerk system used for German half-track vehicles, mounted on swing arms sprung by torsion bars. An idler wheel, mounted at the rear of the vehicle, was used to control track tension. The front wheels had leaf springs and shock absorbers.
 |
| SdKfz 8 chassis, in side view. |
The upper body had a crew compartment with three bench seats, one for the driver and his assistant, and two others for the crew. The rear cargo area contained storage compartments, one on each side and two in the rear. The windshield could fold forward and was also removable. A convertible canvas top was mounted above the rear storage compartments. It fastened to the windshield when erected. The Sd.Kfz. 8 was initially designed to have a towing capacity of 12 tonnes (12 long tons; 13 short tons), but the wartime DB 10 could tow 14 tonnes (14 long tons; 15 short tons).
Design and development
Preliminary design of all the German half-tracks of the early part of the war was done by German
Engineer Ernst Kniepkamp of the "Military Automotive Department" (Wa Prüf 6), in 1933.
 |
| German engineer Ernst Kniepkamp, in WWII-era picture |
His designs were then turned over to commercial firms for development and testing.
Daimler-Benz had been working on its own half-track design during 1931-32, the
Daimler-Benz ZD.5. It weighed 9.3 tonnes (9.2 long tons; 10.3 short tons), used a twelve-cylinder, 150 horsepower (150 PS)
Maybach DSO 8 gasoline engine and its upper body had three bench seats behind the driver.
 |
Daimler-Benz ZD 5 (1931/1932). 150bhp Maybach engine
The drive sprocket is located at the rear. |
Its suspension was based on the World War I-era heavy tractor
Marienwagen II and bore absolutely no relation to the interleaved roadwheels and torsion bars used by the various models of the Sd.Kfz. 8.
 |
| Marienwagen II WWI-era heavy tractor - 1918 |
Daimler-Benz combined the best of both designs in the DBs 7 prototype which appeared in 1934. It used the same engine as the ZD.5, but otherwise bore little resemblance to the older model other than an upper body that had two bench seats for the crew behind the driver's seat. This upper body remained the same over the life of the Sd.Kfz. 8. It weighed 14.4 tonnes (14.2 long tons; 15.9 short tons) and could pull loads of 12 tonnes (12 long tons; 13 short tons).
 |
| A Sd.Kfz 8 DB7 in trials... |
 |
SdKfz8 DB7 towing a 15 cm heavy gun
Notice the missing front fenders
Russian Front - December - 1941 |
An improved version was introduced in 1936 as the DB s8. The heavier (15 tonnes (15 long tons; 17 short tons) DB 9 model appeared in 1938.
 |
Sd.fz 8 DB8 in Wermacht service
Notice the cammo and the Mercedes star in the top of radiator |
 |
A worn out Sd.Kfz 8 DB9 with folliage camo
Notice the missing engine side covers
Russian front - 1941 |
It used the
Maybach HL85 TUKRM engine, could carry an 8000 kilograms payload and could tow a 14 tonnes (14 long tons; 15 short tons) load. Daimler-Benz tried unsuccessfully to use their
diesel OM 48/1 engine, but it was repeatedly rejected by the Army Weapons Office. The DB 10 was a refined version of the DB 9 and was introduced in October 1939 and was produced for the duration of the war.
 |
| Side view of Sd.Kfz8 DB10 with full equipage |
 |
Kriegsmarine's Sd.Kfz 8 DB10.
Notice the WM license plate... |
 |
| Rear view of Sd.Kfz 8 DB10 in the occupied Channel Islands (Jersey) |
Variants:
Ten
8.8 cm Flak 18 anti-aircraft guns were mounted on pedestals on DB s8 and DB 9 chassis in 1939 as the
8.8 cm Flak 18 (Sfl.) auf Zugkraftwagen 12t (Sd.Kfz. 8) - also known as the
Bunkerflak or Bufla - for anti-tank duties. A gun shield was provided for the 88, but the gun crew had no other protection.
The driver's cab was replaced by a lower, armored cupola and the engine compartment was lightly (14.5 millimetres) armored. The vehicle weighed 20 tonnes (20 long tons; 22 short tons), was 7.35 metres long, 2.8 metres tall and 2.65 metres wide. The gun could fire directly ahead without any problem, but traverse was limited to 15° to each side by the gun shield. Elevation was between -3° and +15°. All ten were assigned to the first company of the anti-tank battalion Panzerjäger-Abteilung 8 which participated in the
Invasion of Poland in 1939, the
Battle of France in 1940 and
Operation Barbarossa in 1941.
 |
8.8 cm Flak 18 (Sfl.) auf Zugkraftwagen 12t (Sd.Kfz. 8)
Front left view - Notice the chickenwire in the vehicle
Battle of France - 1940 |
 |
8.8 cm Flak 18 (Sfl.) auf Zugkraftwagen 12t (Sd.Kfz. 8)
Front right view |
The company was redesignated as Panzerjäger-Kompanie (Anti-Tank Company) 601 in January 1942 and then as the third company of Anti-Tank Battalion 559 the following April. It reported that the last three vehicles had been lost by March 1943.
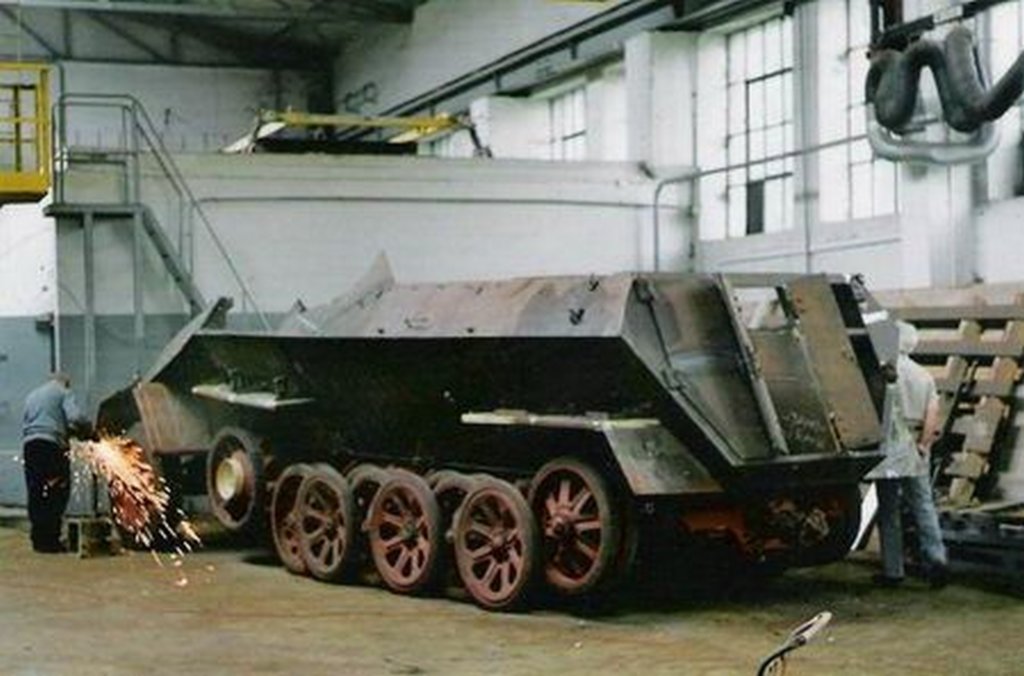
- The SdKfz 8 DB10 Gepanzerte 12t:
A last version of this versatile tractor can be seen in photographic shots showing a very rare completely armoured version. In the meantime such a vehicle has been found in Poland and the following characteristics can be reported.
 |
| A SdKfz 8 Gepanzerte with two rear doors - front view |
The whole vehicle was covered with sloped 14.5mm thick armour plates (bullet proof). In the rear two or four doors can be seen.
 |
| The same vehicle above: SdKfz 8 Gepanzerte with two rear doors... |
 |
An abandoned SdKfz 8 Gepanzerte with four rear doors...
Austria - 4th May, 1945. |
The front axle of the two rear doors vehicle was equipped with solid rubber tyres. Other photographs show air filled tyres and four doors in the rear. As far as licence plates are visible. they only show Luftwaffe units.
No further information is known, however, in 1999 one of these vehicles was found in the Pilica River in Poland. The vehicle, which has since been restored in 2005, is fully functional and can be admired in a museum in Poland
(Pilica River Open-air Museum).
About this rare girl,
Michal "Wojt" Wojtczak , a polen friend, tell us:"
...German troops were retreating across the bridge over the Piłica River, fleeing the Russians. At the beginning of the movement, the bridge was well protected, but the Russians were approaching dangerously. As a result, the bridge was mined with explosives. Apparently, the recognition failed and the Russians were closer than previously thought. From that fact, there are two versions of what happened:
1 - The vehicle broke down while crossing the bridge, was abandoned and exploded with it, falling into the river...or
2. - Apparently, witnesses report that the vehicle was still crossing the bridge and at that moment, the Russians appeared. To prevent Russian troops from crossing the bridge, it was blown up. And that means that Sd.Kfz 8 was sacrificed and fell into the river with the crew, for the benefit of the rest of the German army. When it was rescued, the vehicle was in good conditions, despite the years and conditions ... "
 |
| Sd.Kfz 8 being rescued from the Pilica River |
 |
| After the rescue... |
 |
| Under restoration... |
 |
| Almost ready.. |
 |
Changing the front wheels (solid rubber tyres) by inflated ones,
for smoother running during demonstrations. |
Production and use:
Daimler-Benz and
Krupp were the main builders of the Sd.Kfz. 8 during the war, but
Krauss-Maffei produced 315 in 1940-41 and
Škoda joined in the last years of the war. Approximately 4000 were built in total. The Sd.Kfz. 8 was used by Czechoslovakia after the war, but it is not known if production continued at Škoda or when they were finally discarded. The Sd.Kfz. 8 was also used by
Romania during the war.
Unlike most of the other German half-tracks, the Sd.Kfz. 8 was almost always used as a tractor for heavy artillery pieces and was not modified for other roles.
Sd.Kfz 8 – Annual production
|
Year
|
1934-1939
|
1940
|
1941
|
1942
|
1943
|
1944
|
Units
|
780
|
516
|
828
|
840
|
507
|
602
|
Total production: 4.073
|
| Sd.Kfz. 8 DB 10 12 t Standard and Gepanzerte |
|---|
| Type |
Heavy tractor (Standard)
Armored heavy tractor (Gepanzerte)
|
|---|
| Place of origin |
Nazi Germany
|
|---|
| Service history |
|---|
| In service |
1939–50? (Standard)
1943 (Gepanzerte)
|
|---|
| Used by |
Nazi Germany
Czechoslovakia
Romania
|
|---|
| Wars |
World War II
|
|---|
| Production history |
|---|
| Designer |
|
|---|
| Designed |
1936–39
|
|---|
| Manufacturer |
|
|---|
| Unit cost |
46000 Reichmark
|
|---|
| Produced |
1937–44
|
|---|
| No. built |
approx. 4,000 (Standard)
3 ? (Gepanzerte)
|
|---|
| Specifications DB 10 and Gepanzerte |
|---|
| Mass |
14,700 kg (Standard)
18.000 Kg (Gepanzerte)
|
|---|
| Length |
7.35 m (Standard)
7.50 m (Gepanzerte)
|
|---|
| Width |
2.5 m (Standard)
2.45 m Gepanzerte)
|
|---|
| Height |
2.77 m overall (Standard)
2.50 m (Gepanzerte)
|
|---|
Crew
Armor
Armament |
2 + 11
none (Standard)
14.5 mm (Gepanzerte)
none (Standard)
2x MG 42 7.92mm (Gepanzerte)
|
|---|
|
| Engine |
8.5L V-12 water-cooled petrol 185 hp (188 PS)
|
|---|
| Payload capacity |
2,550 kg
|
|---|
| Transmission |
|
|---|
| Suspension |
torsion bar
|
|---|
| Ground clearance |
400 mm
|
|---|
| Fuel capacity |
250 litres
|
|---|
Operational range
|
250 km road (Standard)
125 km cross-country
|
|---|
| Speed |
51 km/h road (Standard)
21 km/h cross-country
|
|---|
The kit:
For this project, I choose the kit SdKfz 8 DB10 Gepanzerte 12t (#01584) from Trumpeter.
 |
| Trumpeter box kit (#01584) |
Starting the building...First of all, how big is the SdKfz8 gepanzerte:
 |
| The hull of the SdKfz 8 gepanzerte...very huge!! |
The engine and the gear box: amazing details and a sad observation: all these details will be hidden ... The only option to see the details of the engine would be the open top panels, but aesthetically, this is not the best option ... I think I will do something heretical in relation to this...
 |
| Kojak with the engine and gear box!!! |
While I think about how not to be so heretical, let's do a little repair on the drive sprockets of this tractor. According to
Terry Ashley from PMMS, it is necessary to correct the positioning of the sprocket drive's teeth in relation to the reinforcement ribs of the part ... See the details below:
 |
Notice in the PMMS image the alignment of teeth with sprocket drive reinforcements: not correct!!
Cutting the tabs in the "teeth" part for new alignement... |
 |
The right and wrong alignement...
Now, modify the other sprocket drive, but in a "mirrored" way |
 |
The correction is done; notice the
the tooth edge aligned with the reinforcement; Left and right sides
Again, thanks a lot, Terry Ashley!! |
 |
The engine and gear box and the drive sprockets fixed...
The kit comes with 03 wheels and four front tires, with different tread bands in each pair.
This is giving me another idea: let's make a spare wheel !! |
But first, build the chassis:
 |
| Chassis done with power train in dry-run...Hmmmm |
I will cast the lower portions of the engine and gearbox and will keep the original detailed parts for future use. It is a waste to put these beautiful pieces and close them later ... And as only the lower parts appear we are going to make clones of these portions. For that, I will use a material used by dental laboratories to replicate models. It is a jelly called reversible hydrocolloid (agar-agar), because it liquefies at high temperature and gels at room temperature. The great advantage of this is that it is reusable ...
 |
The material for the reproduction of the pieces:
the agar-agar duplicator, parts of the duplicator cut into cubes to be heated
and the parts to be duplicated ... |
 |
Heating the agar-agar duplicator in microwave.
IT IS VERY IMPORTANT to heat slowly, to prevent boils...
The bubbles would ruin the future mold ...
Starting with 15 seconds and increase heat slowly... |
 |
The gel, when heated, liquefies ...
DO NOT OVERGROUND THE TEMPERATURE ...
DO NOT FORGET THAT ITS PARTS ARE PLASTIC !!!
Wait while the agar-agar completely liquefies ... |
 |
A good trick is to place the pot with the duplicator in a dish with ice water.
This speeds up cooling and gelling.
Note the pieces placed on the gel with a weight to prevent fluctuation ... |
 |
The duplicator completely gelled. You should make small incisions
on the retaining areas to allow removal of the parts from the mold.
Some sectors will tear, but just do it carefully to reduce the damage ... |
 |
With scalp, make incisions through the gelatin until it touches the piece.
When you move the part, these parts will open and
facilitate the removal of the original part. |
 |
The gelatin after removing the originals.
The torn parts can and should be returned to the duplicator's pot.
Remember that it is a reusable substance. |
Now that the heresy has been committed, it is time to duplicate the pieces ...
Use substances that do not "fight" with water in the gelatin, such as polyester resin and self-curing dental acrylic resin. DO NOT USE POLYURETHANE RESIN. The polyurethane reacts with the gelatin water, preventing its use. In my case, I used dental acrylic: fast and cheap.
 |
From left to right: powdered graphite, acrylic powder and acrylic liquid.
In a little glass jar, put acrylic powder and add the liquid until you get a semi-liquid paste.
Don't take too long ... the thing is quick to harden ...
Graphite powder (minimum amount) is to add dark color
to the acrylic (which in this case is pink ...).
Pour this substance into the model, preventing bubbles ... |
 |
The acrylic poured into the mold ...
As long as it does not harden, you can remove the excess with tweezers and / or scissors ...
Once hardened, only with an abrasive rotary tool in your Dremel you would this be possible ...
Wait 10 minutes... The chemical reaction of acrylic hardening is exothermic.
The material heats up at the beginning of hardening and then returns to normal temperature.
This indicates that the thing is ready !! |
 |
A "belly vision" of our task...
You can remove the gelatin from the plastic jar to make it easier to unmold ...
Cutting and tearing the gelatin is now very easy ... |
 |
The heresy is complete!! The parts of duplicator returns to the pot...
And the clones will be rectified with your Dremel ... |
 |
After removing the excesses, testing the clone parts in place ... Perfect !!
Belly view!!! |
 |
| The front suspension... |
 |
| And front suspension in place... |
 |
The clone parts in place with accessories...
Horrible in top view, but all this will be closed by hull...
The image above is what counts ... |
Well ... after all this filthy sin, let's go back to orthodoxy !!! Rear suspension time !!
 |
| Torsion bars and wheels... |
 |
| A little touch in metal... |
 |
| Giving to the vehicle a correct direction ... |
 |
| The girl standing on your own feet... |
 |
And in dry-fit with upper hull... No more heresy...
It's all ok now!!! |
 |
| After all these emotions, Kojak built benches to rest a little ... |
 |
As everything fit perfectly, time to weld the chassis with the hull ...
Left side... |
 |
| Right side... |
 |
| Upper view... |
 |
| Adding internal details ... |
 |
The final view of our heresy: no problems with clone parts...
She is perfect!! |
 |
| In the upper hull, detailing the air intake of the radiator ... |
 |
| Close view... Much better!! |
 |
Do you remember that this kit comes with an extra wheel and two spare tires ??
But the problem is that the wheel comes with the hub injected into the part ... |
 |
| This hub!!! We will have to have a small surgery ... |
 |
| Starting the surgery: Cutting the wheel hub !!! |
 |
The wheel without the hub and without the fixing screws.
I did this with my Dremel and some dental drills ...
I left only 3 screws, for fixing the wheel on the rack that will be built in scratch ... |
 |
| The front wheel with hub and the spare wheel without hub!! |
 |
| Testing the upper hull in position... |
 |
| Scratching the reck for spare wheel with plasticard... |
 |
| Testing... testing... |
 |
| Welding the rack in the hull's side... |
 |
| In position!!! |
 |
| Like a glove!!! |
 |
And since I'm working in scratch, let's change the way the jerry cans are attached to the side of the vehicle:
the original shape is with straps, with the two tanks being horizontal.
I decided to make a rack for the installation of 3 jerry cans vertically, just fitted ...
I think more practical at the time of battle !!
Plastruct "I" shape rods... |
 |
| Not two, but three jerry cans!!! |
 |
| A stowage rack on the other side... |
 |
| ...behind the spare wheel rack ! |
Something like this:
 |
| Replacing the width indicators with metal pins. Keeping these parts in plastic is a fracture for sure !!! |
 |
| Metal rules!!! |
 |
As my girl was only conceived at the end of the war, she will be "dressed" in
a dark yellow outfit, typical of late vehicles !!! |
 |
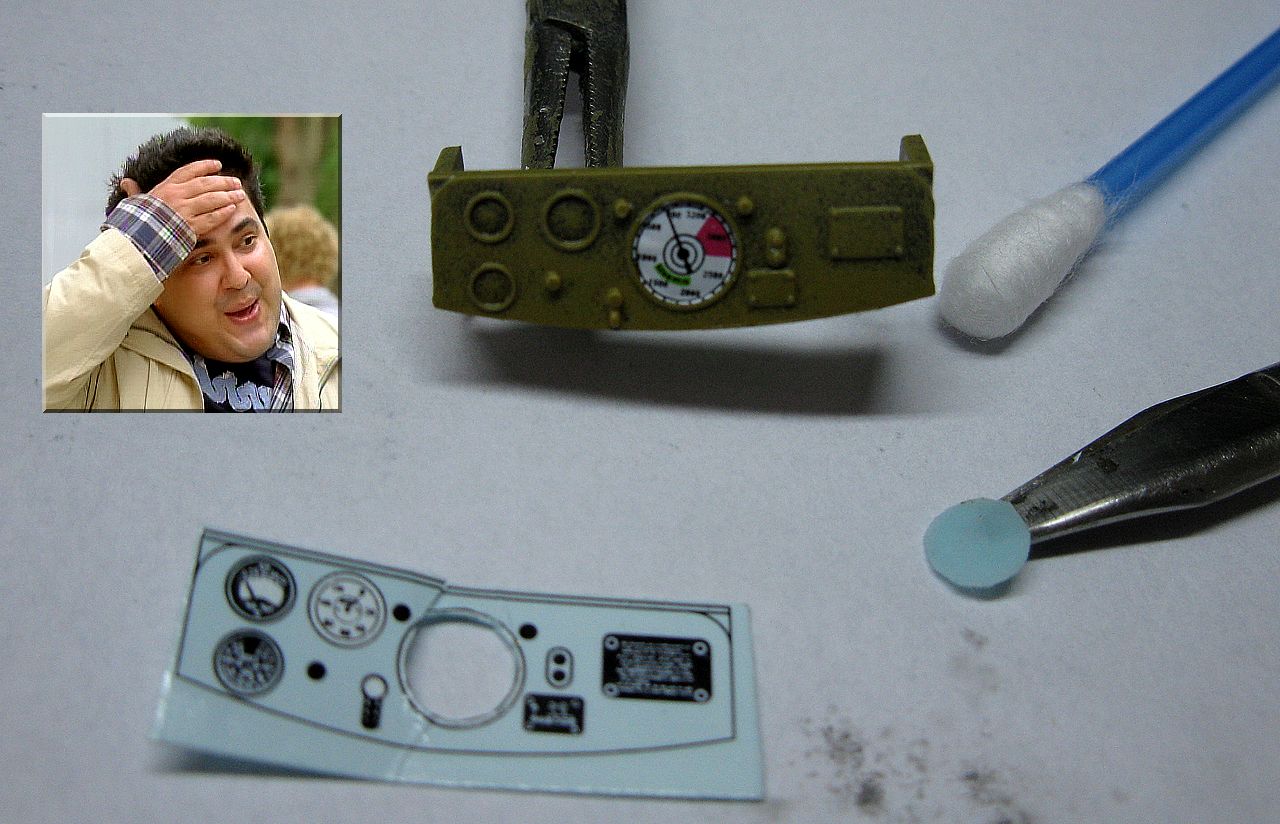
| Next step: interior details... |
Now, I can glue the upper hull in the main body...
But, first, painting and markings... As my girls are "late war" machines, both will have camouflages and colors typical of the end of WWII. The markings are a "poetic license" based on historical research, perhaps the third vehicle in the series never photographed ... But... let's go: here is a profile with the colors and markings of my SdKfz 8 Gepanzerte:
 |
| Luftwaffe rules!!! |
 |
| Base-color: dark-yellow, with shades and variations... |
 |
| left side... |
 |
| Painting a vehicle is always exciting ... and a real box of surprises !!! |
 |
Green strips. Do not worry about the "bright" aspect of green ...
The implacable god, Time (and its model version, the weathering ...), affects and changes everything ... |
 |
| Right side. Notice in the background the Flak 40/1 |
|
| The decals are from my spare box and the tactical sign I made with my laserjet |
 |
The "wet" aspect is due to the glossy varnish, to prevent the damn silvering. I didn't use Pledge this time ...
Vehicle number 3!!! |
 |
| Notice the spare wheel in the side of the hull: field adaptation!! |
 |
| Rear markings: Luftwaffe license plate, tactical sign, Balkenkreuz and Keep Distance!!! |
 |
| WL from Luftwaffe... |
A little bit of Chinese torture: LBL tracks ... But those are easy to build ... Using high technology: two popsicle sticks as guides ...
 |
| Kojak's lovely assistants provided the popsicle sticks ... |
 |
| 56 links for track!!! Piece of cake... |
 |
| ...and the tracks in position...testing the size!! The final pad for lock the track... |
 |
| Using AK track primer...Interesting... |
 |
| And the girl with new and robust shoes... Awesome!! |
 |
| New shoes indeed!!! Even with a spare shoe !!! |
 |
| Glossy and shiny ... That will change soon ... |
 |
| The girl is really very stylish ... |
 |
| Final touches and... |
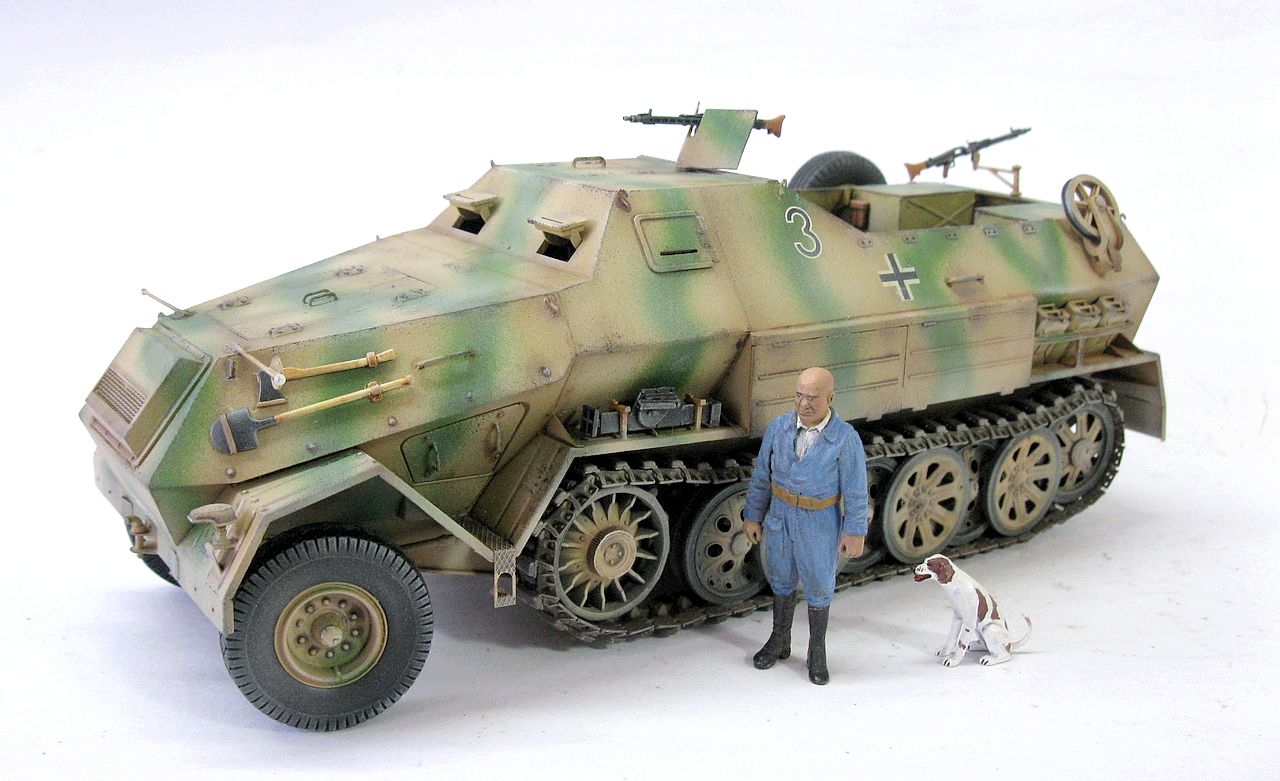
After the weathering, the girl was finally ready. Let's admire the SdKfz 8 DB10 Gepanzerte 12t armoured heavy artillery tractor, in the final days of the Nazi German, working with Luftwaffe near Berlin, in April of 1945.
 |
SdKfz 8 DB10 Gepanzerte 12t armoured heavy artillery tractor
Luftwaffe - unit unknown
Berlin, April - 1945 |
 |
| SdKfz 8 DB10 Gepanzerte 12t - left side |
 |
| SdKfz 8 DB10 Gepanzerte 12t - interior view |
 |
SdKfz 8 DB10 Gepanzerte 12t - interior view
notice the water jerry can below the poster... |
 |
| SdKfz 8 DB10 Gepanzerte 12t - right side |
 |
SdKfz 8 DB10 Gepanzerte 12t with Kojak and Rover, the dog!!
Man, this tractor is huge!! |
 |
| Bird view... |
Stay alert, gunners !!!


 The driver's cab was replaced by a lower, armored cupola and the engine compartment was lightly (14.5 millimetres) armored. The vehicle weighed 20 tonnes (20 long tons; 22 short tons), was 7.35 metres long, 2.8 metres tall and 2.65 metres wide. The gun could fire directly ahead without any problem, but traverse was limited to 15° to each side by the gun shield. Elevation was between -3° and +15°. All ten were assigned to the first company of the anti-tank battalion Panzerjäger-Abteilung 8 which participated in the Invasion of Poland in 1939, the Battle of France in 1940 and Operation Barbarossa in 1941.


Incredible work ! Il like this véhicule.
ResponderExcluirI dont understand your sprocket drive's teeth work.
In this website : http://www.fahrzeuge-der-wehrmacht.de/Artikel/Zgkw_12t.html you can see some photos of a restaured Gepanzerte.
And we see photos or it's exactly the opposite of what you did. It seem that alignment of teeth with sprocket drive reinforcements of the Trumpeter's model is correct.
Hi Scale72world... Thanks, man... About drive sprocket, seems to me a little derivation, like in the PMMS site...but... let's dig more in this matter!! Thanks again for your visit...Mi casa es tu casa!!
ExcluirSimplesmente fantástico, sempre acompanhando e aprendendo, uma ótima aula de historia e montagem!
ResponderExcluirMuito obrigado Marcão!! Como sumpre, a casa é sua!! Volte quando quiser!!!
ExcluirVery good idea with the decals, not nice that they are oversize.
ResponderExcluirAlways love your builds & use them in my scratch built as a source of good info.
Keep up the good work.
Ron Lebert
Hi, Ron...Thanks for your kind words, my friend!! hugs and welcome, always!!
ExcluirBrilliant as always...
ResponderExcluirOliv...Thanks man, thanks a lot!! Hugs!!
Excluirnice build marcos, can you tell us where you have found your big square pieces of metal for good alignment ?
ResponderExcluirHubert, thanks, man... The squared metal pieces are scraps of selenoid valves that I found in a washing machine repair shop. It is the metallic parts of the electromagnets that drive the selenoid water valves. Plastic and copper parts surround these metal parts and are perfectly straight and perpendicular at their angles. Zero cost and a great recycling policy ... Good hunt and take care, my friend!!!
ResponderExcluirGran trabajo, fantástico conjunto con el cañón antiaereo.
ResponderExcluirGracias Carlos!! Gracias por tu palabras!! Saludos!!
ResponderExcluirThe 12,8cm Flak 40/1 and trailer had a combined weight of 28tons. There is no way that your Sd.Kfz 8 would be able to tow this behemoth monster. Even the Sd.Kfz 9 would struggle especially on a climb.
ResponderExcluirSavchenkov1...the traction capacity of a vehicle depends on "n" factors ... The main thing is the terrain ... These guns acted on the outskirts of cities, in direct anti-aircraft protection of large urban centers and industrial centers. They traveled on roads and hardly through battlefield terrain. Sdfz 8 could pull this mass under these conditions, without any major problems. Everything is a matter of necessity. It is clear that in a cross-country situation, the contest of more traction would be necessary, but this is not the picture exposed. But thank you very much for your participation here at Bunker. A hug.
Excluir