
Atteeeeeention!
Today we are going to meet another member of the so-called "British Ecclesiastical Self-Propelled Artillery"... With no regrets or sins, let's meet this girl who was almost like a temporary solution for the Battlefield, but fulfilled her role in a heroic and competent way. Today is the day to learn a little more about Bishop, the 25-pound self-propelled artillery used by the British in the early periods of WWII. So, pay attention to the marking of the target and pass the ammunition, my old boy!!!!

 |
| Bishop 25-pdr SPG on your debut on the Western Desert 25 September1942 No doubt that this photo inspired the box art above. font: Imperial War Museum |
History:
The Bishop was a British self-propelled artillery vehicle based on the Valentine tank and armed with the Ordnance QF 25-pdr gun-howitzer, which could fire an 87.6 mm (3.45 in) 11.5 kg (25 lb) HE shell or an armour-piercing shell.
 |
| Valentine VI (III/IV built in Canada) Base Borden Military Museum |
 |
| Ordnance Q.F. 25 pounder gun Littlehampton in Sussex. 408 Battery -146 Field Regiment. 1941 |
A result of a rushed attempt to create a self-propelled gun, the vehicle had numerous problems, was produced in limited numbers and was soon replaced by better and improved designs.
 |
A (retouched) pic from "Maintainance Manual for the Ordnance, Q.F. 25 pdr, Marks II and III on Carriage, 25 pdr, Mark I and Mounting, S.P. 25 pdr, C, Mark I and Mounting, Valentine 25 pdr Gun, Mark I" ( a very big name). published by 'The War Office' on 23rd September 1944. The name Bishop was not mentioned... pic and informations from Mihai Crisan (thanks a lot, man!) |
Design and development:
The rapid manoeuvre warfare practiced in the North African Campaign led to a requirement for a self-propelled artillery vehicle armed with the 25-pounder gun-howitzer for fire support for infantry. In June 1941, the development was entrusted to the Birmingham Railway Carriage and Wagon Company, using the robust and reliable chassis of the Valentine Infantry tank. A prototype was ready for trials by August and 100 units were ordered by November 1941. The result was a vehicle with the formal title: "Ordnance QF 25-pdr on Carrier Valentine 25-pdr Mk I".
 |
| T17474 prototype of Bishop 25 pdr. SPG under trials, still with "T" identification number of tank. Notice the casemate roof, with indefinite hatch and normal periscope in the right rear roof. England, August - 1941 pic from Mihai Crisan |
 |
| T17474 prototype of Bishop 25 pdr. SPG 3/4 left front - England, August - 1941 pic from Mihai Crisan |
 |
| T17474 prototype of Bishop 25 pdr. SPG 3/4 right rear view - England, August - 1941 pic from Mihai Crisan |
 |
| T17474 prototype of Bishop 25 pdr. SPG left side - England, August - 1941 pic from Mihai Crisan |
The vehicle was based on the Valentine II hull, with the turret replaced by a fixed boxy superstructure with large rear doors. It was nicknamed the "Bishop" for its high mitre-like superstructure.
|
| The best known photo of Bishop 25-pdr SPG, on your debut on the Western Desert 25 September1942 font: Imperial War Museum |
 |
| Bishop 25-pdr SPG in the Western Desert (rear view of pic above) 25 September1942 font: Imperial War Museum |
Into this superstructure the Ordnance QF 25-pdr gun-howitzer was fitted. As a consequence of the gun mounting, the resulting vehicle had very high silhouette, which is a disadvantage in desert warfare.
 |
| A typical towed artillery set: Q.F. Ordnance 25 pdr. gun, ammo trailer and Quad gun tractor. North Africa, December 1941 |
 | |
| Rear view of the same Bishop S32944 above Notice as the fighting compartment was tight...
|
 |
| Bishop 25-pdr SPG showing the crew inside and outside of the fighting compartment. 7th Armored Division and 46th Division Near Cava, Italy - 28 September 1943. font: Imperial War Museum |

 |
| Stowage of the casemate's interior - left view |

 |
| Stowage sketch of Bishop 25pdr. SPG exterior view pic from Mihai Crisan |
 |
| Rear view of Ordnance QF 25 pdr. gun in the Bishop's casemate pic from Mihai Crisan |
 |
| Bishop 25pdr. SPG - S 32967 England - 1941 pic from Mihai Crisan |
 |
| Bishop 25pdr. SPG - S 32967 - front view England - 1941 pic from Mihai Crisan |
 |
| Rear view of Ordnance QF 25 pdr. gun in the Bishop's S 32967casemate pic from Mihai Crisan |
 |
| Bishop 25pdr. SPG firing in Italy - 1943 46th Division - 142nd Field Regiment 23rd Armored Brigade |
 |
Bishop 25 pdr. SPG. 1st Army - 1st Parachute Btn. at Le Krib 6 March 1943 - Tunisia |
 |
Bishop 25 pdr. SPG. - same vehicle above 1st Army - 1st Parachute Btn. at Le Krib 6 March 1943 - Tunisia pic from Mihai Crisan |
 |
| Rear view of Bishop 25pdr. SPG casemate F Troop, 473 Battery - Royal Artillery - 102nd Regts. 23 March 1943 - Tunisia font: Imperial War Museum |
 |
Same dirty vehicle above, but in another angle of view. The unit is belong to the 1st Army and carries the shield of the 1st Army on the rear of the auxiliary fuel tank. Markings on the rear include the letter "F" on the left and 201 on the right F Troop, 473 Battery - Royal Artillery - 102nd Regts. 23 March 1943 - Tunisia font: Imperial War Museum |
 |
| Three Bishops 25-pdr SPG in action near Grenadier Hill The vehicle in the foreground is the same (dirty) Bishop in the two photos above F Troop, 473 Battery - Royal Artillery - 102nd Regts. 23 March 1943 - Tunisia font: Imperial War Museum - NA 1449 |
The maximum elevation for the gun was limited to 15 degrees, reducing the range to 5,900 m, about half that of the same gun on a wheeled carriage. The maximum depression was 5 degrees, traverse was 8 degrees (4 degrees to each side), and the vehicle could also carry a Bren light machine gun, for close defense.
 |
| Bishop 25-pdr SPG near Cava, Italy - 28 September 1943. The vehicle is perched on a ramp to raise the angle of fire and thereby increase the weapon's range... font: Imperial War Museum |
By July 1942, 80 Bishops had been built; as the last 20 were being built, an order for a further 50 was placed, with an option for a further 200 but the tender was abandoned in favour of the American M7 105 mm SP howitzer, named "Priest" in British service. Turkey received 48 Bishops in 1943.
In action:
The Bishop first saw action during the Second Battle of El Alamein in North Africa and remained in service during the early part of the Italian Campaign.
 |
| Bishop 25-pdr SPG of 8th Armoured Division being pulled out a 'Z' craft. When the tanks reach the quay they are driven off under their own power. Port Tewfik, Egypt, 10 July 1942. font: Imperial War Museum |
 |
| Bishop 25-pdr SPG of 8th Armoured Division When the tanks reach the quay they are driven off the port under their own power. Port Tewfik, Egypt - 10 July 1942. Notice the Leyland Retriever Gantry 6x4 truck in background... font: Imperial War Museum |
 |
Bishops 25-pdr SPGs of 8th Armoured Division After disembarking from the ship, the curiosity for the new weapon. Repair the salt spray protections still on the gun. pic from Mihai Crisan |
 |
| Bishop 25-pdr SPG in the desert... 121st Field Regiment - A Battery- Royal Artillery Suporting 23rd Armored Brigade 13 November 1942.North Africa - Libya. font: Imperial War Museum |
 |
| Bishop 25-pdr SPG of 142nd Field Regiment - 231st Brigade firing against the Germans, between Raddusa and Agira 27 July 1943. Sicily. font: Imperial War Museum |
 |
| Bishop 25-pdr SPG "EDNA II" of 142nd Field Regiment After the fire barrage, the crew providing maintenance on the vehicle... 27 July 1943. Near Raddusa and Agira - Sicily. font: Imperial War Museum |
| Bishop 25-pdr SPG of 142nd Field Regiment - 23rd Armored Brigade Royal Artillery, being transported by a Diamond T980 tank transporter of 610 Heavy Recovery Section - 10th Corps - REME. Sector of the 5th Army Front -23 December 1943 - Italy font: Imperial War Museum |
 |
| Bishop 25-pdr SPG 506th Battery, 142nd Field Regiment 14 September 1943 - Italy. font: Imperial War Museum |
Due to its limitations and the Valentine's characteristic slow speed, the Bishop was poorly received. To increase range, crews would build large earthen ramps and run the Bishop onto them, tilting the vehicle back to increase the elevation.
 | |
| Bishop 25-pdr SPG of 142nd Field Regiment - Royal Artillery operating at a captured airfield among the wreckage of German Gotha Go 242 Grazzanise - Sicily, 12 October 1943. Notice the ramp, dug in the ground, made to increase elevation...
|
 |
| Bishop 25-pdr SPG of 142nd Field Regiment - Royal Artillery During the night of 12th October, a heavy artillery barrage was laid on enemy positions north of the River Volturno in preparation for the crossing of the river by British assault troops. The Bishops operating from an aerodrome south of Grazzanise (same aerodrome in the pic above). The wreckage of many Italian and German planes wich were on the airfield can be seen in the light of the gun flashes. To obtain more elevation the Bishops were run on to the wreckage of some of these planes, as seen in this picture. 12 October 1943. font: Imperial War Museum |


The Bishop was replaced by the M7 Priest (105 mm) and Sexton (25 pounder) when those became available in sufficient numbers and surviving Bishops were diverted for training in self-propelled gun tactics. Unfortunately, all the Bishops were disbanded at the end of the war, none of which survives to this day.
 |
| M7 Priest 105mm SPG comes ashore from a LST 22 January 1944 - Anzio, Italy. font: Imperial War Museum |
 |
Sexton Mk.II (early) SPG drives through the shattered village of Putanges-le-Lac, Normandy - France 20 August 1944 font: Imperial War Museum |
Fun fact - British self-propelled guns with ecclesiastical names:
- A British self-propelled gun armed with the Ordnance QF 25-pounder in design from 1941 was given the service name Bishop as its appearance was said to resemble a bishop's mitre. A replacement, the US 105 mm Howitzer Motor Carriage M7 was called Priest by the British, as part of its superstructure (.50 MG station) was said to resemble a priest's pulpit. Following this line of names, a 1942 self-propelled QF 6 pounder on truck chassis was named Deacon, and a 1943 tracked QF 25-pounder was called Sexton. This practice was continued after the war with FV433 Abbot and ended in 1993 with the introduction of the AS-90.
- In 29 April, 1943, the Canadians officially named the 25pdr.,tracked of Deacon, , until it was realized that had already been assigned in the past for the armoured lorry with 6pdr. gun. When they realized the error, they adopted the name SEXTON. Deacon was born in December 1942.

Specs:

| Bishop - Ordnance QF 25-pdr on Carrier Valentine 25-pdr Mk 1 | |
|---|---|
| Type | Self-propelled artillery |
| Place of origin | United Kingdom |
| Service history | |
| In service | 1942 |
| Used by | British Commonwealth Turkey |
| Wars | WWII |
| Production history | |
| Designed | 1941 |
| Manufacturer | Birmingham Railway Carriage and Wagon Company |
| Produced | 1942–1943 |
| No. built | 149 |
| Specifications | |
| Mass | 17.5 t |
| Length | 5.64 m |
| Width | 2.77 m |
| Height | 3.0 m |
| Crew | 4 (Commander, gunner, loader, driver) |
| Elevation | -5° to +15° |
| Traverse | 8° (4° left - 4° right) |
| Armour | hull: 7mm - 60 mm casemate: 10mm - 30mm |
Main armament | QF 25 pounder gun-howitzer with 32 rounds |
Sec. .armament | 0.45 Thompson MG - 16x20 320 rds. |
| Engine | AEC A190 diesel -131 hp at 1.800 rpm |
| Power/weight | 7.7 hp/tonne |
| Suspension | Two Vickers slow motion suspension bogies each side |
Operational range | 177 km +145 km (int. + ext.) |
| Maximum speed Fuel - internal tank Fuel - jettisionable | 24 km/h 164 liters (internal) 136 liters (external) |
The kit:
For this commission project, I'll use an old classic, a kit that for many years was the only possibility to build a Bishop, in 1/35 scale. With you, coming out of the dusty Bunker shelves, the kit "Bishop" Mk.I 25 pdr. (#359504) made by VM Company, of Saint-Petersburg, Russia, in 1995.
 |
| Bishop Mk.I 25 pdr. - VM Company box art (#359504) |
This kit reigned in the model world for years, being relaunched and reboxed by many, many brands, until Bronco Models, in 2010, released its version, totally new tool.
 |
| Bishop 25 pdr. from Bronco Models (#35077) - 2010 |
But as the Bunker is almost a true Museum of Modeling, let's make these kits modern and perfect for weekend military modelers, smelling like mommy milk... A true radical scale modeler like Kojak loves challenges: Transform a VM kit, a Maquette or a Toga one in a piece worthy of a collection... This is what I call "root modeling"!!!!
So, it's time to separate the true military modelers from the "plastic piece gluers"...
 |
| Kojak is a tough guy!! |
Well...first of all, the instructions booklet is awful. I strongly recommend downloading Dragon's Valentine Infantry Tank instruction manual for chassis and suspension construction. Although the kit is the same, the Dragon's manual is much better designed and detailed, what prevents buildings errors. You can download Dragon's Valentine Infantry Tank booklet from excellent Scalemates' website!
 |
| Examples of instruction booklets |
But let's start the construction... and the first round of the fight: Here's a small detail of the plastic contraction...typical of last century kits....
 |
| Plastic contraction in the surface of the bogies suspension units... Man, this is intense... Only Crom, the God of Steel can help the bald... |
 |
| ...but it looks like Crom doesn't really care!! |
The first thought that comes to mind is: PUTTY!! No... no way... The best option here is to fill the "holes" with the same material, the styrene. Time to make some stretched sprues, with remnants of "sprue trees" of pieces...
 |
| Cake recipe: Lighter, lamp, cutter, lighter, sprue tree, defective parts and a ton and a half of patience and good intentions... |
 |
| After stretching the sprues, we will cut and discard the thin portions (red crosses) and use the "conical" portions (green circles), which will fill in the defects (red arrows)... The fire photography was, let's say, aesthetically pleasing.... |
 |
| Preparing the plastic "grafts"... |
 |
| The "grafts" installed and glued... Now, wait for the glue to dry to cut off the excess... |
 |
| Meanwhile, a small contraction defect in the casemate armor can and should be filled with putty... |
 |
| Done...Now... wait for drying, for later sanding... |
 |
| The grafts in the bogies suspension units, after being cut... the appearance was very strange, but this will all be corrected with a thin layer of putty diluted with acetone (and applied with a brush...) |
While we wait for the bogies suspension units (and their grafts) to dry, a great tip: In the construction of the suspension arms, we must first glue the pieces 47, as they will define the position of the pieces 46 (bogies suspension units) in their correct places. Pieces 46 "slide" through grooves on the walls of the lower hull, without a defined position...but pieces 47 do this delimitation, when they fit into the pins of pieces 46...
 |
| Step 01:Parts 47 (red arrows) placed in the lower hull... The brackets for the bogies (46) are waiting... |
 |
| Step 02: installing parts 50 and 51 (idler wheel tensioners) on the front portion of the hull... |
 |
| The bogie (part 46) limited (red arrow) by part 47. Note that the bogie could slide up and down (green arrows). |
 |
| The pin of 46 part in the 47 part... everything perpendicular. |
 |
| Alignment of wheels and suspensions... |
 |
| Alignment of wheels ( in dry-run) and suspensions... everything perpendicular. |
 |
| Chuck is very pleased... |
 |
| Closing the chassis... Notice the bogies with putty in the scars... The dilution is applied with a brush...easy and fast... |
 |
| The hull. almost ready... |
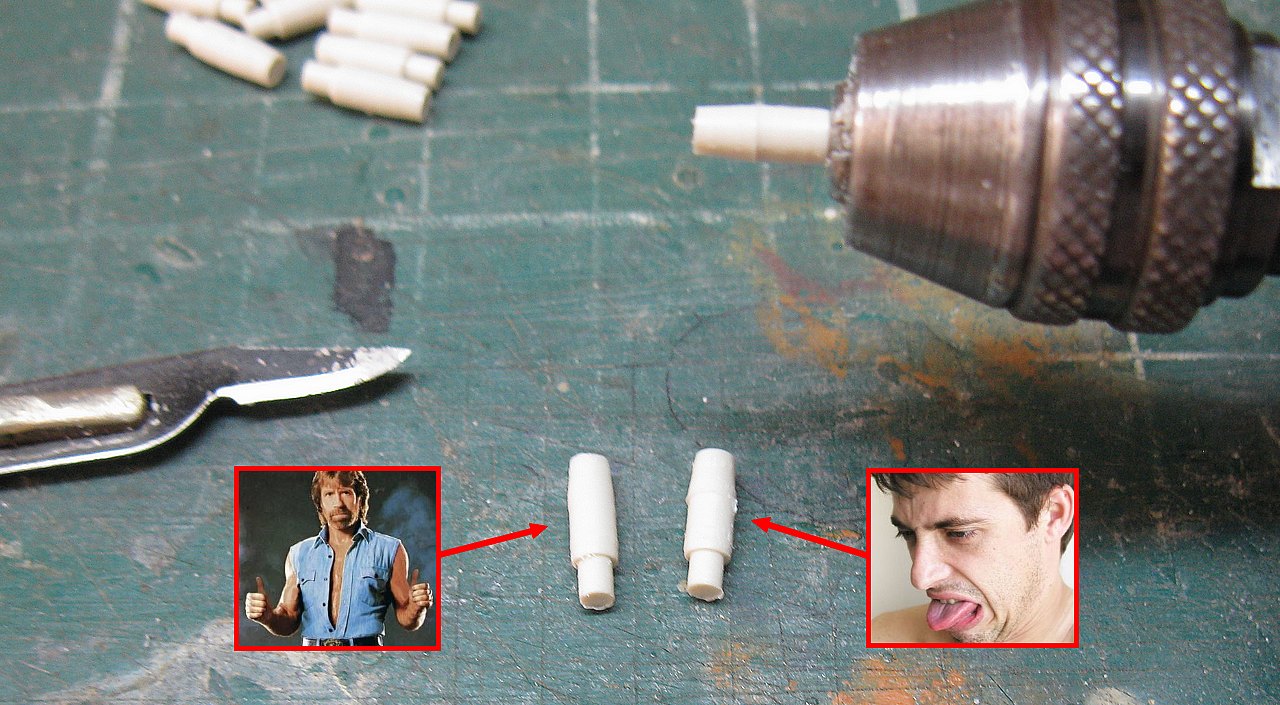
Building the exhaust , we note that exhaust terminal is solid... Here's a defect of the kit's age, but easily fixed: let's open the exhaust end... first, make markings for the 0.2mm diameter drill...
 |
| Using the fine point of the scalpel to make the marks for the perforations with a 0.2mm diameter drill... |
 |
| After drilling, mend the holes with a 0.3mm diameter dental cutter drill, installed in the Dremel. |
 |
| The end of exhaust, open to exhaust gases... But the thing is not over yet... |
 |
| The tow hook in the kit is too rough. I decided to substitute it for one of Tamiya's Chevy LRDG scrap... Much better!! |
 |
| Adding little scratches to the old girl, she gets more and more decent... In addition to improving the kit, we had a lot of fun!!! This is old school modeling!! |
 |
| The hull is growing... |
 |
| Let's replace those horrible plastic handles with something more correct... |
 |
| Eliminating pin marks with putty... |
 |
| Bishop's casemate...right side |
 |
| Bishop's casemate...left side |
 |
| Puty: the invention of the Gods!!! |
 |
| Details...Notice the water can racks, repositioned in the rear left fender. |
 |
| The exhaust outlet diffusers were missing... I said I hadn't finished this subject... |
 |
| Bishop's front hull... |
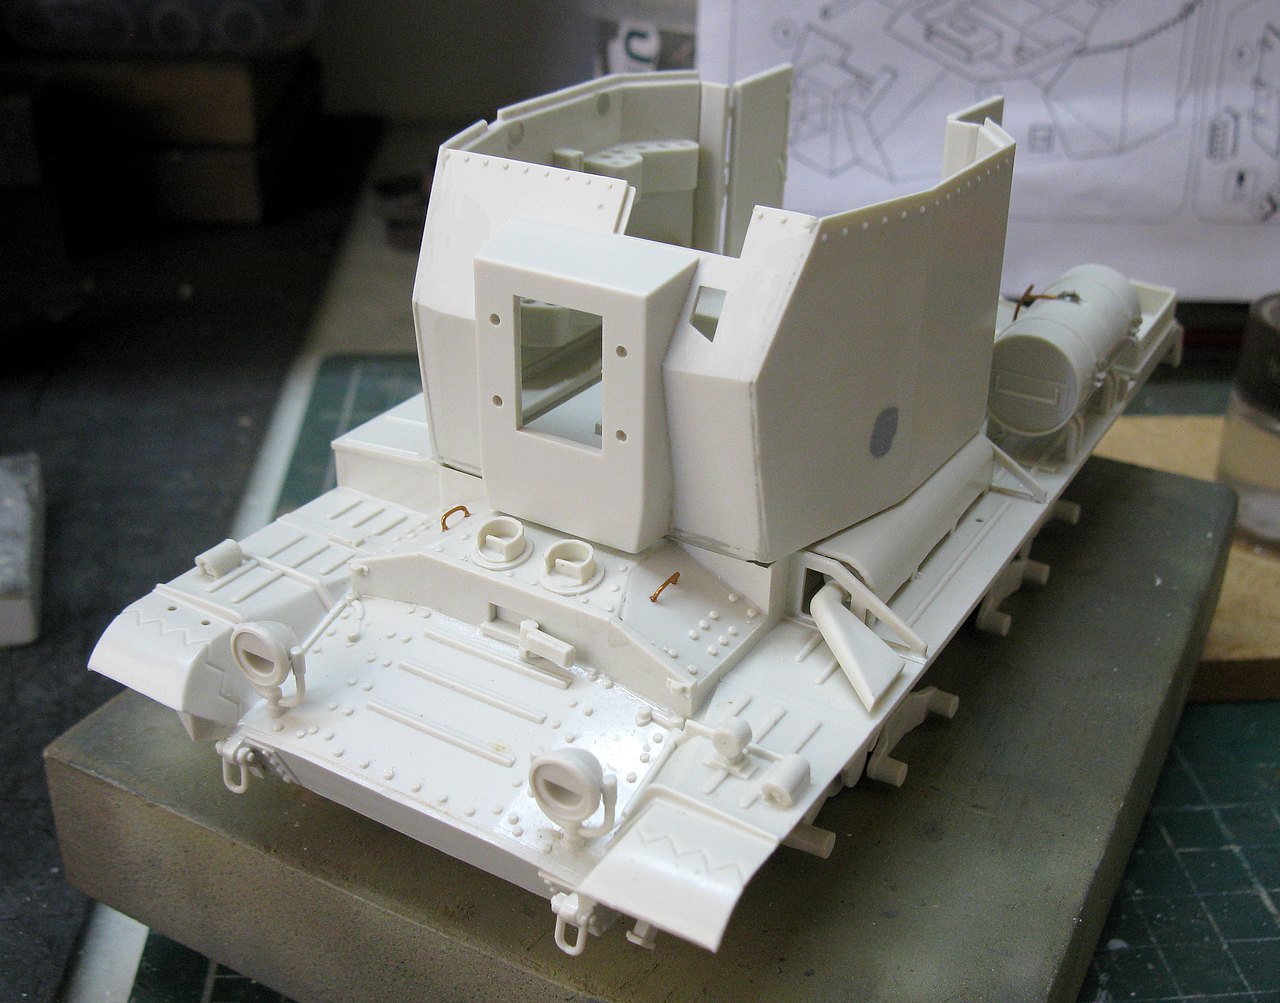 |
| Dry-run with casemate... |
 |
| Rear view... |
 |
| Details and litle parts under construction. Notice the Ordnance QF 25 pdr. gun... |
As I said before, this girl it's from another century, but very, very pretty...
 |
| A classical beauty: Lily Elsie |
And it can be even prettier...with little big details: For example, the ventilator fan in the casemate's roof, which in the kit (part no.35) is just rotten. But with a plastic rod from sprue, small strips of thin plasticard and a little whimsy we can make this girl a good upgrade, because she deserves it...
 |
| Making the ventilator fan... lots of fun!! |
 |
| The ventilator in position... The schematic drawing of Bishop's turret was invaluable... Chuck is pleased!! |
 |
| And speaking in upgrades, based on photos and schematic drawings, the head and back cushion pads and the rear door lock (fixed in the locked position). Again, Chuck is happy!! |
 |
| Yet another sign of the kit's age: the ammo has a lot of burrs... but it's easily rectified with a Dremel. |
 |
| After and Before... I love (and Chuck, too...) my Dremel!! |
 |
| And now, time for the painting. White primer, for the casemate and hull interiors... As you can see, I work with a lot of products... Here, Tamiya... |
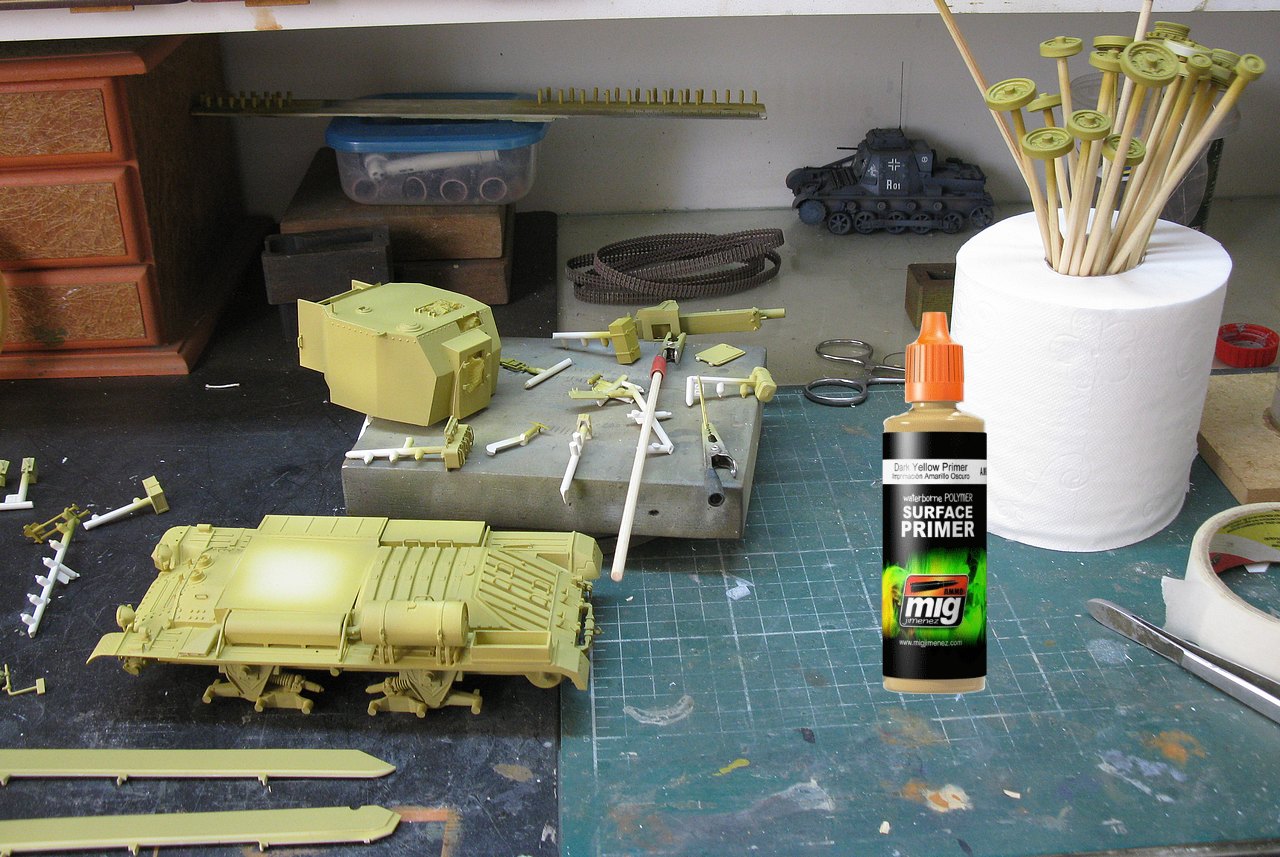 |
| Now, it's Mig Primer.. in dark yellow... |
Well, it's time for one of the facets of modeling that I like a lot: the markings. Normally, I like to have a historical basis to make the markings.... Either reproducing a specific vehicle or reproducing a vehicle that could have existed (based on an original photo, citing location, date and units involved...). Well... My choice is for this last type of markings. So let's do the research...
The kit comes with a decal sheet with almost all markings printed incorrectly:
 |
| VM Models decal sheet |
The decal sheet of VM models presents the option of two vehicles: the S32941 and the S32944. Both vehicles feature real photos:
 |
| Bishops 25pdr. SPG S 32941 & S 32944, from 121st Field Regiment - Royal Artillery A & C turret markings, from 1st and 3rd Batteries, A & C troops North Africa - 1942. |
As you can see in the two real photos above, the markings are clear and sharp, but the work of the people in the research department at VM Models really went wrong. Even the serial numbers in the VM decal are wrong, with that little "S"...
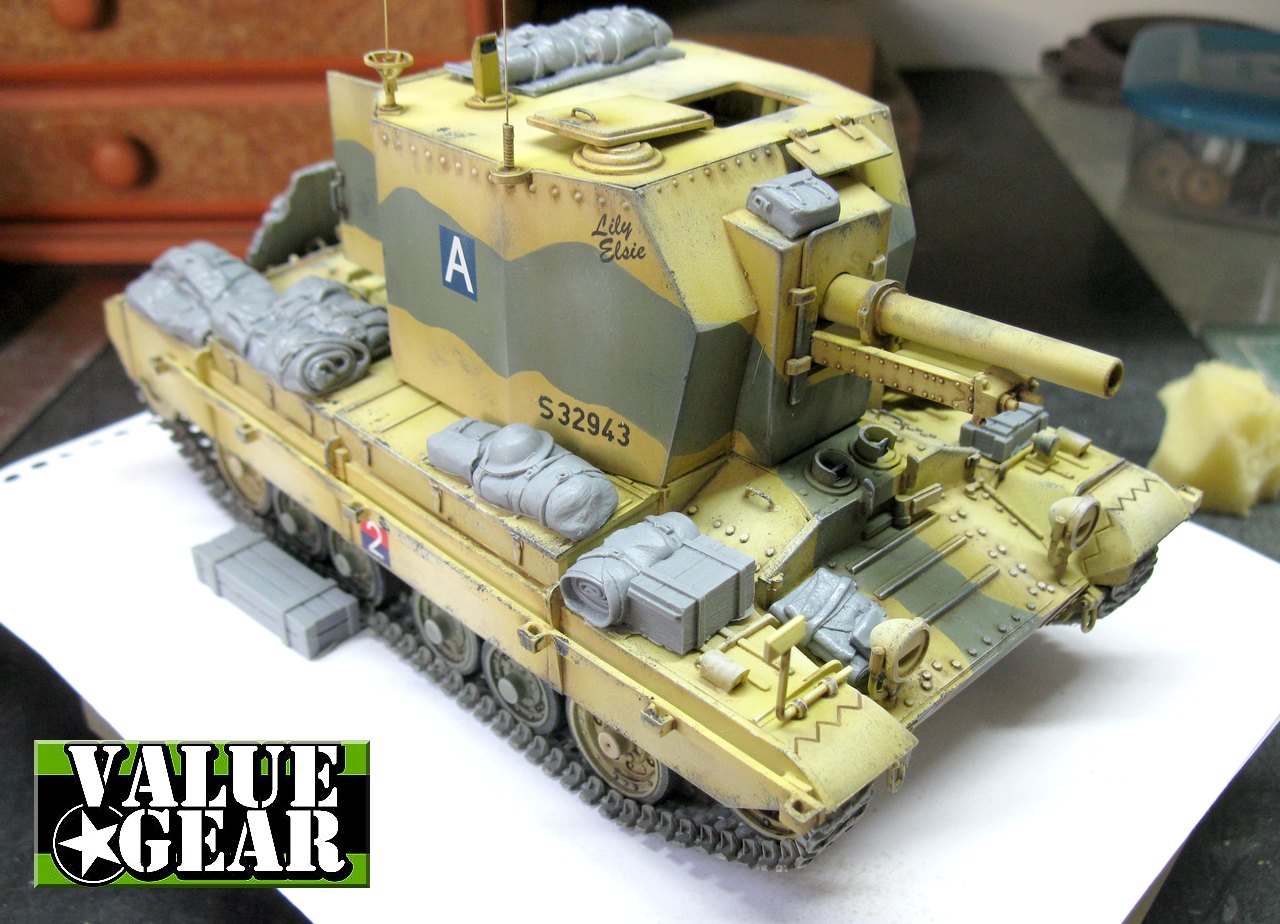
I decided to make my girl from the same unit, taking advantage of the only "correct" decal on the decal sheet, that of the turret marking (A in blue field). I loved the desert's two-tone camouflage... And since I'm going to have to print my decals, I'm going to make a hypothetical S 32943 vehicle, which would have fought in the desert battles of North Africa in 1942. Something like this:
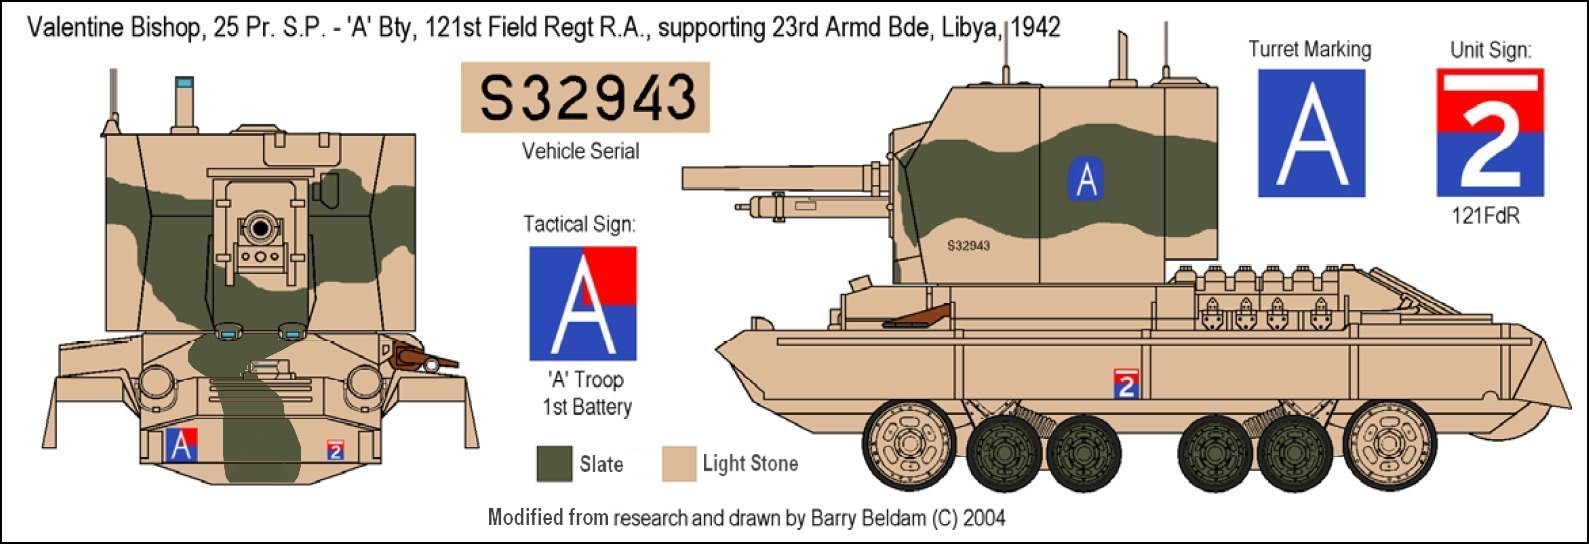 |
| My S 32943 Bishop girl, with corrections (cammo in the front hull) based in the real pics... |
In the meantime, my good friend Peter Jason Lai from Malaysia asked me if the name of my kit would be "Lily Elsie" (which I used as an example of classic beauty..) and it gave me a snap: Why not officially baptize my Bishop with the photo of this pretty girl from the Edwardian era ??
I didn't just want to put the girl's name on my Bishop, but to do something more "individual", like an airplane nose art... We know that WWII airplanes had amazing nose art, some of them very well detailed:
 |
| A beautiful and very well executed nose art on the bow of a B-24 Liberator |
 |
| Here's the best example of detailing in a nose art: Major Richard I. Bong and his P-38 Lightning, named after his wife, Marge. |
 |
| Example of an artist-mechanic starting his work... |
Ok...ok...we all know that nose arts on airplanes are pretty common, but what about tanks??? And before someone yells "that doesn't exist!", let's do some research!!
 |
| US Army Corporal Paul F. Janesk posing in his jeep "Shortstop" in Sicily, Italy - 3 September 1943. At that time, Benito Mussolini had been deposed (thus marked with an "X") |
But a Jeep is not a tank, scream the most fanatical and radical "Rivet Counters", their mouths foaming in frenzy!
Oh, Immortal Gods...how long will I be among you??
 |
| M4A3E8 Sherman "PaperDoll" |
 |
| M4A3 "Classi Peg" Philippines, 1945. |
But these tank designs are about cartoon characters and not real people!!!!!!
 |
Sherman M4A2 "The Black Orchid" - USMC Pacific Theater |
But the British didn't do that!!!
 |
| from Bison Decals |
Well...after this intense, heated debate and based on the evidence above, meet my new girl, the Bishop 25pdr. SPG "LILY ELSIE", belonged to 121st Field Regiment - Royal Artillery. She heroically served with the A troop, 1st Battery, suporting the 23rd Armoured Brigade, in the battles in the Libyan Desert, North Africa, in november 1942.
 |
| Bishop 25pdr. SPG "LILY ELSIE" markings. |
 |
| Racks in the sandshields for rollbags and disguise screens |
Painting time: first of all, apply with an airbrush a layer of slate color over the yellow primer, in the regions that will be camouflaged.
 |
| Slate over yellow primer. Notice the mask in the water-can rack position, like the real vehicles... Water can rack in top of the rear left fender. |
 |
| After masking with paper tape, let's paint with light stone color - left view |
 |
| Masking with paper tape right view |
 |
| The vehicle painted with light stone and with the masks removed. Notice the small tonal variations... The rear "ladder" (water-can rack impression) in the rear left door was achieved with a discreet cloud of light stone over the paper masking tape. |
 |
| Front view. The turret is in dry-fit |
 |
| Right view of the Bishop. |
 |
| Internal hull in white... |
 |
| The girl putting on your shoes... left view |
 |
| The new shoes: right view... |
 |
| Painting and interior details of the turret... right side |
 |
| Painting and interior details of the turret... left side |
 |
| Painting and interior details of the turret with the 25pdr gun - left side |
 |
| Painting and interior details of the turret with the 25pdr gun - right side |
 |
| The painting and weathering of the turret roof... |
 |
| Turret roof glued in position... left view Notice the aerials (made with acupuncture needles...) and the Commander's hatch. |
 |
| Turret roof glued in position... right view Notice the aerials (made with acupuncture needles...) and the Commander's hatch. |
 |
| Turret - rear view |
 |
| Interior hull with weathering... |
 |
| Interior hull with weathering... front left view |
Now that the paint is done, while it dries completely, let's make the art of the decals in Corel Draw software. "Lily Elsie" vectorized and miniaturized to the desired size. I print the design on an A4 paper sheet...I cut out a strip of transparent decal and tape it over the printed design and return the sheet to my laser printer. When printing, the print is located exactly on the fragment of the transparent decal. I printed two "nose arts" in case of damage the decal. The objective is to use only one complete nose art (on the left side, like in airplanes...) and, on the other side, apply only the name. The painter-mechanic (Kojak is a perfect artist...) was afraid that he would not be able to reproduce the girl's face perfectly twice. A wise and logical decision...
 |
| decals made by Panzerserra |
After 2 or thin layers of Pledge (Future) applied with an airbrush in the markings positions, I wait the Pledge to dry completely and start applying the decals in their positions...
 |
| Markings: left side. The nose art and serial numbers were made by me... The AoS of 121st Field Regiment are from Archer. The "A" in the blue field is VM Models decal |
 |
| Kojak's nose art!! Perfect!! Soooo pretty!! |
 |
| Front hull decals from Archer |
 |
| The right side, same recipe... Kojak is wise and prudent. He didn't dare make another Lily as it's hard to achieve perfection twice in a row... |
 |
| Rear markings from my spare parts decal box... |
 |
| Now, another another layer of Pledge to completely seal the decals, wait for drying and apply a layer of matte varnish, so we can start the final weathering. |
And, unfortunately, the worst part is approaching: the link-by-link tracks... which I hate with passion!!!

But the way is to face the misery... Let's install the links in their positions...
 |
| Cutting the links with the cutter... The mountain of links represents half of the one provided by the kit... Let the terror begin!!! |
And to my surprise, the thing was not as bad as it seemed... An hour after using tools developed by NASA:
 |
| High-tech tools for build thid... Popsicle sticks are the icing on the cake... |
 |
| Now the girl is wearing her shoes, properly... Right side.... |
 |
| One hour later, the left side... |
 |
| After the shoes, time to wear the skirts... Our girl with the much needed (for the desert...) sand skirts... Also note the commander's periscope and the driver's rearview mirror. Left side view |
 |
| Sand skirts - right side...The turret was also glued in place. |
 |
| Some details that were being forgotten: the fire extinguisher and the gun barrel cleaner "swab" (red arrows) |
 |
| With the matte varnish applied, the decals disappear, leaving only the Kojak artwork. |
But continuing the project; how about putting some accessories on Lily Elsie??
 |
| Roll bags, crates and other things from Value Gear Details... always a good choice!!! |
 |
| Accessories - left view |
 |
| Value Gear stuff, in the rear deck... Notice the leather straps of the water cans, made with painted paper-tape... I was forgetting... |
 |
| Accessories in white primer... |
 |
| And after painted... |
 |
| Ugly thing are "magnetic" accessories. Straps to keep everything in place!!! |
 |
| Lily loves accessories... |
 |
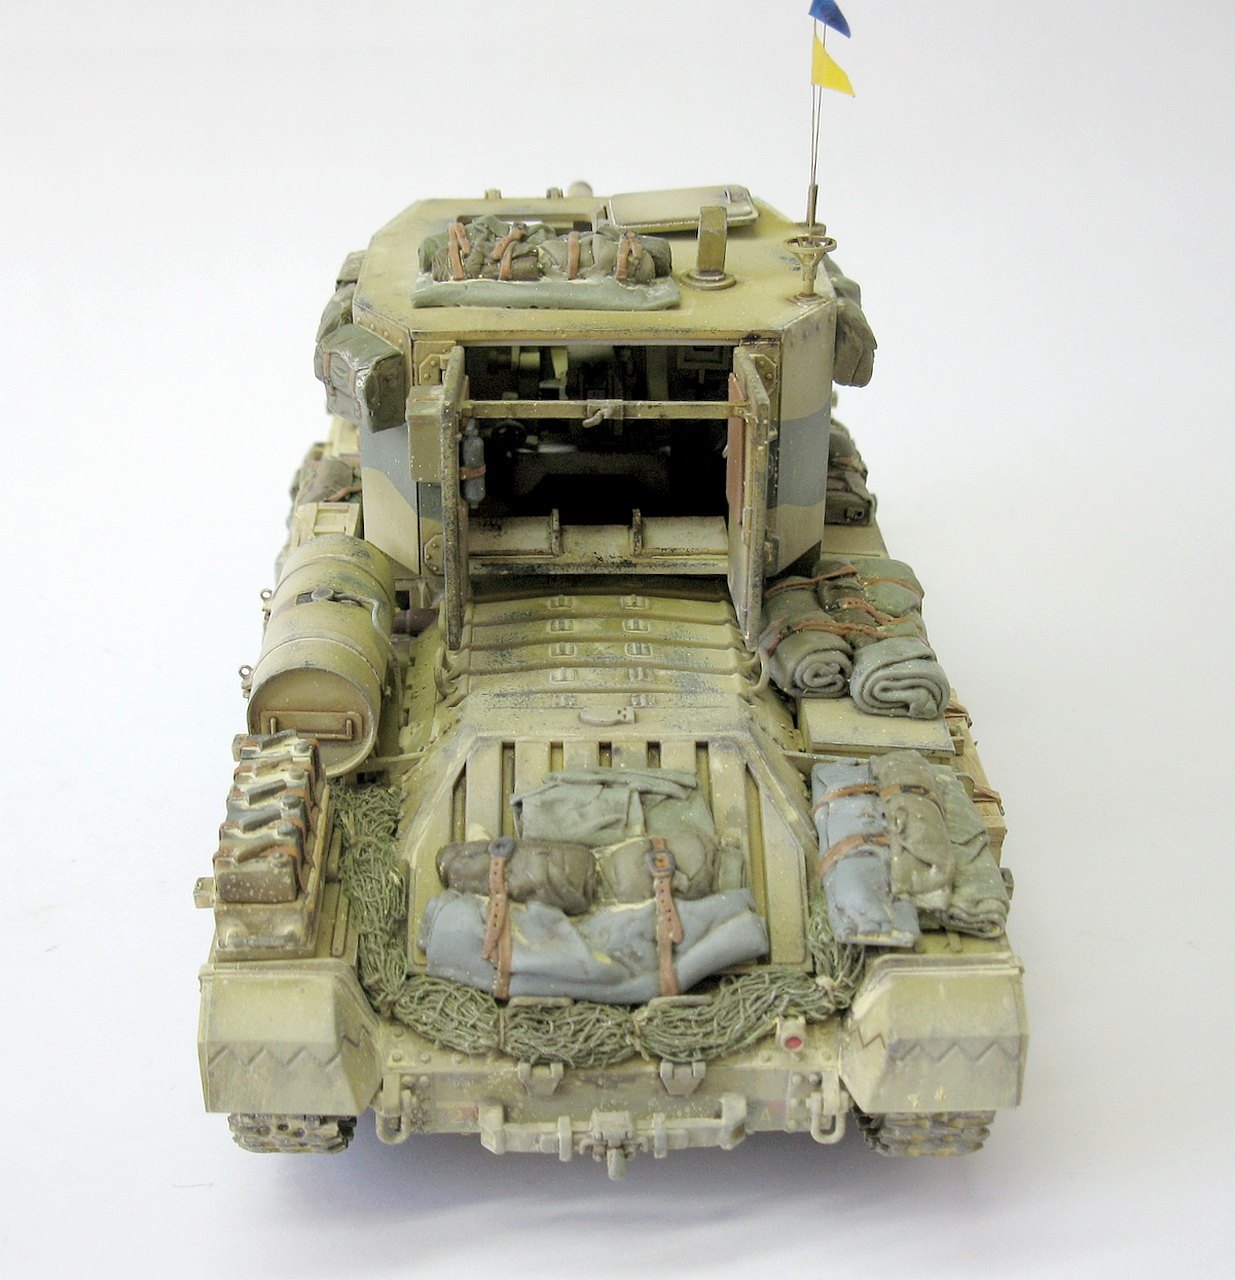
| front view |
 |
| Belts to hold things in their places... |
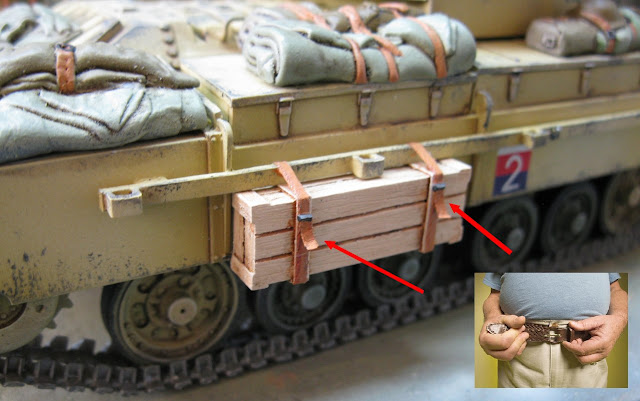 |
| Paper-tape and stretched sprue(buckle) ...easy... |
 |
| Cammo net made with surgical gauze, in the Bishop's rear... I applied a layer of PVA glue diluted with water and dyed with Khaky acrylic paint, to darken a little... |
 |
| Glued with pure PVA glue and after discreet application of a dry-brush. Man... I loved this detail... |
 |
| "Lily Elsie" almost ready for battle. left view |
 |
| Upper view |
 |
| Right view |
 |
| Believe me...I'm a russky VM Models model kit...with pride!!! |
And finally our girl was ready. With you LILY ELSIE, a Bishop 25pdr. SPG providing duties in the 121st Field Regiment - Royal Artillery. She fearlessly struggled with the A troop, 1st Battery, suporting the 23rd Armoured Brigade, in the bloody battles in the Libyan Desert, North Africa, in November 1942.
 |
Bishop 25pdr. SPG "LILY ELSIE" 121st Field Regiment - Royal Artillery - A troop - 1st Battery Libyan Desert - North Africa - November, 1942. |
 |
| Bishop 25pdr. SPG "LILY ELSIE" left view |
 |
| Bishop 25pdr. SPG "LILY ELSIE" Notice the crew stuff, tied on the fender |
 |
| Bishop 25pdr. SPG "LILY ELSIE" Casemate interior - right view |
 |
| Bishop 25pdr. SPG "LILY ELSIE" rear left view |
 |
| Bishop 25pdr. SPG "LILY ELSIE" rear view |
 |
| Bishop 25pdr. SPG "LILY ELSIE" right rear view |
 |
| Bishop 25pdr. SPG "LILY ELSIE" Casemate interior-left view |
 |
| Bishop 25pdr. SPG "LILY ELSIE" right view |
 |
| Bishop 25pdr. SPG "LILY ELSIE" right upper view |
 |
| Bishop 25pdr. SPG "LILY ELSIE" |
 |
| Bishop 25pdr. SPG "LILY ELSIE" front view |
 |
| Bishop 25pdr. SPG "LILY ELSIE" |
 |
| Bishop 25pdr. SPG "LILY ELSIE" |
 |
| Bishop 25pdr. SPG "LILY ELSIE" front details |
 |
| Bishop 25pdr. SPG "LILY ELSIE" with Kojak and Rover, the dog. |
 |
Two desert girls: Bishop 25pdr. SPG "LILY ELSIE" and |
 |
| Indeed, two sunny girls... Bishop 25pdr. SPG "LILY ELSIE" |
 |
Bishop 25pdr. SPG "LILY ELSIE" 121st Field Regiment - Royal Artillery - A troop - 1st Battery Libyan Desert - North Africa - November, 1942. |
Thanks for stay with us, Lads!!

Esplendido, você não tem limites, mas um trabalho magnífico. A cada vez apendo mais com seus trabalhos. Sempre seu fã!!!!
ResponderExcluirOi, Marcão...você estava sumido...é sempre um prazer te ver ´por aqui!! Um grande abraço e se cuida!!! Muito obrigado pelos elogios!!
ExcluirMy Grandfather served as a Sergeant in 121st Field Regt. You may well have built his Bishop. His would, however, have probably been named Freda. Thank you.
ExcluirHi, Anonimous!!! Wow, how cool that you have a dear relative with such a history!!! my most sincere congratulations!!
ExcluirA big hug and thanks for sharing your emotion with us...
Take care and come back often!!
Superbe!
ResponderExcluirHI, Bluewillow!! Thanks a lot, man!! Sorry my delay!!!
Excluir