"We build, we fight !"
Our protagonist this time is a friendly American 4x4 truck, with a capacity of 1.5 ton, which flooded the battlefields around the planet during WWII. This versatile girl (in all its various versions) had excellent performance in small and medium capacity transport, accelerating logistics on the battlefronts that served since its introduction in 1940 and beyond the end of World War II. Today we are going to talk about Chevrolet G7107 4X4 1,5t cargo truck (G506).
 |
Modified drawing from MiniArt´s US Army G7107
4x4 1,5t cargo truck box art kit (#35380) |
 |
Chevrolet Model G7107 NJ 4x4 1,5 ton cargo truck (G506)
beautifully restored |
History
The G-506 trucks, 1,5ton, 4x4, produced as the Chevrolet G7100 (and originally G4100) models, were a series of medium four wheel drive trucks used by the United States Army and its allies during and after World War II. This series came in standard cargo, as well as many specialist type bodies.
The G506 was a U.S. Army
Ordnance Corps supply catalog designation for the 1,5ton, 4X4, truck chassis built in large numbers by the Chevrolet Motor Division of GM. Their official model numbers were initially the "G4100", and later the "G7100" series. They became standard 1,5ton 4x4 trucks for the US Army and Army Air Corps during World War II.
During World War II, the US military purchased a total of 167.373 4x4 1,5ton trucks, and Chevrolet supplied the great majority of them. According to the 1946 revision of the U.S. military's Summary Report of Acceptances, Tank-Automotive Materiel, Dodge (Fargo) - the initial standard supplier of U.S. 1,5ton 4x4 trucks - contributed 6.762
Dodge VF model, G-621 series trucks in 1940; and Ford (Marmon-Herrington) and Diamond T supplied another 6.271 and 136 units respectively, leaving 154.204 Chevrolet trucks.
 |
Dodge VF-405 4x4 1,5 ton truck - 1940.
|
 |
| Ford 51 Marmon-Harrington B5-4 4x4 truck - 1935 |
However, some 47.700 of the G7107 (no winch) and G7117 (with winch) model trucks were shipped to the Soviet Union as part of the Lend-Lease program.
 |
| Chevrolet G7107 (no winch) 4x4 1,5ton. truck |
 |
| Chevrolet G7117 (with winch) 4x4 1,5ton. truck |
The Soviet Red Army's logistics/transport capabilities improved dramatically in the spring and summer of 1943 largely as a result of the steady supply of American-made trucks (such as
Studebaker US6s and the Chevrolet G506s) for the USSR.
 |
A flurry of Chevrolets G7107 ceded to the USSR under the Lend-Lease program.
These trucks played a decisive role in improving
the Red Army's logistics, from 1942. |
 |
Soviet forces in Berlin, Germany -1945.
Notice the Chevrolet G7107 leading a Studebaker US-6,
in background |
Characteristics
Engine and driveline:
The G506 used a Chevrolet BV-1001-UP, a 3.860cc overhead valve inline-six cylinder gasoline engine developing 83 hp (62 kW) at 3.100rpm and 249 Nm of torque at 1.000 rpm. This is a smaller version of the engine used in the
GMC CCKW 2,5 ton 6x6 trucks. All models had a four-speed manual non-synchronized transmission and a two-speed transfer case.
 |
| Chevrolet BV-1001 engine |
Chassis:
The G506 had a
ladder frame with two
live beam axles on
semi-elliptic leaf springs. GM banjo type axles were used, these axles were also used in later GMC CCKW 2,5 ton trucks. There were three wheelbases: 318cm extra short wheelbase used only on the G7128 Bomb servicer, 368cm short wheelbase (a majority of production), and the 444cm long wheelbase. All models had hydraulic brakes with vacuum boost, 7.50-20" tires and dual rear tires.
Body:
Almost all G-506s had closed Chevrolet cabs, shared with the closed cab versions of the GMC CCKW - except for three models. A panel van version was built for the
Army Signal Corps, open cabs were used on bomb servicers and cab over engine types were used for long-bodied cargo trucks and fire-fighter trucks. The pilot models had flat top panels of the front fender, but production trucks had arches over at the fender crowns.
Versions:
- Model G7103 serial prefix NE - cab (with chassis) SWB (short wheelbase)
 |
| Chevrolet Model G7103 NE - SWB chassis with cab |
- Model G7105 serial prefix NG (K-51) - panel body. 3658 built
 |
| Chevrolet Model G7105 NG - panel van |
- Model G7106 serial prefix NH - dump body, less winch (9.008 built)
 |
Chevrolet Model G7106 NH - dump body, less winch
Notice the absence of rear mudguards |
 |
Chevrolet Model G7106 NH - dump body, less winch
Notice the absence of rear mudguards |
- Model G7107 serial prefix NJ - cargo body, less winch (86,871 built)
 |
| Chevrolet Model G7107 NJ - cargo body, less winch |
- Model G7113 serial prefix NK - cab tractor
 |
| Chevrolet Model G7113 NK - cab truck tractor |
- Model G7116 serial prefix NL - dump body, with winch (5.133 built with a winch)
 |
Chevrolet Model G7116 NL - dump body, with winch
Notice the absence of rear mudguards |
 |
Chevrolet Model G7116 NL - dump body, with winch
front view |
- Model G7117 serial prefix NM - cargo body, with winch (26.207 built)
 |
| Chevrolet Model G7117 NM - cargo body, with winch |
- Model G7123 serial prefix NN - COE stake and platform (LWB), 581 built
 |
| Chevrolet Model G7123 NN - COE stake and platform (LWB) |
- Model G7127 serial prefix NP - truck cargo, LWB (long wheelbase), 383 built
 |
| Chevrolet Model G7127 NP - truck cargo - LWB |
- Model G7128 serial prefix NQ - M6 bomb service truck G35 (extra-short wheelbase) -7.857 built
 |
| Chevrolet Model G7128 NQ - M6 bomb service truck G35 (ESWB) |
- Model G7133 serial prefix NZ - airfield crash truck
 |
| Chevrolet Model G7133 NZ - Airfield rescue crash truck |
- Model G7143 serial prefix NF - Field lighting
 |
Chevrolet Model G7143 NF - Field lighting
(as delivered prime contractor: American Gas Accumulator Co.) |
- Model G7153 serial prefix NX - COE fire-fighter truck - LWB
 |
| Chevrolet Model G7153 NX - COE fire-fighter truck - LWB |
- Model G7163 serial prefix NR (K-44) - telephone body with earth borer. 1719 built
 |
| Chevrolet Model G7163 NR - telephone body with earth borer |
- Model G7173 serial prefix NS (K-43) - telephone maintenance body. 4.328 built
 |
| Chevrolet Model G7173 NS - telephone maintenance body |
Army Air Force versions:
- Chevrolet Model G506 E-5 turret trainer (many versions)
 |
Chevrolet Model G506 E5 turret trainer
B-17, B-24, B-25 and B-26 dorsal turret |
 |
Chevrolet Model G506 E-5 turret trainer
B-17, B-24, B-25 and B-26 dorsal turret |
 |
Chevrolet Model G506 E-5 turret trainer
B-17, B-24 Sperry ball turret |
 |
Chevrolet Model G506 E-5 turret trainer
B-24 Consolidated tail turret |
- Chevrolet Model G506 J3, J4 and J5 field lighting truck
 |
| Chevrolet Model G506 field lighting truck |
 |
| Chevrolet Model G506 field lighting truck |
- Chevrolet Model G506 Fire-fighter truck - class 135 - fog and foam
 |
| Chevrolet Model G506 Fire-fighter truck - class 135 - fog and foam |
Operational use During World War II, the US military purchased over a 150.000 1.5-ton 4x4 trucks, and Chevrolet supplied the vast majority of them. Although it was produced from 1940, the Chevrolet G506 initially equipped some logistics units in the United States, participating in the reconstruction of the American Army. The small truck only saw action from Pearl Harbor, as it was used by the US Navy.
 |
Chevrolet G7107 very well restored
with US Navy colors and markings
|
 |
Chevrolet G7117 - US Navy, 1944.
MiniArt color profile |
Some units that were exported to the Philippines also made their debut in combat, against the Japanese, around this time. Its baptism of fire with the US Army was in North Africa, during Operation Torch, in November 1942.
 |
Chevrolet G7106 dump truck
in cargo configuration at trials.
USA - 1942 |
 |
Chevrolet G4112 (G7107) in maneuvers at Hoffman, North Carolina - USA
Battery E - 209th Coast Artillery -Anti Aircraft - trials with .50 Browning MG water cooled
notice the markings in the door:209th C.Artill.Batt E
Autumn - 1941.
|
 |
Chevrolet G4112 (G7107) in maneuvers at Fort Benning, Georgia - USA
161st Signal Photo Company
notice the markings in the door:161st Sig Photo Co.
October - 1941. |
 |
Chevrolet G7107 leading a convoy of CCKWs in manouvres 7th US Army - 12th Armoured Division Camp Barkeley - Abilene, Texas - United States - 1943. |
 |
Line of Chevrolets G7106 dump trucks
unknown place and time |
 |
Captured Chevrolet G7107, used by Germans, in heavy rasputitsaCaucasus - 1943 |
 |
Captured Chevrolet G7107, used by Germans
Notice the Notek light in the left front mudguard
Kursk - 1943 |
 |
Chevrolet G7107 4x4 1,5 ton. cargo (wooden) truck carrying troops
14th Guards Mechanized Brigade - 4th Guards Mechanized Corps - Red Army
Yugoslavia, autumn 1944.
Notice the elephant (14th Brigade symbol unit) painted in the door
and the Ford 3 ton in background
|
 |
Chevrolet G7107 4x4 1,5 ton. cargo (wooden) truck
unloading a team of Maxim Model 1910 7,62mm machine guns,
with one on alert over the cab of the truck
14th Guards Mechanized Brigade - 4th Guards Mechanized Corps - Red Army
Notice the elephant (14th Brigade symbol unit) painted in the door
|
 |
Chevrolet G7107 4x4 1,5 ton. cargo (wooden) truck
14th Guards Mechanized Brigade
4th Guards Mechanized Corps - Red Army
Yugoslavia, autumn 1944.
kit 35386 from MiniArt
|
 |
Chevrolet G7113 tractor with bus trailers, from U.S.Navy
carrying japanese POWs - Mariana Islands - September, 1945
The vehicles were painted in navy blue gray. |
 |
A 105mm howitzer and Chevrolet G7107 4x4 truck 9th Service Command - US Army Service Forces font: Boeing Magazine, January, 1945. |
 |
Better pic of the same Chevrolet G7107 4x4 truck above,
going down by the cargo ramp of a C-97 Stratofreighter.
9th Service Command - US Army Service Forces
font: Boeing Magazine, January, 1945.
|
 |
| MiniArt color profile from the truck above (kit #35380) |
 |
A Soviet Officer taking a ride in a Chevrolet G7107
final days of III Reich - Berlin - 1945 |
As already mentioned, from the Tunisian Desert, the Chevrolets G605 served on all Allied combat fronts, with the US Army, Navy and Marines. These trucks were also supplied in limited quantities to the British, Dutch, Chinese, Brazilian and Free French Armies, with the largest quantities (over 47.000) being supplied to the USSR as part of the Lend-Lease program.
 |
Chevrolet G7117 - Brazilian FEB.
MiniArt color profile
|
 |
Chevrolet G7117 - Brazilian Air Force - FEB.
MiniArt color profile
|
The Soviet Red Army used them as transport along with the US-6 Studebakers. One of the versions used only by the Soviets was the use of the G605 chassis as the mythical
Katyusha rocket launcher.
 |
Chevrolet G7107 with BM-13-16 Katyusha
Gunners preparing the rocket launcher for action
Russian Front - Autumn, 1943.
|
 |
Chevrolet G7107 with BM-13-16 Katyusha
Gunners loading rockets (132mm) on the launch rails
Russian Front - Autumn, 1943. |
 |
Chevrolet G7107 with BM-13-16 Katyusha rocket launcher
84th Red Banner Novozybkovsky Guards Mortar Regiment
Russian Front - November, 1943.
ICM #35596 box art |
After WWII, it was used until the 1950s by the Soviets and many allied nations, such as Brazil.
 |
Chevrolet G7117 from Brazilian Army
Victory Parade - Rio de Janeiro, 18 July 1945
Notice .50 water cooled Browning MG, the troop uniform
and Brazilian markings (after WWII) |
 |
Chevrolet G7107 from Brazilian Army
Victory Parade - Rio de Janeiro, 18 July 1945
Notice the driver wearing the old uniform and soldiers with "american" ones
see more in Brazilian markings (after WWII) |
| Chevrolet G7107 4x4 light truck |
|---|
| Type | 1+,5 ton 4x4 truck less winch |
|---|
| Place of origin | United States |
|---|
|
| Manufacturer | Pontiac West Assembly,
Yellow Coach/GM Truck and Coach |
|---|
| Produced | 1940–45 |
|---|
| No. built | 154.204 (all versions) |
|---|
|
| Mass | 3,726 kg (empty) |
|---|
| Length | 570 cm |
|---|
| Width | 220 cm |
|---|
Height
Wheelbase | 270 cm
368 cm |
|---|
|
| Engine | Chevrolet BV1001 235
83 hp (62 kW) - 3.860 cc |
|---|
| Transmission | 4 speed X 2 range |
|---|
| Suspension | Live beam axles on leaf springs |
|---|
Operational range | 434.5 km |
|---|
| 77 km/h |
|---|
The kit:
My intention is to build this cutie with another girl from the same MiniArt, because the client wants to compose a duo, in his collection.
But this article is about the Chevrolet 1,5 ton truck....so let's start building it!!!
 |
| As with all truck construction, chassis alignment is the key step... |
 |
Using the (very good) PEs from the kit...Bending the rear bumpers with the jig...
but specific pliers are essential, too... |
 |
Rear bumpers in position...
Repair the gas tank support ribs... A beauty of detail... |
 |
| The gas tank in position in the chassis... |
 |
| Leaf springs, axles, shock absorbers, battery.... details and more details... |
 |
| Brake hubs in position, allowing alignment check: everything perfect!!! |
 |
| Construction is going smoothly!!! |
 |
| Engine and rear chassi details in place |
 |
Starting the painting of the cabin's interior
Standard olive drab colors |
My client requested
US Navy Seabees markings for this vehicle, as well as the other it that will be built in parallel...so, the colors will be US Navy blue-gray.
Go Navy!!! |
| Enlistment Seabee poster |
 |
Seabee motto:
"Construimus, Batuimus"
"We build, we fight" |
 |
| Seabee badge |
 |
| Seabee 34th Naval Construction Battalion shield |
But here are the Girl's markings: Chevrolet G7107 4x4 1,5t, working in the construction of
Halavo Seaplane Base, with 34th Naval Construction Battalion (Seabees), in the Florida Island, in the Solomon Islands, in September 1943.
The truck presents a variation of the Seabees badge in the door, with a stylized 34th inscription in the upper right corner of the badge.
 |
| 34th BC badge. Notice the 34th... |
But first, we have to paint and close the cabin:
 |
| Details in the nterior of the cabin |
 |
| The decals of dashboard, placed in position... |
 |
| Testing the cabin in front part of chassis... |
 |
...and finally gluing the cabin to the chassis.
Left view |
 |
Cabin in position
right view |
 |
| Front left fender glued in position... |
 |
| Front right fender glued in position... |
 |
Headlights and lanterns...
using an extra detail to make the headlights more real and beautiful... |
 |
| Cool!! |
 |
Soldering the kit grill, in PE...
Immortal Gods, this is crazy!!! |
 |
But the madness is not over: after soldering, rectify the irregularities
of the tin solder with a sandpaper disc (Dremel)...
|
 |
Headlight guards have been soldered (yellow)
while the horizontal bars were glued with cyanoacrylate (red).
Notice the tin solder finish worn by the Dremel sanding disc,
in the solder points... See the same image, below: |
 |
| And the front grille ready... Beautiful, but very, very laborious... |
And now, pay attention to a small mistake in the MiniArt Instruction booklet: in step 47, to make the additional protection grille for the blackout light, the instruction indicates the PE7 metal part, but this part has already been used in step 27, as an exhaust rod. The correct thing is you use the PE39 part to make the additional grid of your kit...see below:
 |
Drawings from MiniArt's booklet:
There is only one PE7 part for step 47 and you already used it in step 27...
The correct thing is to use the PE39 part |
 |
The evidence of the crime: only one part PE7 available...
And in the booklet the PE39 part is not "used"... |
 |
| Done!! |
Now, just for relax, let's work a little with the (very good) kit's PE sheet...it's a lot of metal!!!
 |
| mooring hooks and other details... |
 |
After the sides of the cargo area are glued, we are going to install the rear mudguards.
The perpendicularity here must be perfect!!! |
 |
| Good job, sailor!! |
 |
| Rear details in the cargo area... |
 |
| ...and gluing the loading platform to the chassis. |
 |
| As always, we have to be careful with the alignment... |
 |
Repair the alignment of the cargo area with the cabin...
Perfect!! |
 |
| The side tool rack, with all its PE's... |
 |
The wheels, built and the tools cleaned and glued in sprue,
for easy painting. |
 |
And the girl standing, for the first time, in her own sandals...
So cute!!
Notice the off-center position of the rear axle in relation to the rear fenders:
completely off-center, as in the real vehicle. See the profile below: |
 |
| The off-center position of the rear axle in relation to the rear fenders. |
 |
Wheels are in dry-run for alignment test.
Painting the wheel sets off is much easier... |
Before painting, we'll insulate the truck's cab from spray paint with toilet paper. I insert pieces of soft toilet paper with tweezers and place these papers carefully, so as not to fracture the internal details (levers, steering wheel, etc...). Then, with a brush moistened with clean water, I "adjust" the wet paper on the edges and corners, allowing for a good sealing...
 |
The best insulator for cabins...
left view |
 |
The isolated cabin!
right view |
 |
The color adopted is Navy-grey, a bluish grey color, typical of the US Navy...
Here is my cake recipe. Attention: I'm not a poster-boy for Vallejo!!
I like and use this awesome paint... as well as many others...
Notice the kit in white primer, in background... |
 |
| And the sexy fifty shades of navy-grey!! |
 |
| Next step: decals!!! |
 |
| ...but first: a layer of Pledge, to prevent silvering... |
While the paint (and Pledge) dries, let's get to the decals: I'll show you a step by step on how to make and apply your own decals.
Monochromatic Decals Tutorial:
Step 01 - Choosing your markings: After your research, draw or get drawings of the desired markings. Something like this:
 |
| Chevrolet G7107 Seabee markings |
Step 02 - Transform your drawings into vector files: Vector files are "drawings" that maintain sharpness and proportionality, regardless of the size of the image or drawing. Unlike JPEG or GIF files, which warp (and blur) when enlarged or reduced, vector files are ideal for reproducing images at any scale. But for that, you need the drawing (or art) to be clear and you will need the REAL size that this drawing (or art) will have after being ready, in the vectorization program. To make the primary drawings, large and simple, in JPEG or GIF, I use a free software called
PhotoFiltre 6.5.3 (but it can be any image editor, like Photoshop or much simpler...). For vectorization, I use CorelDRAW software. let's see an example: Below, you can see the print screen of my computer, with Photofiltre sofware:
 |
Print screen of my computer...
You can see the markings and the Seabee badge in detail,
in the left of the screen. I copy this art with Control+c and
paste the image in the CorelDRAW software (see below) |
 |
| The Seabee badge is paste in the CorelDRAW. |
Step 03 - Getting the measurements of your future decal: Now, you will measure where the badge will be in your kit (I use the metric system) and with the space in millimeters obtained, you will put this value in the CorelDRAW software for it to convert the JPEG image into a CDR image (vectored). I'm going to use the
Caterpillar D7 photos as a "model", instead of the Chevrolet G7107, as the work was done for both kits... The steps and procedures are the same...
 |
| Getting the size of the space where the badge will be installed... |
I'm not going to explain all the steps here, because they are long and complicated, but there are "n" tutorials on the Internet about it... The important thing is to know how many millimeters your full-size image of the kit will have to fit in the desired space. In this case, the size of the Seabee badge was 8mm in diameter. Repeat this measurement on all the drawings on your decal sheet...
 |
All drawings in their actual sizes, vectorized
and grouped for future printing. |
Step 04 - Printing your decals on plain paper (field test): After all the drawings are ready in the CorelDRAW software and in their respective sizes, print your "decal sheet" on an A4 sheet to do a "field test", that is, to test if the sizes you obtained with your ruler were correct.
 |
The "decal sheet" printed in paper A4. Notice
the size of the drawings... |
Now, cut the paper with fine scissors as close as possible to the drawing and, with a drop of water, apply the "decal" in the desired place to test the size... A picture is worth a thousand words!!!
 |
The "paper-decal-sheet" in front of the kit...
The sizes seem correct to me...Let's see individually... |
 |
The engine hood area: the Seabee badge is perfect,
the number 59 needs to be reduced a little
the census number is correct and the Allied Star in the top
of the hood can be increased a little... |
 |
| Yes..no doubt: the Allied Star can be increased a little... |
 |
Rear markings: the Star and number 59 are perfect;
the markings in the Power Control Unit It needs to be reduced a little... |
 |
Front view; the letters are ok
and the Allied Star also...
In this case, I'll use a stencil, for painting the star, not a decal...
The holes would turn the decal installation into hell!!! |
Step 05 - Printing the decal: After the size corrections, the drawings are ready for the "true" impression. In this case, I'm going to print the two decal sheets (
Caterpillar D7 and Chevrolet G7107) as they will all be in black (which makes the decal a lot easier) and I can group the work in just one step. Detail: to make the Chevrolet decals, I repeat all steps of measurements and proofs of the sizes of the drawings... Here's a picture of the thing:
 |
Print screen of my computer:
above, the Caterpillar D7 decals;
below, the Chevrolet G7107 ones. |
Now, I print the "artwork" in the center of an A4 sheet, so I can then place a piece of transparent decal over that print.
 |
The artwork printed in a A4 paper sheet.
Notice the size of the area that will be covered by the clear decal sheet.
|
The transparent decal sheet cut and applied over the printed designs, with two strips of adhesive tape. These adhesive tapes cannot invade the area of the drawings, of course. Use high quality tapes, so there is no danger of these tapes "rolling up" in your printer.
 |
The transparent decal sheet over the primary impression,
stabilized by the two strips of adhesive tapes.
Everything clean and organized... |
Once this is done, you will return the prepared A4 sheet to your printer's feed tray, in the same position as the "primary" print and command a new print, which will be printed exactly on the decal area. The result was this:
 |
| The decal sheet printed in my Laserprint... |
 |
Notice the adhesive tapes in position,
away from the drawings... |
Step 06 - Using the decal: Cut the decal sheet from the host sheet (this is so Alien...)
 |
| Removing the decal sheet from the A4 host sheet |
 |
The decal sub-sheets, in front of each girl...
Now, just apply!!, |
Don't forget that the decal sheets are one-piece. that is, you will have to individualize each design by cutting as accurately as possible. Then, just apply the decals, according to the established standards!!!
 |
Cutting the decals from the single sheet... A delicate job...
I use clean water (white container) and Pledge (green container) with a brush,
to apply the decals...Tweezers and cotton swabs are essential |
While the truck's decals dry, I decided to attack the fuel drums that MiniArt supplies with kit (very good, MiniArt...perfect!!). When looking at the kit, I noticed that all the drums have American markings, with these markings being part of the kit's excellent decal sheet (again, point to MiniArt!!).
 |
MiniArt fuel drums with decals...
Amazing job, MiniArt!!! |
But a strange idea occurred to me (as always...): what if the Seabees could be transporting gasoline drums captured from the Japanese?? I loved the idea and went looking for pictures and images of those Japanese fuel drums in internet and in my books... Result: nothing!!! I was about to give up on the idea when I stumbled across this Hasegawa box-art of a Japanese fuel truck, trailer and fuel drums with the specified colors!
Bingo!!  |
Hasegawa's box art
Fuel truck Isuzu TX-40 |
I think the source is reliable, because Hasegawa is a reference in the modeling world... and even more when it comes to Japanese material.... Story summary: fuel drums painted in Khaki color. And, as Kojak had the Devil in his body (and since American drums all had markings...), why not make markings in JAPANESE?? Consulting Google Translator, I typed GASOLINE and voilááá:
 |
| Gasoline, in Japanese ( Google Translator) |
 |
Fuel drums in Khaki color
drawings form Hasegawa Isuzu booklet |
With the historical reference in hand, I painted 3 fuel drums in Khaki and printed a decal sheet with the markings GASOLINE in Japanese, following the same techniques described above. Here is the consequence of my Japanese daydream: BANZAI!!!
 |
Fuel drums in khaki and the markings
GASOLINE in japanese...
Can I fill the fuel tank, sailor ??? |
 |
| And the fuel drums, ready for transport... |
 |
| Drum with japanese spelling in black, you're next!! |
 |
| testing all drums in the truck's rear... |
 |
| Weathering in the fuel drums... |
 |
...and in the truck, too!!
Left front view |
 |
| Rear view |
 |
| Frint right view |
 |
| Front view... |
 |
I'm going to try these drum stain stencils I bought last year...
Interesting stuff from Vallejo... |
 |
| This is very good , no doubt... |
 |
Fuel drums glued in position...
left view |
 |
Fuel drums glued in position...
rear view...
The stains give a great touch... |
 |
| Right view |
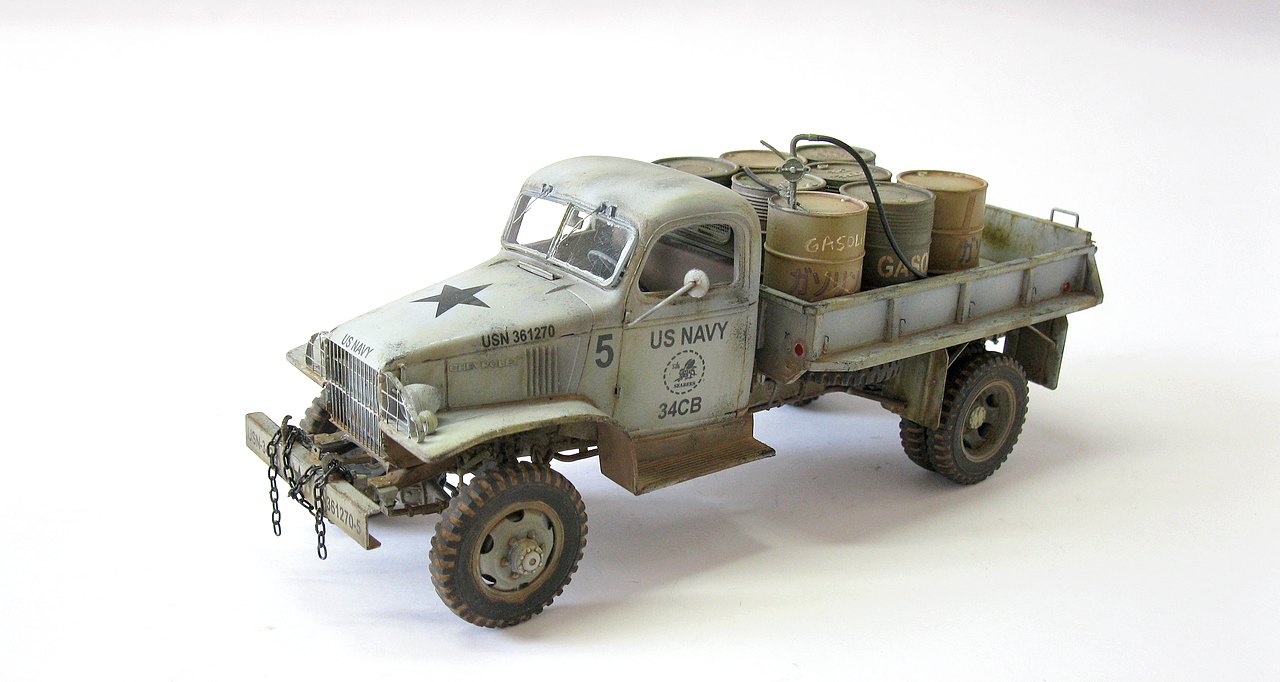
And after the weathering step (sorry...my camera crash the pics ...), the Chevrolet G7107 4X4 1,5t cargo truck (G506), belonged to Seabees (US Navy), 34th Naval Construction Battalion, providing services in the construction of Halavo Seaplane Base, in Florida Island (Solomons Islands), in September, 1943.
 |
Chevrolet G7107 4X4 1,5t cargo truck (G506) - Seabees (US Navy)
34th Naval Construction Battalion - Halavo Seaplane Base
Florida Island (Solomons Islands) - September, 1943. |
 |
Chevrolet G7107 4X4 1,5t cargo truck (G506) - Seabees (US Navy)
left view |
 |
Chevrolet G7107 4X4 1,5t cargo truck (G506) - Seabees (US Navy)
3/4 rear left view (top) |
 |
Chevrolet G7107 4X4 1,5t cargo truck (G506) - Seabees (US Navy)
3/4 rear left view |
 |
Chevrolet G7107 4X4 1,5t cargo truck (G506) - Seabees (US Navy)
3/4 rear right view
|
 |
Chevrolet G7107 4X4 1,5t cargo truck (G506) - Seabees (US Navy)
right view |
 |
Chevrolet G7107 4X4 1,5t cargo truck (G506) - Seabees (US Navy)
3/4 rear right view (top) |
 |
Chevrolet G7107 4X4 1,5t cargo truck (G506) - Seabees (US Navy)
3/4 front right view |
 |
Chevrolet G7107 4X4 1,5t cargo truck (G506) - Seabees (US Navy)
with Kojak and Rover, the dog. |
 |
Two Seabees (US Navy) chicks: Chevrolet G7107 4X4 1,5t cargo truck (G506) |
 |
Chevrolet G7107 4X4 1,5t cargo truck (G506) - Seabees (US Navy)
34th Naval Construction Battalion - Halavo Seaplane Base
Florida Island (Solomons Islands) - September, 1943.
|
Another challenging kit from MiniArt, with incredible details and fittings. A great kit, not as "radical" as the Caterpillars, but also a kit with a high workload. A beautiful piece, no doubt!!!
See you, soon!!!


Serra.. legal? apenas para dar um toque, uma das fotos abre links de blogs diversos. É a primeira foto onde tem um alemão olhando para a camera, após uma foto com uma kettenkrad enlameada e caminhao capturado. Abs
ResponderExcluirOi Marcão... Obrigado pela preocupação, mas é proposital: um dos links aponta para a temida rasputitsa, a infame lama russa que tanto estrago fez na Guerra e o outro link é sobre a moto-tanque Sd.Kfz.2 Kleines Kettenkraftrad HK 101. Mas muito obrigado pela sua preocupação com a sanidade do site.... Nesses dias de piratas e hackers, todo cuidado é pouco... MUITO OBRIGADO mesmo, amigão!!!
ExcluirSempre gostei desse modelo, com o seu toque de mestre estou gostando mais ainda, bateu a saudade das montagens!
ResponderExcluirOi, Marcão!!! muito obrigado!! Parou de construir?? Volta para o Covil dos Loucos, Xará!! O que a gente gasta com kits economiza com médicos!!! Se cuida e um prazer te rever por aqui!!
Excluir