
Keep eyes on the Stukas, lads!!!
This article is about the late operational anti-aircraft version of the Light Tank Mk VI, built by Vickers. Today, we're going to talk about the Vickers light AA Mk II tank , known as "Ack Ack" Mk II light tank.
 |
| "Ack ack" girl from Auxiliary Territorial Service (ATS) in training. A humorous tribute to such brave girls!! Lest we forget!! |

History:
The German Blitzkrieg came as a shock to the Allied nations, with its doctrines and tactics. At the beginning of WWII, with the Invasion of Poland and the Battle of France, the attacked nations had to learn the hard way how important close air support was, brought to perfection by the Luftwaffe in the turbulent early stages of the War. The precision of the air attacks, through dive bombers masterfully executed by the Germans, devastated the defensive positions and the logistical columns, creating chaos in the core of the Allied forces. The British desperately studied these operations in an attempt to neutralize this German Cyclone.
 |
| Ju-87 Stukas beginning its attack dive... Somewhere in France - 1940. |
In 1940, the British Army proposed the development of an anti-aircraft (Ack ack) vehicle that could accompany the armored columns in their movement, providing cutting-edge air protection. Two prototypes were built by Vickers using light tanks Mk VI chassis: The first one was a light tank MK VIB with an open turret armed with two 15 mm Besa heavy machine guns, with ammunition boxes projecting externally to the sides of the turret.
 |
| Light AA tank Mk VIB prototype with two 15 mm Besa heavy machine guns. |
 |
| 15 mm Besa heavy machine gun |
The second prototype was built in a light tank Mk VI chassis. The early version of this vehicle had its weapons installed in a complete power-operated Boulton-Paul type A turret, with four .303 Browning light machine guns, used by RAF planes. The concept bore a certain resemblance to the Beaverettes Mk III AA.
 |
| Light AA tank Mk VI prototype (early version) with four .303 Browning light machine guns. Notice the return roller on the top of the front bogie. |
 |
| .303 Browning light machine gun (aircraft model) |
After, the Perspex cupola of the turret was removed and four folding armor flaps have been added to increase the protection of the gunner. Neither of these turret designed was used on the production of the AA light tanks.
 |
| Light tank Mk VI AA prototype - (late version) Notice the turret without transparent cupola, the folded armoured flaps and the return roller on top of the front bogie, characteristic of the early versions of MK VI chassis. |
Operational Ack ack light tanks:
Light AA Tank Mk I
The Light AA Tank Mk I (also known as Ack ack light tank Mk I) was the first production vehicle designed. It used the chassis of the Mk VI A or B light tanks, having its standard two-man turret removed and replaced by a new, open-top AA Mk I turret with 360º manually operated, armed with four Besa 7.92 mm light machine guns in a horizontal row.
 |
| Left and right view of Besa 7.92 mm light machine guns |
 |
| Close up view of the Mk I AA turret with the four Besa 7.92mm light machine guns. Note the tight look of the turret... African Desert, 15 September, 42. |
It was installed on top of a rectangular box added on top of the original superstructure. The standard light tank carried three men, but in the anti-aircraft version the crew was reduced to two.
 |
| Blueprint of Vickers light AA Mk I tank (with Mk VIA chassis) |
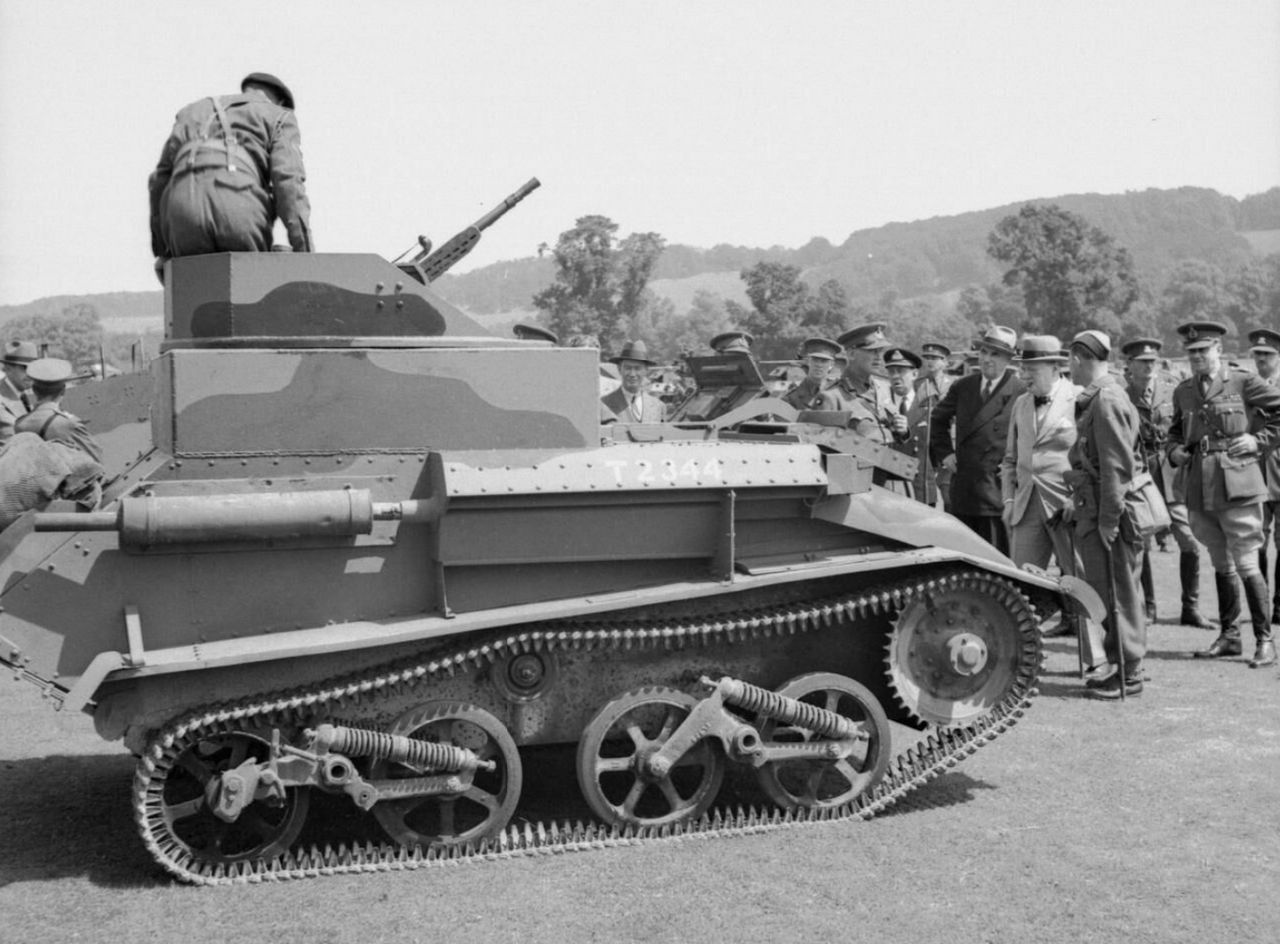 |
| Tank, Light, AA Mk I (T 2344) also known as "ack-ack tank" during inspection of an Armoured Division by PM Winston Churchill. Notice the use of Mk VIB chassis ( one armored cover for the engine air inlet) Southern Command, 25 July - 1941. |
 |
| The Tank, Light, AA Mk I (T 1728), also known as "ack-ack tank" with the markings of 33th Tank Brigade - 3rd Infantry Division. Notice the use of the chassis of Mk VIA in this vehicle. (two armored covers for the engine air inlets on the front glacis) August - 1942. |
 |
| Very close view of Light tank AA Mk I turret. Notice the Besa 7.92mm light machine guns and aiming device |
 |
Tank, Light, AA Mk I, (T 1742 - HURRICANE) Notice the use of the chassis of Mk VIA with two armored coversfor the engine air inlets on the front glacis and the vehicle´s name censored as a white band above the red-white-red mark front left view |
 |
The same Tank, Light, AA Mk I, (T 1742 - HURRICANE) above In this left side view, the censor not smudged the name HURRICANE above the red-white-red mark, as pictured above. |
 |
The same Tank, Light, AA Mk I, (T 1742 - HURRICANE) above In this right side view, the name HURRICANE above the exhaust muffler, it's blurred. |
| Tank, Light, AA Mk I, ( T 2011 - MARY) arrives in the forward areas on a transporter. Notice the chassis of Mk VIB version and yellow cammo. African Desert, 15 September, 42. |
 |
| Tank, Light, AA Mk I, ( T 2011 - MARY) the same tank above, right after stepping off your transporter. Notice the chassis of Mk VIB version and yellow cammo. African Desert, 15 September, 42. |
 |
| Tank, Light, AA Mk I, ( T 2011 - MARY) the same tank above, with the crew at their stations. Notice the colonial type helmet on the left fender. African Desert, 15 September, 42. |
 |
| Tank, Light, AA Mk I (T2011 - MARY) in anti-aircraft readiness. Notice the chassis of Mk VIB version and yellow cammo. African Desert, 15 September, 42. |
,%20El%20Alamein%20Area%201942.jpg) |
| Two Australian Vickers Light Anti-Aircraft Mk I tanks Notice the camouflage netting crammed into the rear rack of the T 2033 vehicle. Western Desert (Egypt), El Alamein Area - 1942 |
Light AA Tank Mk II
The Light AA Tank Mk II (also known as Ack ack light tank Mk II) replaced the Mk I version on production lines. The Mk II version featured a slightly more spacious turret, better protected and motorized, with a new and improved aiming system, but still with the same light armament.
 |
| Rear view of AA Mk II turret (late version). Notice the Besa 7.92mm light machine guns and new aiming device. This turret was also installed in Humber Mk I AA Armored Car |
This vehicle also used the chassis of the Mk VI A or B version, with the early Mk II variants having the box on top of the tank superstructure of the same size as the Mk I model, with later Mk II versions featuring a box with lower height, at the top of the superstructure, perhaps to decrease the center of gravity and the stability of the fire when the turret was in a fast rotation to follow the target. Another feature of the later versions of the Mk II model was an external ammo bin on the rear of the hull, between the sloping rear face of the original tank and the back of the rectangular base for the AA turret. Strangely, there are many more photos of Mk I models than Mk II models.
 |
Blueprint of Vickers light AA Mk II tank (late version with Mk VIB chassis) |
 |
| Initial version of the Tank, Light, AA Mk II, with the same high top box as the Tank, Light, AA Mk I, which increased the center of gravity and instability in the rotation of the turret. This chassis in particular was a Mk VIA verion. |
 |
| Final version of the Tank, Light, AA Mk II, with the upper box lowered, which increased stability in the rotation of the tower and rear ammo bin. This "ack ack tank" wear a Mk VIB chassis |
 |
Rear view of the final version of the Tank, Light, AA Mk II. This vehicle in particular does not have the external ammo bin at the rear. Notice the ejectable fuel tank attached to left of vehicle. |
The Ack ack Mk I model was effective against early machines (especially unarmored dive bombers), but in the second half of the war it was no longer suitable for destroying high-flying or heavily armored enemy units. The Ack ack Mk II model probably boasted slightly better stats than its predecessor, but its small-caliber weaponry also limited its effectiveness.
About fifty Mk VIs were converted into anti-aircraft tanks, and the plan was to give a troop of four to each regimental HQ squadron, although the numbers produced suggests that this didn't happen.
Specs:

| Vickers light AA Mk II tank( Ack ack MkII tank) | |
|---|---|
| Type | Anti aircraft light tank |
| Place of origin | United Kingdom |
| Service history | |
| In service | 1940 -1942 (frontline) |
| Used by | United Kingdom Australia |
| Wars | Second World War |
| Production history | |
| Designer | Vickers-Armstrongs |
| Manufacturer | Vickers-Armstrongs |
| Produced | 1940 |
| No. built | around 50 (Mk I + Mk II) |
| Variants | Mk I and Mk II |
| Specifications | |
| Mass | 5 ton |
| Length | 4.0 m |
| Width | 2.08 m |
| Height | 2.35 m |
| Crew | 2 (commander/gunner, driver) |
| Armour | 4 -14 mm |
Main armament | 4 x 7.92 mm Besa light machine gun |
Secondary armament | none |
| Engine | Meadows 6-cylinder petrol 88 hp (66 kW) |
| Power/weight | 16.9 hp/ton |
| Transmission | Wilson pre-selector gearbox |
| Suspension | Horstmann inclined springs |
| Ground clearance | 250 mm |
| Fuel capacity | 140 l |
Operational range | 210 km |
| Maximum speed | 56 km/h on road 40 km/h off road |
The kits:
In this commission work, I'm going to use two kits: a plastic injected (hard-to-find) kit from Vulcan Scale Models - British Light Tank Mark VIB - #56008), and the resin conversion kit from Resicast - Vickers Light Tank AA Turret Mk.II Conversion - #351239. This Ack ack girl will be built in parallel with its older sister, the standard Vickers light tank Mk VIB, as you can see in this article.
 |
| Kojak in a new double project... Injection plus resin!!! |
The first thing to do is always to start by the most laborious job, that is, cleaning the resin parts. Let's separate the parts from their foundry bases and remove all excess...
 |
| All polyurethane resin castings from Resicast´s conversion kit |
The Vickers injected in plastic you can see in this article. In the left, the standard build; In the right, the future Ack ack tank, that will not use the standard turret.
 |
| Two Vickers girls with different fangs... |
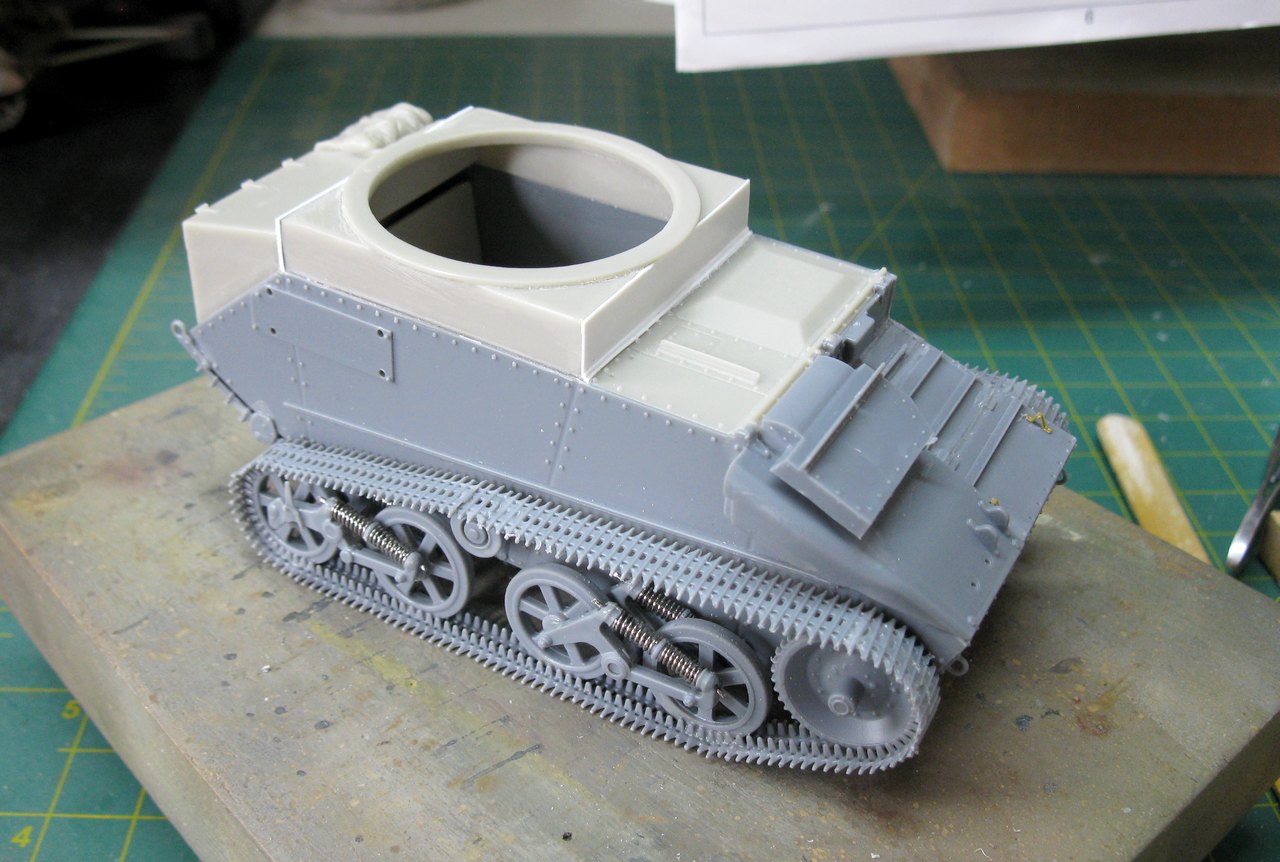
First, let's install the vehicle's spartan interior which unfortunately only reproduces detail in the turret area. No details of the driver's station...
 |
| Details only in the turret area... |
A common problem in resin kits is the deformities and contractions of the parts... And, for a change, I was drawn with a kit with some dimension deformities in its parts...
 |
| Built the upper deck of the vehicles. Notice the gap between the upper deck and the turret superstructure box, on the AA version (red arrow above) |
 |
| Notice the considerable gap between the superstructure box and the driver's station deck. |
 |
| Notice that the gap in the rear portion of the turret superstructure box is even larger. Here we have a typical case of material contraction (red arrows). The rear ammo bin is already glued (with superglue) in its position... |
 |
| My solution was to add a 0.3mm sheet of plasticard to the front (red arrow) and back of the turret box, as well as a corner profile to the front of the superstructure (blue arrow). This "mechanically logically" rectified the shrinkage of material in that area. |
Notice below, the sheet of plasticard on the back of the turret box (red arrows) and the beginning of construction of the turret basket, with the Commander/gunner seat.
 |
| The rectification of the dimension of the superstructure box, at the rear (red arrows)... Things are going in the right direction... |
 |
| Much, much better!! The Old Henry was satisfied with the solution found!!! |
 |
| Nothing like a piece of plastic to fix a resin block!!! The King is very pleased!!! |
 |
| The commander's basket. A piece not with many details, but well made... |
 |
| An "in loco" test of the Commander's basket... Fits perfectly. No dimensional problems here... |
 |
| The adaptation between the superstructure box and the tank chassis is now perfect!!! |
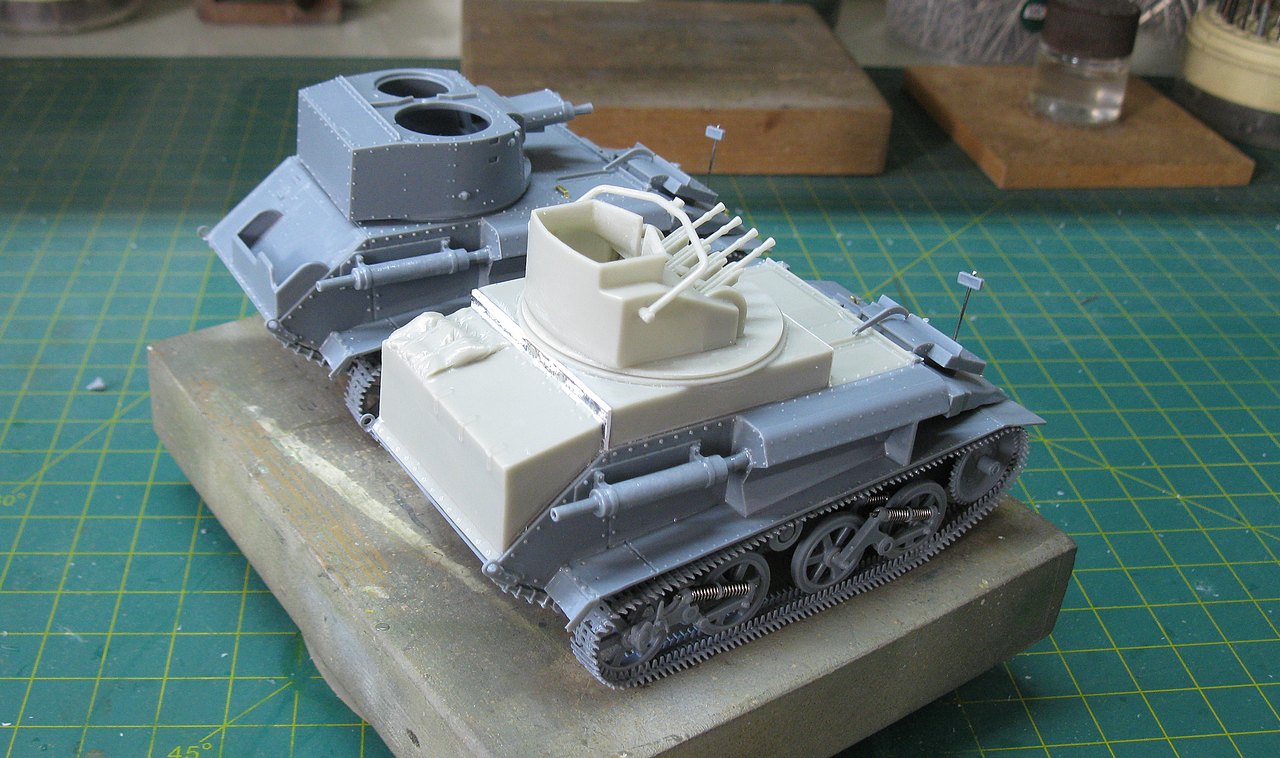
But now, things really got ugly: the machine guns' rotor of the turret is simply too narrow...Here, contraction has reached Heaven!!! And I (and Kojak, of course...) cannot admit such heresy!!!
 |
| Holy crap!! the machine gun rotor is much narrower than the front of the turret!! |
I'm going to use the same recipe as for the box correction: rectify with plasticard, this time with a 0.6mm thick sheet that, after being glued at both ends, was hollowed out and rectified following the same internal and external perimeter of the rotor.
 |
| Getting fat (like Old Henry...) a bit: notice the white plastic portions on the rotor ends (red arrows). |
 |
| Now, the rotor fits perfectly, without gaps... and keeping the movement of elevation and depression free... Damn, Kojak knows how to work the little (big) details!!! |
 |
| The rotor, fully armed with four 7.9mm Besa machine guns installed, at maximum elevation, testing the movements... |
 |
| Still testing the moves... |
 |
| The installation of the ammunition tray below the rotor is a bit delicate, but the tray cannot touch the struts of the basket, as this tray moves with the elevation and depression of the weapons |
 |
| Notice that I had to make a little wear on the tray angles so that the movement was smooth and I continue. No big deal here... |
 |
| And the turret in position... Looking left!!! |
 |
| Looking forward!!! |
 |
| The two girls, side by side. the AA version and the standard version, Mk VIB. |
 |
Hulls and upper decks in position. Note the unique armored air intake of the Mk VIB versions, in front of the hulls. |
 |
| As the kits do not feature interior detailing in the driver stations, I will leave the hatches in the glacis plates closed. |
 |
| The hulls almost complete... Right view. |
The supension of Vulcan kit is very delicate and full of tricks. But using the Vickers-type suspension wheel alignment apparatus, as described in the steps of the Vickers light tank Mk VIB article, the thing flows like a thousand wonders!!!!
 |
Vickers-type suspension wheel alignment apparatus in action |
 |
| Bogies ready for the springs... |
 |
| bogie o suspension in detail Superglue to stabilize the suspension steel wire... |
 |
| The bogies ready for the installation... |
 |
| Vickers light AA Mk II tank, standing on its own foot!! Left view |
 |
Vickers light AA Mk II tank, standing on its own foot!! Right view |
 |
The two Vickers sisters, side by side, with tracks in position... |
 |
| The two Vickers growing togheter... |
The rearview mirror is very fragile and, being prominent, it will be the first piece to be broken when handling the model... To avoid heart attacks, replace the plastic rods with metal rods. Prevention is always better than cure!!!
 |
| Metal in action... |
 |
| Details in pairs...headlights and mirrors in position... |
 |
| The twoVickers girls, side by side... left view |
 |
| Right view... |
 |
| These two girls are really cute!!!! |
 |
| The two girls almost ready!!! |
 |
| The Ack ack Mk II light tank 3/4 front left view |
 |
| The Ack ack Mk II light tank 3/4 front right view |
 |
| Modifying the aiming device, using an original photo as a reference... |
 |
| Vickers light AA Mk II tank - rear right view Notice the license plate |
 |
| Vickers light AA Mk II tank rear left view |
With the project almost finished, it's time to look for details to improve the kit...and looking at the photo below, in addition to discovering that some Mk II turrets had the armor on the Commander's back angled (the one in the kit is the rolled plate type. ..), I noticed the presence of two chains hanging from the inner portion of the turret's frontal shield (red arrows). From the looks of it, it should be for locking the vertical drift movement of the weapons, when the vehicle is in transport. But whatever it is, it's a nice detail to add. Let's make these chains...
 |
| Two mysterious chains... it's a lot of temptation for the bald man's creative spirit!!! |
First, we're going to take some very thin copper wire, cut a segment more than twice the desired length, bend the wire exactly in half, and thread the bend portion through a hook made of thicker metallic wire, attached to the Dremel. The Dremel is meant to be just a stand...I won't be using electricity to turn the wire, but turning the tool's chuck by hand for more control. The important thing is to obtain a twisted yarn with a regular and harmonious appearance.
 |
| Very thin copper wire, attached to the Dremel. |
 |
| Removing the braided copper wire from the Dremel´s hook. |
With flat and smooth jaw pliers, I crush the twisted wire, and this flattening reproduces the appearance of a very thin chain...
 |
| The King was surprised by the results.... Well done, Edna!!! |
 |
| Installing the "chains" on thin copper wires, which will later be cut, after the superglue dries... |
 |
| Chains installed... Really, a great little added detail.... rear view |
 |
| Chains installed.... rear right view |
 |
| And since I have the "Spirit of Scratch" around, I decided to make a "field adaptation" type toolbox with Value Gear stuff. |
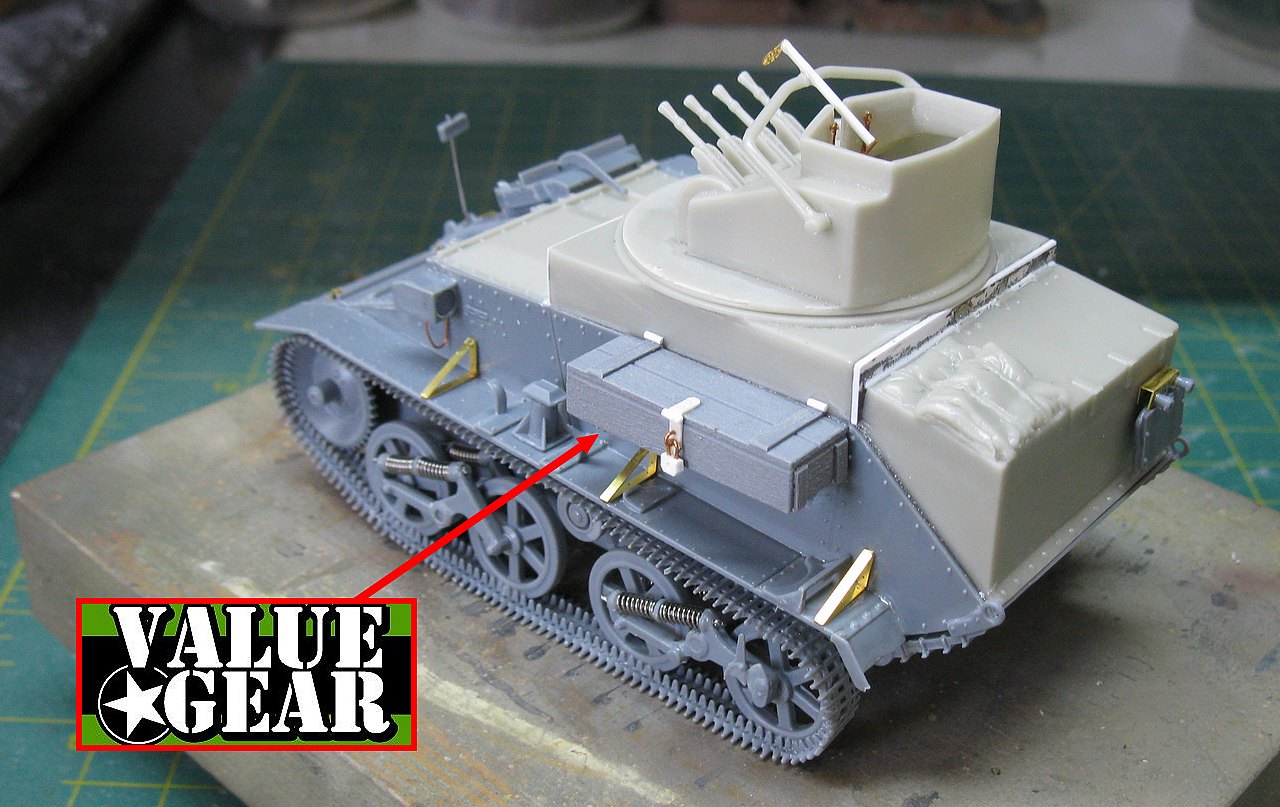 |
| It could be an ejectable fuel tank, as in some photos, but I decided to do something more "field"... something simpler, that a tanker with a blowtorch and scrap metal would do in a workshop... |
 |
| The Ack ack girl, almost ready for painting... right view |
 |
| The Mk II AA turret, in close view... |
 |
| The two light girls from Vickers, side by side ready for make-up!! |
 |
Really, two very beautiful girls.... Vickers "Ack Ack" Mk II light tank front right view |
 |
| Vickers light AA Mk II tank, ready for painting and markings... |
Well, about markings, let's build our girl with these details: Meet "QUEEN", a Vickers light AA (Ack-Ack) Mk II tank (T-2445), serving in the 33th Tank Brigade, 3rd (mixed) Infantry Division, training in Burleigh in Hampshire, England, in August 1942.

 |
| Shades of green... Vickers light AA (Ack-Ack) Mk II tank left front view |
 |
| Vickers light AA (Ack-Ack) Mk II tank right front view |
 |
| Vickers light AA (Ack-Ack) Mk II tank right rear view |
 |
| Vickers light AA (Ack-Ack) Mk II tank left rear view |
 |
| and after a layer of pledge, decals with colors for Vickers light AA (Ack-Ack) Mk II tank "QUEEN" 33th Tank Brigade, 3rd (mixed) Infantry Division left view |
 |
| Vickers light AA (Ack-Ack) Mk II tank "QUEEN" 33th Tank Brigade, 3rd (mixed) Infantry Division front view |
 |
| Vickers light AA (Ack-Ack) Mk II tank "QUEEN" 33th Tank Brigade, 3rd (mixed) Infantry Division right view |
 |
| Vickers light AA (Ack-Ack) Mk II tank "QUEEN" 33th Tank Brigade, 3rd (mixed) Infantry Division rear view |
 |
| Painting details and starting the weathering... |
 |
| Ack ack Mk II light tank left view |
 |
| Ack ack Mk II light tank rear left view |
 |
| Ack ack Mk II light tank rear right view |
 |
| Ack ack Mk II light tank right view |
 |
| Since she already has a roll bag on her back deck, let's use one from Value Gear to balance things out... |
 |
| So far, so good!!! |
 |
| Painting the roll bags, from this and others projects... Primer time!!! |
 |
| And the Value Gear roll bags painted... |
After a more detailed weathering session, our little girl who hates planes is finally ready. With you, Vickers light AA Mk II tank QUEEN, belonged to 33th Tank Brigade, 3rd (Mixed) Infantry Division, in training before the fight, in Burleigh in Hampshire, England - August, 1942.
 |
| Vickers light AA Mk II tank QUEEN 33th Tank Brigade - 3rd (Mixed) Infantry Division Burleigh in Hampshire, England - August, 1942. |
 |
| Vickers light AA Mk II tank QUEEN left view |
 |
| Vickers light AA Mk II tank QUEEN rear left view |
 |
| Vickers light AA Mk II tank QUEEN rear right view |
 |
| Vickers light AA Mk II tank QUEEN rear right top view |
 |
| Vickers light AA Mk II tank QUEEN right view |
 |
| Vickers light AA Mk II tank QUEEN front right view |
 |
| Vickers light AA Mk II tank QUEEN front right view |
 |
| Vickers light AA Mk II tank QUEEN with Kojak. |
 |
| Vickers light AA Mk II tank QUEEN with Light tank MkVI B |
 |
| Vickers light AA Mk II tank QUEEN 33th Tank Brigade - 3rd (Mixed) Infantry Division Burleigh in Hampshire, England - August, 1942. |
Thank you very much for following us!!!
 |
| Ack ack girls from Auxiliary Territorial Service (ATS) in readiness. A humorous tribute to such brave girls!! Lest we forget!! |
Brilliant article and a conversion I've wanted to do for ages as my dad drove one of these and I'm trying to do all the tanks he drove. I've got the tank but not the conversion from Resicast yet.
ResponderExcluirGreat work!
Hi, my friend!! Thanks for your kind words...Congratulations for the service provided by your father... You must know many interesting stories... About the conversion kit, you can find it relatively easily on eBay and in stores in the UK... Try dig in Google and good hunting!!
ExcluirMy dad was a tank driver and remembered driving the Vickers in Hull whilst training. They decided to test the machine guns and he said the noise smashed all the windows around them. He quickly drive away! 🤣
ResponderExcluirHi, Mark...Thanks for your visit and tell the story of your Father, my friend... Really, very fun and interesting... A big hug and thanks for sharing this small (big) piece of your life!! Check back often!!!
ExcluirMarco: quedó excelente el AA, un gran trabajo. Tus trabajos me inspiran en la realizacion de mis maquetas (por supuesto muy limitados), pero es una pasatiempo increible. gracias
ResponderExcluirHola, Jose!!! Muchas gracias por tus palabras de aliento. Este vehículo fue realmente interesante... pero aún sucederán muchas cosas por aquí... ¡estén atentos!
Excluir