Royal Gunners... aaaateeeention!!!
Today's girl is an extremely strong, reliable and robust tractor, which went through the entire Second World War providing great services to its British designers, allies and even its enemies. We are talking about the versatile and beloved Scammell Pioneer R100 heavy artillery tractor.
 |
| Girls in trouble!!! Scammell Pioneer R100 heavy artillery tractor |
History
The Scammell Pioneer was a British 6x4 military vehicle used as artillery tractor, recovery vehicle and tank transporter. This rugged and reliable truck was built by the British company Scammell Lorries Limited.
 |
| Scammell Lorries Ltd. advertising print - 1945. |
Used by the British Army and Allies, the Scammell Pioneer was known for its ruggedness and ability to tow heavy loads like artillery pieces or tanks. It had a distinctive look with its exposed long engine hood, front wraparound fenders and robust construction, making it a recognizable vehicle of its time. Its contribution to military logistics during WWII was crucial in transporting heavy equipment across various terrains.
To learn more about Scammell history, head to this report...Development
Designed as a 6×4 off-road vehicle for use in Britain's colonies where metalled (sealed) roads were scarce, the Pioneer was first produced in 1927. Though lacking all-wheel drive, its combination of a suspension with great travel, excellent traction, and a low-revving engine gave it impressive pulling power on rough ground at low speeds.
.jpg) |
| Very early Scammell Pioneer, 6 x 4, Artillery Tractor. Notice the the spoked wheels on the front axle font: IWM (KID 3834) |
Though not designed for military use, the British War Office purchased a single petrol engined example in 1932. Equipped as a tank transporter with a permanently coupled 18t semi-trailer, it was assigned to a training unit but did not initially catch on. Additional transporters were not purchased until 1937.
%20on%20to%20a%20Scammell%20Pioneer%20tank%20transporter%20IWM%20(KID%203821).jpg) |
| Loading a Medium Tank (A6E1) on to a Scammell Pioneer tank transporter England tests - 1932 font: IWM KID 3821 |
Military use
With the exception of the single 1932 tank transporter, all Pioneers purchased by the British Army were equipped with a 102 bhp Gardner 6-cylinder diesel engine, driving the rear wheels through a constant-mesh gearbox and fitted with a power take-off driving a Scammell winch.
 |
| Gardner 6LW diesel engine in a preserved Scammell Pioneer R100 |
 |
| Gardner 6LW diesel engine (30's photo) |
Artillery tractor
Introduced in 1935, the Pioneer R100 heavy artillery tractor was a completely modernized version, very different from the original 1927 tank transporter model. The truck's bed was customized for artillery units, allowing space for 9 crew members and immediate use ammunition.
 |
| A very bruised photograph of a Scammell Pioneer R100 heavy artillery tractor, in his early version, with front spocked wheels |
 |
| Early Scammell Pioneer R100 heavy artillery tractor in tests, in England. Notice the rear suspension in action and the front wheels spocked. |
 |
| A brand new Scammell Pioneer R100 heavy artillery tractor Notice the width markers on the front fenders and the thermal blankets over the radiator. |
 |
| Another Scammell Pioneer R100 heavy artillery tractor, with thermal blankets over the radiator. |
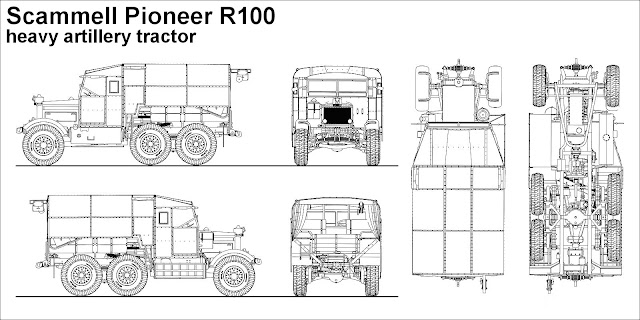
The Scammell Pioneer R100 was a robust artillery tractor truck, with a rigid front axle mounted on a semi-elliptical transverse front suspension, with an "A"-shaped frame anchored to a pivoting axle in the chassis. This front axle was not driven. It had a chassis consisting of two very robust "U"-shaped longitudinal stringers, interconnected by transverse stringers. The rear suspension consisted of two oscillating sets of wheels, installed in two bogies, supported on an oscillating axle supported by longitudinal semi-elliptical springs. The traction was on the four rear wheels, powered by the two differentials interconnected by cardan shafts. Amidships, there was a horizontally installed winch, with a large pulley driven by a reduction box connected to the vehicle's engine, installed in the front. The entire assembly was extremely robust and reinforced.
 |
| Factory pic of a Scammell Pioneer R100 chassis |
Directly behind the driver's cab had two sets of forward-facing double seats, for 4 crew members, with the rest of the crew sitting on seats on the sides of the cargo bed. On the roof of the cargo bed was a chain hoist, which slid on a track of the roof, to facilitate the handling of ammunition. The chain host could slide back and forth on its longitudinal rail, while that rail could slide left and right on tracks on the roof of the rear frame.
 |
| Scammell Pioneer R100 heavy artillery tractor showing the chain hoist, which slid on tracks of the roof, to facilitate the handling of cargo. |
 |
| The same Scammell Pioneer R100 heavy artillery tractor, seen above, in a 3/4 front view |
 |
| Side view of the same Scammell Pioneer R100 heavy artillery tractor, seen above. Indeed, the girl is very huge!! |
Just behind the driver's cab, on both sides, there were small doors for crew access, via fixed ladders, placed just below these doors. The windows above the doors were covered with canvas. The rear of the cab was formed by a half-bulkhead that separated the driver's cab from the truck bed. There was a folding ladder on the rear of the bed, on the left side, to facilitate crew access.
To increase traction, the rear wheels could be fitted with sets of tracks or chains, which were installed over the vehicle's large tires. This procedure greatly increased the tractor's traction capacity.
%2014-01-1944.jpg) |
| Scammell Pioneer R100 showing its rear wheels equipped with a set of traction-enhancing tracks. England, 14-01-1944. font: IWM (H 35213) |
.jpg) |
| A set of drive chains being fitted to the rear wheels of a Scammell Pioneer SV2S Heavy Breakdown Tractor, somewhere in Italy, on 23-11-1944. font:IWM (NA 20279) |
Typical early war use included towing such medium pieces as the 60-pounder, 6-inch howitzer, 4.5-inch gun and 5.5-inch howitzer, until the AEC Matador artillery tractor was issued in sufficient numbers. Heavy artillery pieces towed included the 6-inch gun, 8-inch howitzer, 155 mm Long Tom and the 7.2-inch howitzer.
 |
| Line of 60-pounder Mk.I field guns- France - 1916 |
 |
| 60 pdr Mk II on Mk IVP carriage with modern pneumatic tyres 12 Medium Battery -Royal Artillery - 1938 font: IWM |
.jpg) |
| A Scammell Pioneer R100 artillery tractor towing a 60-pdr gun of 2nd Medium Regiment - Royal Artillery, at the Royal Artillery School at Larkhill, 1939 font: IWM (H 462) |
.jpg) |
| Mobile Workshop engineers repairing a spade of a BL 6-inch 26 cwt howitzer Western Desert - January, 1942 font: IWM (E 7605) |
.jpg) |
| 4.5-inch field guns in action South of El Alamein - 20 July 1942 font: IWM (E 14638) |
 |
| Ordnance BL 5.5-inch Medium Gun font: Library and Archives Canada Photo - no. 5053591 |
 |
| 6-inch Mark XIX field gun font: Landships |
.jpg) |
| 8-inch heavy howitzer during an inspection by French General Georges at Bethune - 23 April 1940 font: IWM (F 3971) |
.jpg) |
| Scammell Pioneer R100 artillery tractor tows an 8-inch howitzer of 1st Heavy Regiment, near Calais, 12 January - 1940 font: IWM (F 2119) |
.jpg) |
| 155mm 'Long Tom' gun of 33/61 Heavy Regiment Royal Artillery, at Vergato, Italy - 22 February 1945 font: IWM (NA 22470) |
.jpg) |
| B.L. 7.2-inch heavy howitzer Mk. 1 |
 |
| B.L. 7.2-inch heavy howitzer Mk. 1 in firing position, with front and rear ramps used to absorb the recoil of the weapon |
.jpg) |
| Scammell Pioneer R100 artillery tractor towing a B.L. 6,0-inch heavy howitzer forms part of a recruiting parade in a Yorkshire town, England. 11 November 1941 font: IWM (H 15529) |
Sometimes the Scammell Pioneer R100s were called upon to perform the tasks of their "brothers" tank transporters or even recovery vehicles. In the photo below, we can see a R100 artillery tractor towing a disabled Matilda II infantry tank to safer areas...
 |
| A Scammell Pioneer R100 artillery tractor working like a recovery vehicle, towing a Matilda II Infantry tank in trouble. somewhere in the African Desert, late 1940. Notice the vehicles in Caunter scheme cammo. font: Keith Brooker- Facebook |
Many Scammell Pioneer artillery tractors were lost in France in June 1940 with the evacuation of the British Expeditionary Force (BEF) in Dunkirk (Operation Dynamo) either destroyed by the withdrawing troops or captured by the Germans.
 |
| Scammell Pioneer R100 artillery tractor abandoned at the beach, in Dunkirk. June, 1940. |
 |
| The same Scammell Pioneer R100 artillery tractor abandoned seen above (right side view) at the beach, in Dunkirk. June, 1940. |
The Scammells that were captured by the Germans and could be repaired were extensively used by their new owners, who were enthusiastic about the model, due to its robustness and reliability, and were used until the end of the War by the Germans, which is nothing short of a testament to its incredible qualities.
 |
| Scammell Pioneer R100 heavy artillery tractor with colors and markings from Luftwaffe |
 |
| Scammell Pioneer R100 heavy artillery tractor with markings and license plate (WH 1223773) from Wermacht. Notice the absence of air filter in the right side of engine hood. |
 |
| The same Scammell Pioneer R100 heavy artillery tractor from pic above, with markings and license plate (WH 1223773) from Wermacht. |
 |
| Scammell Pioneer R100 heavy artillery tractor with markings and license plate (WH 474847) from Wermacht. |
 |
| Rear view of Scammell Pioneer R100 heavy artillery tractor captured by the Germans. |
 |
| A very good Scammell Pioneer R100 heavy artillery tractor with their happy and satisfied German captors. |
 |
| A battered old Scammell Pioneer R100 heavy artillery tractor used by the Germans, in a frame from a color documentary about the surrender of the Das Reich SS division and other troops in Czechoslovakia in 1945. The true proof of the vehicle's robustness!! font: Youtube |
Scammel produced 786 Pioneer R100 heavy artillery tractors by the end of the war. As this quantity was insufficient to meet requirements, the Pioneer was supplemented by the Albion CX22S heavy artillery tractor from late 1943.
 |
| Albion CX22S heavy artillery tractor front left view |
 |
| Albion CX22S heavy artillery tractor rear right view |
The Scammell Pioneer R100 artillery tractors were produced and used during WWII, and it was still in use by the British until 1950, when it was replaced by the Leyland Martian tractor.
 |
| A 1950s Leyland Martian Diesel 6WD artillery tractor and BL 5.5-inch howitzer |
Fortunately, many of these vehicles have survived, being restored and preserved in the hands of enthusiasts and historical associations.
 |
| A preserved Scammell Pioneer R100 heavy artillery tractor, an historical preservation event. |
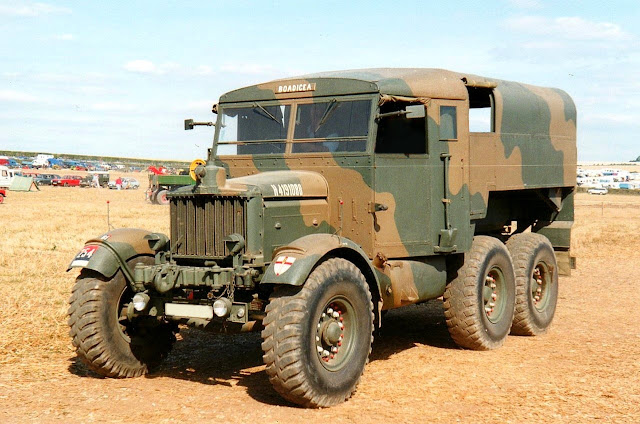 |
| Another very well restored Scammell Pioneer R100 heavy artillery tractor |
Specs
| Scammell Pioneer R100 heavy artillery tractor | |
|---|---|
| Type | Heavy artillery tractor |
| Place of origin | United Kingdom |
| Service history | |
| In service | 1932 - 1980s |
| Used by | British Army |
| Wars | World War II |
| Production history | |
| Designer | Scammell |
| Designed | 1927 |
| Produced | 1927–1945 |
| No. built | 786 (artillery tractor) |
| Variants Crew | Heavy artillery tractor, Heavy recovery vehicle & Tank transporter 1+8 |
| Specifications | |
| Mass | 8.509 Kg |
| Length | 6.27 m |
| Width | 2.59 m |
| Height Wheelbase Winch | 2.97 m 3.708 mm 8.000 Kg |
| Engine | 8.4 L Gardner type 6LW 6-cylinder Diesel 102 brake horsepower (76 kW) @ 1700 rpm |
| Drive Tires | 6x4 13.50-20 (front) 15.00-20 (rear) |
| Transmission | 6-speed constant-mesh gearbox |
| Suspension Fuel capacity | Walking beam 245 liters |
Operational range | 690 km |
| Maximum speed | 39 km/h |
The kit
For this project ( a double project: tractor and gun. About the gun, see in the next report...) my client send to me these fantastic models: British Scammell Pioneer R100 Heavy Artillery Tractor (#35202) from Thunder Model:
 |
| British Scammell Pioneer R100 Heavy Artillery Tractor (#35202) Thunder Model box art |
...and the British 7.2 inch Howitzer (#35211), also from Thunder Model.
 |
| British 7.2-inch Heavy Howitzer (#35211) Thunder Model box art. |
The purpose of this report will be the construction of the tractor. The howitzer, along with its history, will be the subject of a future report. In some of the photos, you will see images of the construction of the howitzer in the background, as the artillery piece is being built in parallel...
I had already built a Scammell Thunder kit years ago, but it was the tank transporter, the Scammell Pioneer TRMU30/TRCU30 Tank transporter 30 ton, and I knew that Thunder Model products were very good... Let's see this version... Starting by the engine: since it is very detailed, I will build it exposed (as most real vehicles were presented...), with some detailing done in scratch... It would be a shame to hide this little gem in a closed engine compartment... Here, the most delicate part is to open the holes in the pieces (with an ultra-fine drill and Dremel) without deforming the plastic. Then, just insert the copper wire into the holes and glue it with superglue.
 |
| Aftre the holes in the engine and fuel injector pump, gluing the copper wire in the fuel pump... These metal stuff is in scratch... left view |
 |
| Bending the copper wire to the correct size and gluing the ends to the engine... left view |
 |
| These metal parts are from Thunder Model Notice the radiator... right view |
 |
| The engine almost ready!!! |
 |
| Building the front suspension with axle... |
 |
| ..and starting the chassis, with front suspension in place. Squaring is essential here!! Notice the engine waiting, in background... |
 |
| The radiator, engine and gear box in the chassis. With these parts installed, the chassis starts to look much more structured. left view |
 |
| Right view |
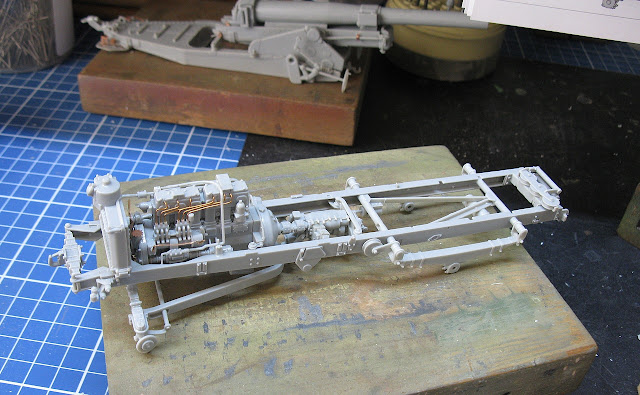 |
| "Closing" the chassis, with all its details, besides the rear suspensions. Don't pay attention to the 7.2-inch howitzer in the background: the build report will be specific about it... |
 |
| Continuing the construction of the chassis and all its components (rear transmission and winch). Note that the squaring must be perfect... |
 |
| All parts that make up the suspensions must be aligned to prevent the model from becoming crooked in the longitudinal direction, which would destroy the final appearance of the model... |
 |
| Installing the steel wire rope inside the chassis winch. I used a twisted polyester thread, in the appropriate diameter. Note that in its terminal portion, I made a mooring eyelet.... |
 |
| This step is a little time-consuming, but the care taken is worth it in the results... left view of the chassis |
 |
| right view of the chassis |
While the chassis is being glued together, I'll tackle the cabin so I can join the two sub-assemblies. Gluing the PE parts supplied by Thunder is tricky (the PE metal is very thin!!)
 |
| Using a piece of cutting board to support the gluing of the PE part |
 |
| Parts of the cabin interior in position, so we can paint the interior... |
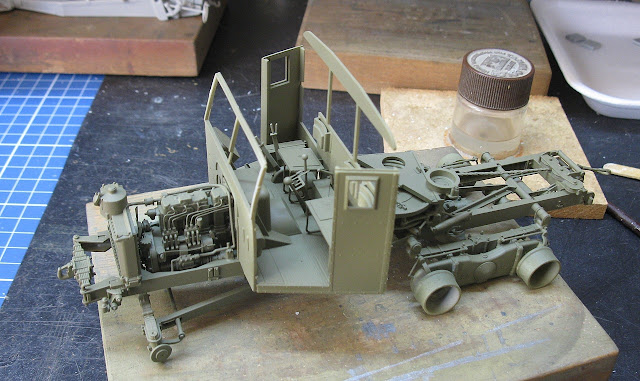 |
| Starting the painting, using dark green primer, from Vallejo. left view |
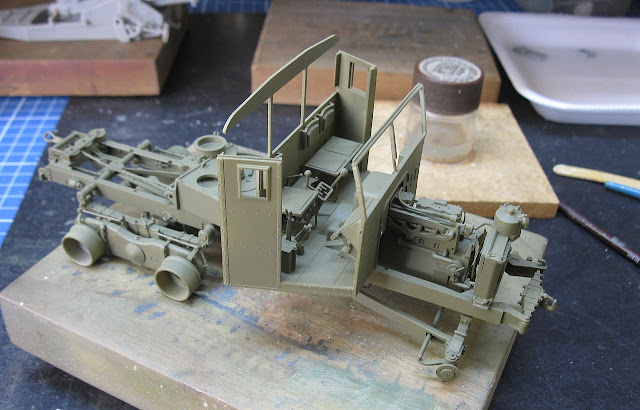 |
| Cabin and chassis painting: right view |
 |
| Adding air filter, bar and steering box. The painting will be retouched next... |
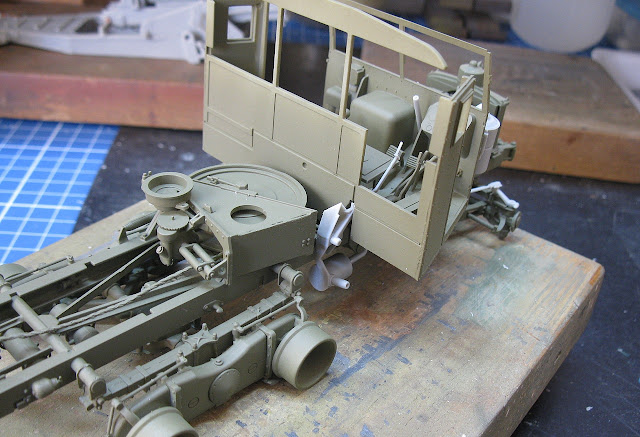 |
| Chassis winch lever and control mechanisms being installed... |
And now, an idea that came to me after looking at some photos of real vehicles: to equip our brave tractor with a spare wheel!!! I'll come back to this topic later, but for now, let's turn one of the standard wheels that the kit provides as optional extras into a spare wheel. But it would be a bit negligent to simply place a wheel anywhere and call it a spare wheel... especially since they come molded with their brake hub. Therefore, to transform a "working" wheel into a spare one, I will remove the brake hub, remove ALL the fixing nuts and make the necessary holes, in the places where the nuts are. It is not difficult... it is just delicate. The use of the Dremel here is essential!!! See the pics below:
 |
| Two front wheels (first pair from the left) and the four rear wheels. The spare wheel is pointed by red arrow... |
But going back to the construction of the truck cabin, the base paint being applied, to allow its future closure...
 |
| Color base - left view of the cabin |
 |
| Right view |
Starting a somewhat complicated part to build: the chain hoist track, on the roof of the Scammell's cargo area. Of course, not all movements are duplicated here... in fact, the tracks for the transverse movements don't even exist, but I'm going to build the track with longitudinal movement so that later I can position the chain hoist in a more favorable position. The assembly is quite tricky, as I said, but with care, everything fits together...
 |
| Fitting the longitudinal rail...Small and delicate parts, but allow movement when correctly installed... |
In the original, the canvas would fall over the rail...but since we are dealing with plastic, I will follow the instructions and open a space in the canvas for the rail to pass through: scalpel n°15 and a steady hand...
 |
| Opening a space in the canvas for the chain hoist rail |
 |
| So far, so good!!! |
 |
| Building the structure of the transverse crew seats, just behind the driver's position |
 |
| The crew seats in position!! |
 |
| The "closing" of the cabin roof and cargo area, with the previous painting in base color... |
 |
| The rail and the chain hoist with movement... |
 |
| The crew seats, painted and detailed... |
My kit was a bad Thunder raffle: the set of decal sheets came with two sheets of census numbers (repeated) and the small sheet of the instruments for the dashboard missing. ...And speaking of decals, the print quality is simply terrible... We'll see the quality of the film for the decal numbers when I use it.
 |
| A standard kit decal set. In my kit, the dashboard instruments sheet is missing and two sheets of census number... Shame on you, Thunder!!! |
This is a problem, but one with a possible solution: let's paint the instruments on the dashboard by hand, with a soft, thin brush...
 |
| The instruments on the dashboard hand painted. |
The kit provides 4 metal spacers for gluing the wheels to the rear suspension bogies. But gluing wheels (which must be positioned aligned and squared) with superglue is a pain!!! Therefore, I replaced the metal spacers with thin plasticard discs (0.3mm thick), as gluing plastic to plastic is much easier... especially since I use welder type glues for this procedure.
 |
| The 0.3mm thick plasticard discs, which I cut with a cutting compass, glued in position on the bogies. Note that I have already "closed" the kit, gluing the tractor's cabin and roof. left view |
 |
| The parts fit together perfectly. The kit is very good in this regard. |
 |
| Rear view. |
Do you remember the story about installing a spare wheel on a vehicle? This was not standard from the factory, but if I were a Scammell driver on the front line, I would certainly want to have a spare wheel with me. The problem would be where to load this wheel, which is not at all small (the Scammell's cargo area is already too small for its own needs). The vehicle's roof presents itself as a great solution, given that its metal structure is well reinforced. Here are some real photos that prove my concept:
 |
| Detail in the picture of a Scammell R100 from 18/56 Heavy Regiment, R.A. , in Italy. Notice the spare wheel in the roof (red arrow), tied by ropes (blue arrow) in his position... |
Hmmmm...this is a safer and more effective solution, besides being more "elegant"... Guess which one I'm going to use??!!!
I will build a "rack" made of simple metal sheets, with two angle brackets, all of this bolted to the metal frame of the cabin. And in the center of this frame, a steel tube that will serve to retain and stabilize the spare wheel, and the wheel will be held in place by a metal crossbar with a portion in the center. This is the concept of the "Panzerserra spare wheel rack", built in the workshops of the artillery brigade. And let's get to work, by Saint George!!!
 |
| The spare wheel rack, bolted to the roof of our Scammell. Notice the tube with the metal crosspiece that will receive the spare wheel lock |
 |
| The rack and the spare wheel. Notice the bar-lock (U-shape) in the wheel... |
 |
| Testing the spare wheel in position, locked and safe! The boys were proud of the work done by Kojak!!! |
 |
| With the spare wheel problem solved, we will continue to add the other details of the kit to our tractor... |
A criticism of the Thunder kit: the thickness of the photoetched part is very thin, especially the part that corresponds to the toolbox on the side of the chassis, on the right side: bending and maintaining the shape of this part to allow welding of the metal parts is a real nightmare...
 |
| The toolbox rack on the side of the chassis... This piece is a pain to build...very thin metal!! |
 |
| Toolrack glued in position (red arrow) |
 |
| Notice the chain hoist at the rear of the Scammell... |
 |
| Masking with toillete paper... |
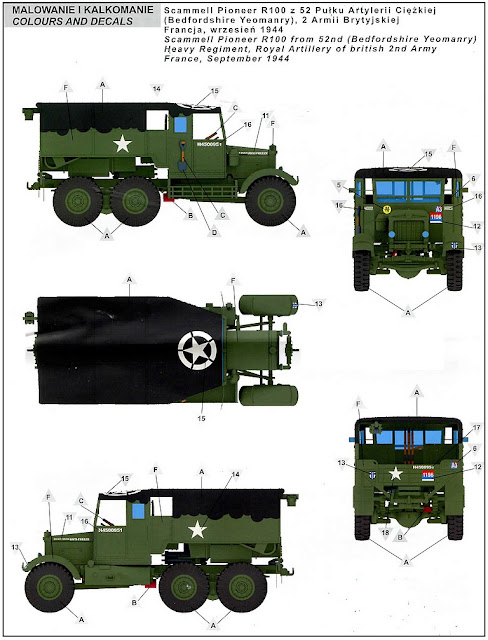
And now, the markings... I decided not to use the markings provided by Thunder, because of the appearance of the decals... I thought they were terrible and, therefore, I'm going to make my own markings. Since this vehicle will be displayed together with its "customer", that is, together with the artillery piece to be towed, I decided to opt for the markings of the 52nd Heavy Regiment-Royal Artillery (Bedfordshire Yeomanry), under the 2nd Army, in September 1944, after Normandy, in France. Meet "BOMBAY, a Scammell Pioneer R100 Heavy Artillery Tractor, senving at 419th Heavy Battery. I choose the camo in green-black, but a variation of the |Mickey Mouse one. The same camo featured by IBG (#35030) and Accurate Armour (#K102) markings for their Scammells R100.
 |
| Panzerserra Markings & Colors guide |
 |
| IBG kit (#35030) Scammell Pioneer R100 markings |
 |
| Accurate Armour ki (#K102) Scammell Pioneer R100 box art |
After painting in a green base color, with small tonal variations, we will use masking tape to paint the surfaces that will be painted black.
 |
| Green and masking tape - left front view |
 |
| Green and masking tape - right front view |
 |
| After painting in black, with small tonal variations, we remove the masking tape. front left view |
 |
| After painting in black, with small tonal variations, we remove the masking tape. right view |
 |
| Painting - rear view |
 |
| Wheels for tratctor and howitzer under painting... Notice the big 7,2 pol. Howitzer under construction, in background |
As I suspected, the decals in the kit are terrible: brittle and take forever to come off the paper. Thank goodness I have a box of extra decals and my old Laserjet color is still working. The Battery markings are old Archer decals; the Allied stars and our girl's name are scraps from other projects and the AoS are my own creation. I only used the census numbers and the bridge marking, which had to be retouched because it was crumbling... Thank goodness the numbers were ok...
 |
| Leaving the tool rack empty would be simply heretical. Let's use some jerry cans and oil cans from this excellent kit Allies Jerry Can Set WW2 (#35587) from MiniArt. Starting with the decals... |
 |
| Allied Jerry-cans and Krauts, plus some oil cans under construction |
 |
| After painting. Notice the spare wheel rack under painting in red oxide, on top of the tractor. (red arrow). Note also the ammo box (green) and 7,2 pounders projectiles... Starting the weathering... |
 |
| The rack was very crowded...much better!!! |
 |
| The shovel installed vertically behind the driver's cabin is not from Thunder...it's from my scrap box |
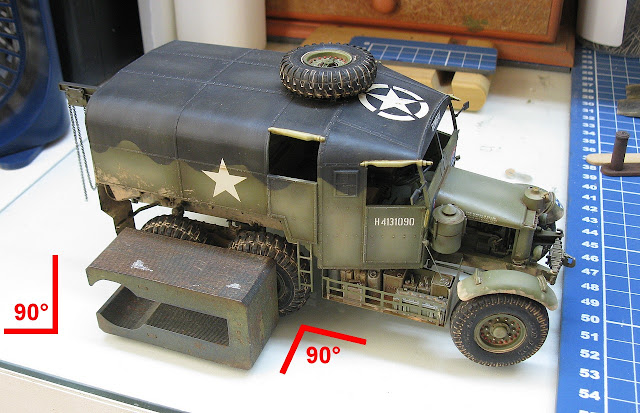 |
| Gluing ALL the wheels (including the spare wheel). The use of squaring guides is essential. I'm glad I chose to use plastic discs as spacers instead of the metal ones from Thunder... |
 |
| Perfect alignment of the rear wheels with the tractor body. I chose to present a small deviation in the front wheels... Notice the spare wheel... |
 |
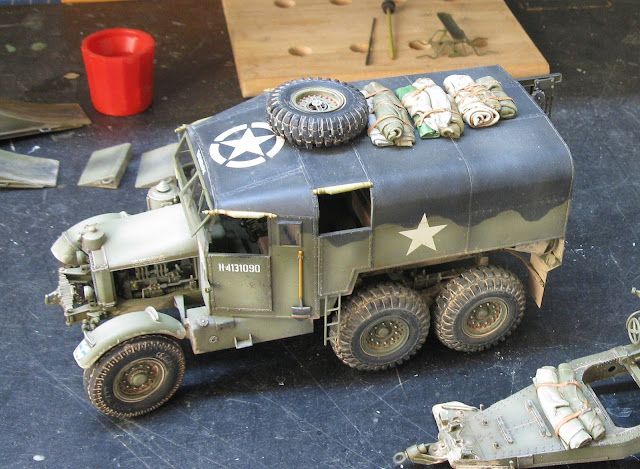
| BOMBAY became a very elegant girl!!! |
 |
| Rear view |
 |
| I managed to fit a funnel into the empty space on the rack... |
 |
| The projectiles and propellant cases are from the B.L. 7.2-inch heavy howitzer kit, that I am building in parallel with the tractor but which will be transported by it |
 |
| These Scammells have a very badass visual aspect, no doubt!!! |
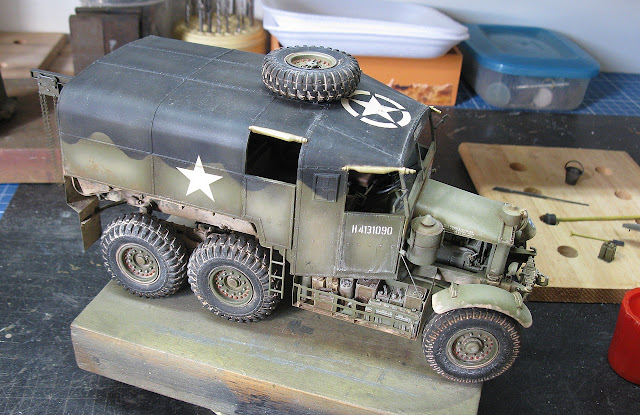 |
| The painting job is almost ready... |
And since we're finishing up, let's use some more accessories from Value Gear Details... Testing the positioning of the parts on the tractor and howitzer...
 |
| Value Gear stuff under dry-run... |
 |
| And after being painted... |
 |
| ...and glued in position on the tractor... |
 |
| ...and (spoiler!!) in the howitzer! |
And after some more dirt and weathering, I present to you BOMBAY, a Scammell Pioneer R100 Heavy Artillery Tractor, in the colors of the 2nd British Army, with the 52nd Heavy Regiment-Royal Artillery (Bedfordshire Yeomanry), fighting in France, September 1944, after Normandy, in the 419th Heavy Battery.
 |
| Scammell Pioneer R100 Heavy Artillery Tractor "BOMBAY" 2nd British Army - 419th Heavy Battery 52nd Heavy Regiment-Royal Artillery (Bedfordshire Yeomanry) France- September, 1944. |
 |
| Scammell Pioneer R100 Heavy Artillery Tractor front left view |
 |
| Scammell Pioneer R100 Heavy Artillery Tractor left view |
 |
| Scammell Pioneer R100 Heavy Artillery Tractor rear left view |
 |
| Scammell Pioneer R100 Heavy Artillery Tractor internal cargo bay - right view |
 |
| Scammell Pioneer R100 Heavy Artillery Tractor internal cargo bay - left view |
 |
| Scammell Pioneer R100 Heavy Artillery Tractor rear right view |
 |
| Scammell Pioneer R100 Heavy Artillery Tractor right view |
 |
| Scammell Pioneer R100 Heavy Artillery Tractor rear right top view |
 |
| Scammell Pioneer R100 Heavy Artillery Tractor spare wheel in close view |
 |
| Scammell Pioneer R100 Heavy Artillery Tractor tool box rack |
 |
| Scammell Pioneer R100 Heavy Artillery Tractor front right view |
 |
| Scammell Pioneer R100 Heavy Artillery Tractor BOMBAY with Kojak... |
 |
| Scammell Pioneer R100 Heavy Artillery Tractor towing a 7,2-inch heavy howitzer Mk I |
 |
Scammell Pioneer R100 Heavy Artillery Tractor with his sister, Scammell Pioneer SV2S Heavy Breakdown Tractor |
 |
| Scammell Pioneer R100 Heavy Artillery Tractor "BOMBAY" 2nd British Army - 419th Heavy Battery 52nd Heavy Regiment-Royal Artillery (Bedfordshire Yeomanry) France- September, 1944. |
See you soon, gunners...
and keep firing!!!


.jpg)
.jpg)



Nenhum comentário:
Postar um comentário