Mes amis...
While the oil paint in the weathering of
quartet of Char B1s dry, I'll start to build a project of a very rare version: the Char FCM 2C Bis!!!
 |
| Char FCM 2C bis - notice the casted turret and the 155mm howitzer |
When I was building the super-heavy tank FCM 2C (standard), I discovered that existed only one vehicle on this configuration , characterized by a 155mm howitzer in a front casted turret. We only know the photo you posted above and the greatest difficulty is the misinformation about this beast.
History:
The origins of FCM Char 2C bis is the same of their nine other "common" brothers, as we've seen in the
previous article: The tanks were baptized with the names of ancient provinicas of France. The number 9 was the Champagne.
 |
| France - ancient provinces |
 |
| Champagne Brason |
In 1926 (some sources cite 1923), the Champagne n° 9 (late, 99) was modified to Char 2C bis (some fonts cite the Char n°10 (90) Poitou, too), an experimental version armed with a
155 mm howitzer (possibly a variant of the
155 C Mle1917 Schneider) in a casted turret. New engines (two Sautter-Harlé engines 6-cyl 250hp/each) were fitted and the machine guns in the side positions were deleted. In this configuration the tank weighed perhaps 74 tons. Though, the changes were only temporary: the vehicle was brought back into its previous condition in 1934 (some fonts cite that the "Champagne" returned back to its original state in the very same year). The new casted turret was used in the
Tunisian Mareth Line.
My opinion is that the industrial effort required for this modification would be wasted by its use for less than a year. I counter-intuitive that such expenditure should be used for so short period, even more in a vehicle that has been modified in the interwar era. IMHO, I agree that the Champagne 2C bis returned to its standard condition in 1934, because a question of logistic and maintenance standardization. Based on this premise, I modified the blueprint in 3 views of FCM 2C that I found on the internet to the 2C bis version.
 |
| Super-heavy tank Char FCM 2C bis - blueprint |
I found in the web (I love the internet) some artistic drawings on this version on an online
tank game site (
World of Tanks). This version of Char 2C bis was idealized and renderized, but never was used in this
game. In this artistic version, the rear turret shows a
25 mm Hotchkiss anti-tank gun, but whether this evolution has happened, I think that it would be extended to all tanks of the lineage and never be "retrofitted" to the inferior pattern with a machine gun, later ...Again, IMHO !!!
 |
| Char FCM 2C bis - W.o.T. art - top front view |
 |
| Char FCM 2C bis - W.o.T. art - top rear view |
 |
| Char FCM 2C bis - W.o.T. art - notice the 25mmAT in the rear turret |
 |
| Char FCM 2C bis - W.o.T. art - in the Bunker... |
| Char FCM 2C bis - Super-heavy tank (prototype) |
|---|
| Type | Super-heavy tank |
|---|
| Place of origin | France |
|---|
| Service history |
|---|
| In service | 1923–1934 (?) |
|---|
| Used by | France |
|---|
| |
|---|
| Production history |
|---|
| Designed | 1923 |
|---|
| Produced | 1923 |
|---|
| Number built | 1 -(2 ?) |
|---|
|
|
|---|
| Specifications |
|---|
| Weight | 74 tonnes |
|---|
| Length | 10.27 m |
|---|
| Width | 3 m |
|---|
| Height | 4.09 m |
|---|
| Crew | 12 |
|---|
|
| Armour | 45 mm max. |
|---|
Main
armament
| 155mm howitzer- variant of the 155 C Mle1917 Schneider |
|---|
Secondary
armament
| two 8 mm machine guns (ball mount at front and one mounted in a rear turret) |
|---|
| Engine | two Sautter-Harlé engines 6-cyl
2 x 250 hp |
|---|
Operational
range
| 140 km |
|---|
| Speed | 15 km/h |
|---|
The kit:
I'll start the building modifying the front upper hull.
 |
| The parts that will be removed (in red) |
 |
| Using the Dremel and saw tool. Beware with your fingers !!! |
 |
| Surgery done. Starting the cleaning job... |
 |
| Almost there... |
 |
| The front hull without little details.... |
 |
| Plasticard cut to the closing of the upper hull |
 |
| Like a glove !!! |
 |
| Internal reinforcing with dental acrylic and sprues (very good, indeed...) |
 |
| Putty diluted with acetone to close the narrow gaps... |
 |
| Done ...What a mess !!! |
 |
| Flat and smooth... |
Starting the "auxiliary turret"
 |
| Three layers of plasticard (1mm) glued in the corners... |
 |
| After the dremel's cut. The "cake recipe ... |
 |
| Testing in place... |
 |
Plasticard plates after separation.
How were cut together, are identical with each other ... |
 |
| The "auxiliary turret" after lamination with thin plasticard (0,2mm) |
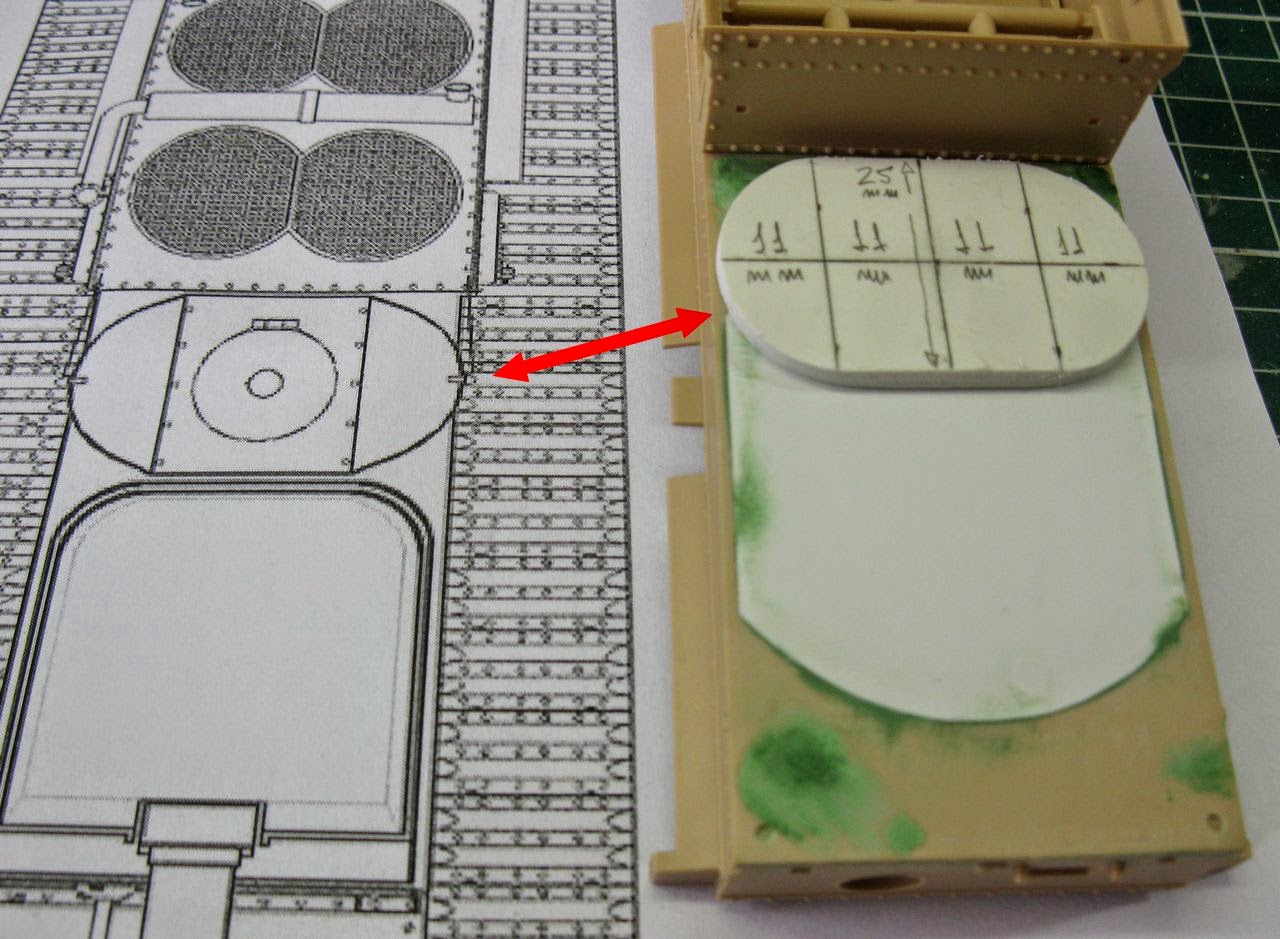
While the auxiliary turret dry, we start the main turret. Base is measured and cut ...
 |
| Notice the very complicated cutting template... |
 |
| Testing the parts... |
After that, testing the main turret in movement...
 |
| The screw as movement pivot... |
 |
| Left eyes !!! |
 |
| Right eyes !!!! |
The auxiliary turret, almost done !!!
The old turret under surgery... The new auxiliary turret has a crown !!!
 |
| Cool !!!! |
Yesterday (Sunday) was the main turret day !!! After almost finishing the auxiliary turret (which was easy), my challenge is to build the main turret. . The biggest problem will be to make the gun stay mobile with elevation and depression of the howitzer. But as said Jack the Ripper: "Let's do the thing in separate parts ..." My idea is building the turret with plasticard (for the bottom and top) and balsa wood, for the core. The wood will be laminated with very thin plasticard, after...
 |
Starting the main turret. I used two layers of balsa wood with 5mm height.
I glued the wood together with PVA glue and drops of cyanoacrylate. |
 |
| Making the place of the future gun's rotor... |
I glued the wood together with PVA glue and drops of cyanoacrylate. Then I glued block of wood in the plastic with cyanoacrylate, again:
 |
| The bottom part of the main turret done. The sides will be laminated with thin plasticard... |
The upper part of the turret was built following the same recipe. The difference is that the top was made with a triple layer of plasticard, to allow the cutout (rounded) the edges of the top.
 |
| The main turret in details. Notice the gun rotor gap.. |
 |
| Testing the main turret with the auxiliary ... |
Following the Jack's motto, it's time to do the howitzer. In the photo and drawings, the short barrel of the 155mm howitzer emerges from a rotor... When thinking about this, I remembered that one was left a rotor when I built my Char b1bis quadruple project, from the Flamm version ... I love my spare parts box!!
 |
| Char B1bis gun rotor spare part. A bit narrow, but easily fixable ... |
After I removed the 75mm cannon, increased the thickness of the rotor with two plates of plasticard. The thing was perfect!!
 |
| Testing the rotor thickness... Like a glove !! |
I made a simple system for the movement of the rotor: two plates of thin plasticard connected by a axis. The rotor rotates around this axis and this set is pasted (through the plates) in the front gap of the turret. The howitzer was made with Plastruct rod and the gun collar was a spare port of Char B1.
 |
| The turret (notice the front edge already rounded) and the rotor device... |
 |
The turret with all edges rounded (Dremel) and notice the thin plates of
plasticard in the sides of the rotor... |
I fit the rotor in the turret gap and glued the aparatus through tabs ...Voilá !!!
 |
| In the hull !!! Testing ...testing... |
 |
The turret turns and the gun moves !!!
Gun up !!! |
 |
| Gun down !!! |
 |
| Left eyes !!! |
 |
| Right eyes !!! |
Bottom view. The little screw allows the turret movement...
 |
| So I made the two "reinforcing beams" in parallel ... |
The beautiful girl, armed and dangerous!
 |
| The main turret done !!! |
 |
| The two front turrets in place, in dry-run... |
 |
| And the Char B1 girls, in the wait stand... |
Well, Gents...Today, I could work on this beauty. My office was being repaired and in a Spartan Wednesday, I attacked the project. Let's go !!!!
 |
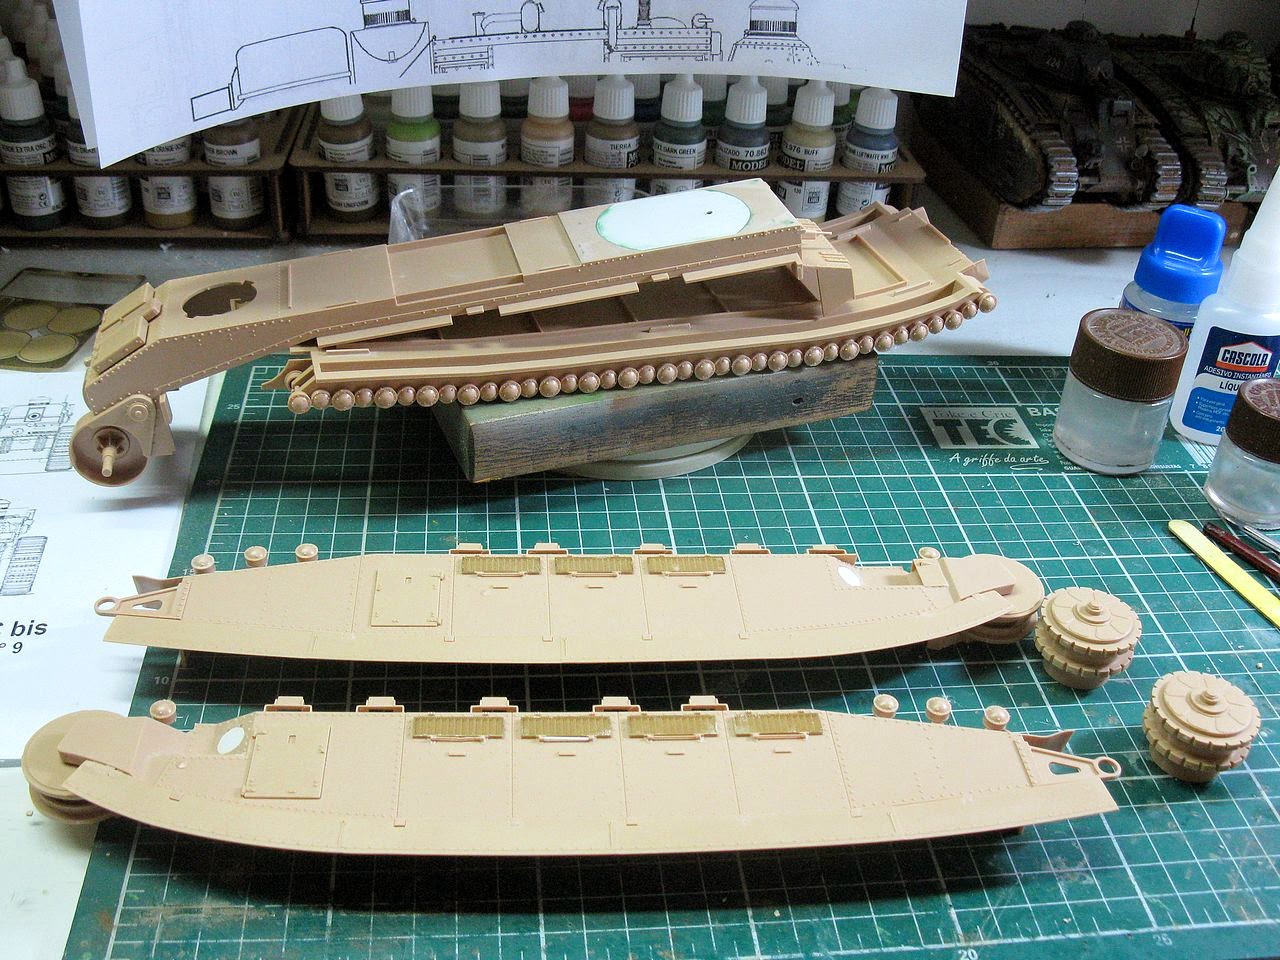
| Building the suspension and the chassi...by the book !!! |
 |
| The sides of the hull. Notice the absence of the MGs... |
 |
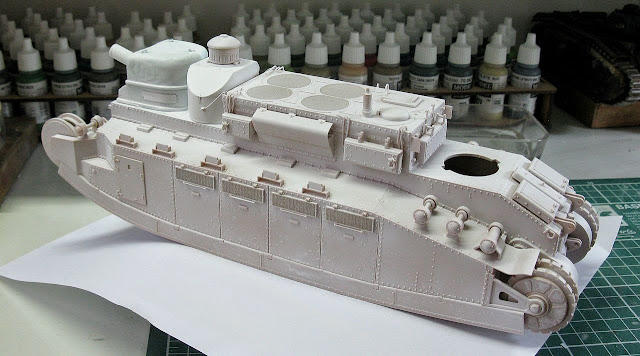
| The tank, stands and with the main turret in place... |
According to the literature, the turret was casted. As the plasticard features a very smooth surface , I'll do the casted texture with putty diluted in acetone.
 |
| Putty+acetone = corrugated texture... |
 |
| Done. Notice the the lifting rings in the roof of the turret. |
 |
| Lifting rings in close... |
 |
Details in the auxiliary turret.
Notice the rivets in the hull, made with Archer surface decals. |
 |
| Ready for paint... |
About the colors, I do not like to do this beast in monochrome, as my standard FCM 2C. As it was a unique version (and interwar era ... with very much propaganda connotation ...) , I thought of a well flashy camouflage scheme!
My Belgian friend
Alain Drèze sends to me a very beautiful example of camouflage scheme of the FCM tanks ...and i love it !!!
 |
| Alain's avatar ...Thanks , Alain !!!! |
 |
| French FCM 1A tank - 3 color cammo |
So, let's paint the tank!!! Primer Valejo, first !!!
 |
| And the cammo...Wow...Very discreet! |
 |
| Next, weathering and tracks !!! |
It's time to install the tracks of the tank ...Easy and smooth.
 |
| Tracks ready for installation... |
Now, the best part: the markings and decals...As we've seen in the
previous article, the FCM 2C tanks were baptized with the names of ancient provinicas of France. The number 9 was the Champagne. I have been searching about the ancient province of
Champagne and discovered the beautiful coat of arms of this wonderful region:
 |
| Original coat of arms of the County of Champagne. |
The FCM 2Cs were important propaganda weapons of France in the interwar period and some of these vehicles sported the coats of arms of the regions of their names on the left side of their turrets.
 |
| FCM 2C Normandie (97) with the coat of arms in the left side of the turret |
 |
| FCM 2C ALSACE (93) with his beautiful coat of arms. |
The MENG provides these two colorful versions in the original decal sheet of the kit.
Here, a curious fact: the Coat of Arms of Normandie is composed of two leopards and not two lions, as in the MENG decal.
 |
The correct Normandie coat of arms.
Leopards!! |
This led me to believe in a search error on the part of the MENG, but observing a vintage photo, the coat in the tank turret NORMANDIA presents the coat with two lions and not two leopards.
 |
Notice the Lions in the NORMANDIE's turret
The correct would be leopards, but ... |
MENG historically reproduced the "correct" tank's coat of arms. Are the crewmembers wrong, in those times ?? Who would know ???
Since I'm building the Champagne, I decided to make the decal of the coat of arms of the Province of Champagne to decorate the turret left side of my puppy ...
 |
| Panzerserra's decal art |
I updated my profile:
 |
| FCM 2Cbis CHAMPAGNE |
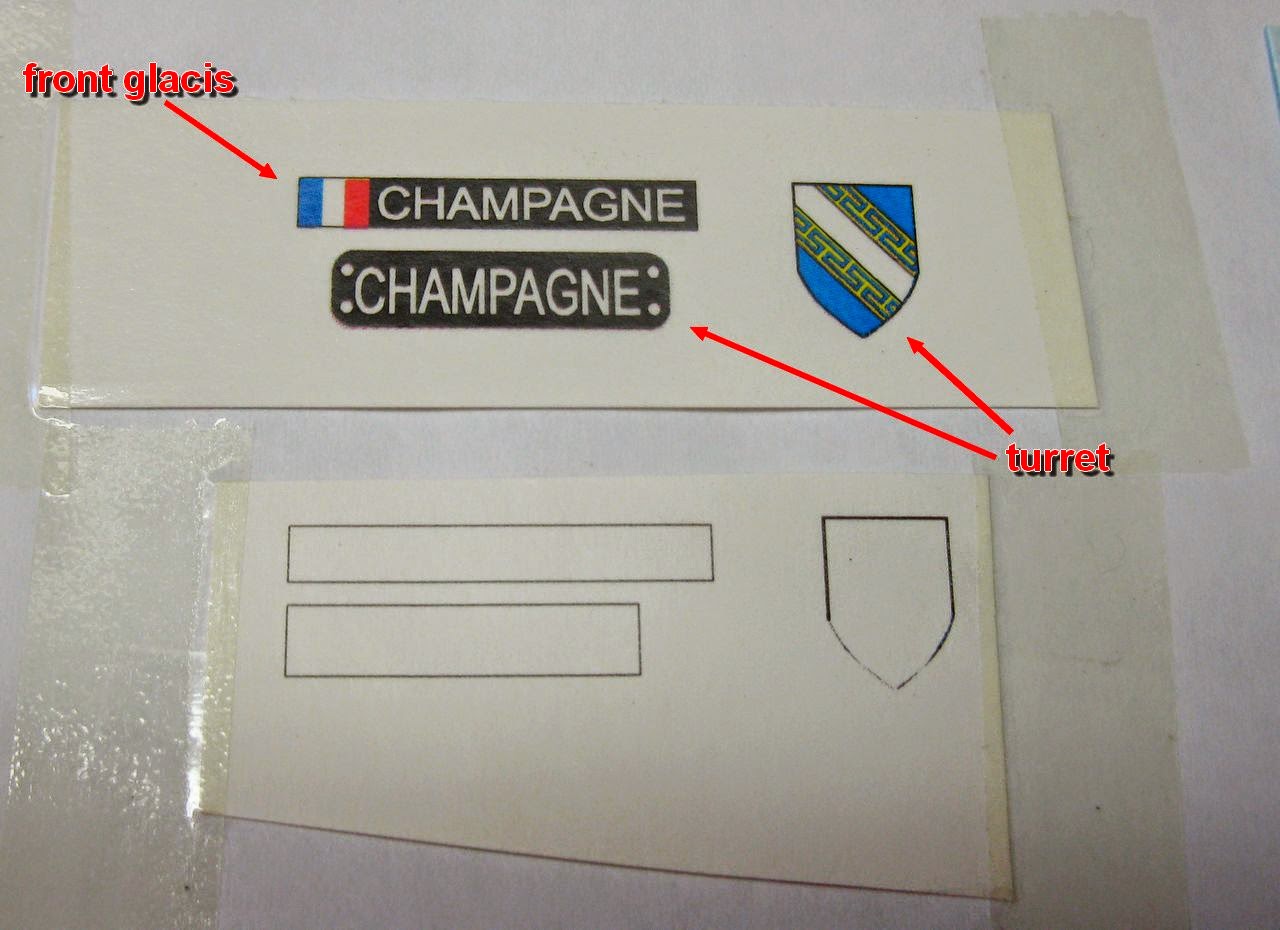
The colors fo my kit:
 |
Panzerserra decals and MENG decals. I'll use the number 9 of MENG decal sheet
Notice the right French flag of my decal... |
 |
| Panzerserra decal close up |
 |
| and the FCM 2Cbis CHAMPAGNE (9) was born... |
 |
FCM 2Cbis CHAMPAGNE - left side ...starting the weathering...
I will not exaggerate in the weathering, because I will choose to present this tank
as a true propaganda vehicle... |
 |
FCM 2Cbis CHAMPAGNE (9) - right side
|
And searching more and more, I found that the plate on the front portion of the tank does not have marking or decals in the kit:
 |
| The plate in blank... |
 |
| The markings of the plate... |
 |
| Decals for the FCM 2C and FCM 2Cbis... |
|
| FCM 2Cbis Champagne |
 |
| Painting the background in white (in the two tanks...) Normandie pictured... |
 |
| Decal in position...Normandie |
 |
| Decal in position...Champagne. I corrected the decal position after the picture... |
 |
The two big girls, side by side...
Notice the tracks, in different positions of the links. |
Merci beaucoup pour se joindre à moi, mes amis!
See you, soon !!!


Waouw a rolling bunker ! What a nice project my friend ! We are starting for a new adventure ;-)
ResponderExcluirAnd don't worry: i don't forget the 04 Chars girls...they are drying ....
ResponderExcluirStay tunned, Alain !!!
omg ! what a work ! very nice. i need this lol. well done
ResponderExcluirThanks a lot, Darkproject!!! Hugs!!!
Excluir