
Well...it's my vacations...away of my workbench... Meanwhile, let's talk about a scratch-built project... About a companion of many of our brave trucks: the 7 ton American Semitrailer, Panel Cargo. Keep them rolling !!! ( These trailer will be finished with my Studebaker tractor...).

History:
The WWII-vintage 7-Ton Semitrailer, Panel Cargo (also called Semitrailer, 7-Ton, Combination Stake and Platform) is a two-wheel general cargo utility vehicle having dual tires.
 A spare wheel and tire is carried on a bracket attached to the front of the body.
 A retracting-type landing gear is attached to the frame, and is operated by a worm screw and hand crank, which is located on the right center side.

Auxiliary supports are attached to both sides of the frame forward. The body, which is mounted on a steel frame, is of the open-top panel type, with a maximum payload of 6.350 kg.
 The frame is carried on a one-piece axle through a slip-end, semi-elliptical spring suspension. Two combination blackout tail and stop lights are installed on the rear.


Auxiliary supports are attached to both sides of the frame forward. The body, which is mounted on a steel frame, is of the open-top panel type, with a maximum payload of 6.350 kg.


The braking for the trailer is done by means of internal expanding (Duo Servo), vacuum-operated power brakes, located on each of the inner dual wheels. The brakes are controlled through the tractor-trailer brake linkage system by an operating valve located on the tractor and operated by the driver through foot pedal or hand brake.


The 7-Ton Semitrailer, Panel Cargo is towed by a 2 1/2-ton tractor-truck equipped with a fifth wheel coupling. The upper fifth wheel for this coupling, consisting of a plate and kingpin, is attached to the front end of the trailer.

The 7-Ton Semitrailer, Panel Cargo was manufactured by multiple companies during World War II, with a different Ordnance Supply Catalog G number for each, including these:
- Edwards Iron Works (G-544)
- W. C. Nabors Company (G-546) Model 2-GC
- Highway Trailer Company (G-572 and G-596)
- Gramm Motor Truck & Trailer Corp. (G-595)
- Carter Mfg. Co. (G-597)
- Whitehead & Kales (G-598)
The differences among the models are very small; all these trailers have the same outward appearance. Both wood and steel beds were produced. Some of the trailers have tubular axles, while model 2-GC has a solid, rectangular axle.
Specs:


| 7-Ton American Semitrailer, Panel Cargo | |
|---|---|
| Type | 2 wheel general cargo trailer |
| Place of origin | United States of America |
| Manufacturer | Edwards Iron Works (G-544) W. C. Nabors Company (G-546) Model 2-GC Highway Trailer Company (G-572 and G-596) Gramm Motor Truck & Trailer Corp. (G-595) Carter Mfg. Co. (G-597) Whitehead & Kales (G-598) |
| Specifications | |
| Weight empty Weight loaded | 2.510 kg 8.860 kg |
| Length | 5.029 mm (not spare wheel) |
| Width Height (all) | 2.324 mm 2.387 mm |
| Height of bed Ground clearance | 1.308 mm (empty) 1.225 mm (loaded) 355 mm (minimum) |
| Speed (max.) | 72,5 km/h (road) |
The model:

After this "route correction", more detailing: the axle clamps:
Now, we will extend the canvas on top of the cargio: We will use the technique of tracing-paper with PVA glue diluted 50% in water.


Stay connected, Drivers!!
As I said before, this project will be in scratch... First of all, drawing the trailer in 1/35 scale...
Lets have fun!!!

Well... In this Sunday my work is yielding a lot ... Let's go to spring leafs:
Now, time to put the suspension in the trailer. The big problem at this time is a misalignment ... This would destroy everything !!! To avoid this, I invented a jig made with metal strips. Again, my spare parts box save me!!!
My good friend Johannes Haspels alerted me to some flaws in the dimensions in the vertical stringers of the cargo area:
 |
| Side view of 7 ton. trailer |
 |
| And the sketch in 1/35 for scratch the parts... |
 |
| Starting by the triler's chassis... Cutting the stringers: Plastruct 90769 - 2x6,4mm and Plastruct 90767 - 2x4mm |
 |
| Glued togheter... |
 |
| Preparing the surgery on stringers... |
 |
| The problem and the solution: Dremel !!! |
 |
| Done!! |
 |
| adding the transverse struts (the ribs of the chassis ...) Plastruct 90767 - 2x4mm |
 |
| The floor of the trailer's loading area, made of a 1mm-thick plasticard plate and carved to imitate a pattern of wooden planks. |
 |
| Upper view of the cargo area: wood!!! |
 |
| Side view... |
 |
| Side walls: wood, too... |
 |
| scribbed plastic... |
 |
| Glued in position.... |

 |
| side view |
 |
| Rear view |
 |
| Front view... |
 |
| Old spring leafs from my spare parts box... New blades made with plasticard... |
 |
| Reinforced suspensions done!!! |
 |
| Making the suspension clips |
 |
| Done!! |
 |
| Details in the rear suspension brackets |
 |
| The metal jig (green arrow); The use of the jig as a limiter in the front part of suspensions (red arrows). Finally, the jig in the rear portion of the suspensions (blue arrows) |
 |
| Checking the alignment ... |
 |
| Chuck approves!!!! |
 |
| First test with the tractor!!! OMG!!! |
 |
| Belly view!!! |
 |
| Gaps in the vertical stringers... Awful!! |
But the girl is under construction, yet!! Let's fix these flaws:
 |
| I cut some segments of Plastruct... |
 |
| And I introduced the segments with extra-thin glue in the gaps !! Voiláá |
 |
| Chuck and Johannes are happy, again!!! Thanks, Johhanes!!!! |
"Oh faithless and perverse generation... How long shall I be with you, Rivet Counters?"

After this "route correction", more detailing: the axle clamps:
 |
| Plastruct rod 0,8mm diameter... |
 |
| Done!! |
And the fun continues:


My girl will have to work hard. I will load with blocks of Styrofoam and cover everything with "canvas" made with the tracing-paper technique.
 |
| Trailer's plate and king pin in position... |
 |
| Starting the trailer's land gear... |
 |
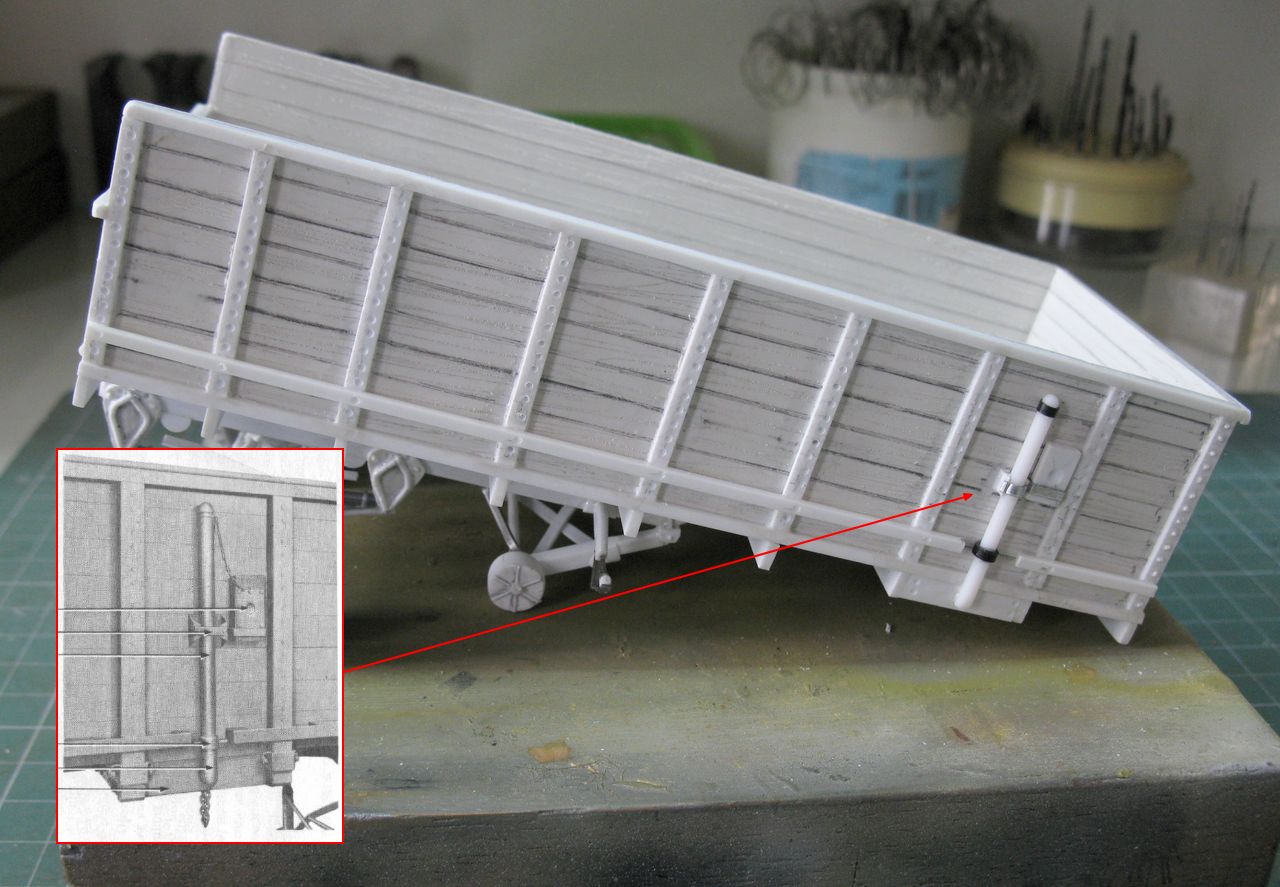
| In position. Notice the tool box (rectangular) and the vacuum tank for the brakes (cylindrical) |
 |
| Landing gear rear view |
 |
| Pads for the auxiliary supports... |

 |
| Auxiliary supports in position: right side... |
 |
| left side |
 |
| Rear view |
 |
| Belly view |
 |
| Close up of landing gear and brales in the axle. |
 |
| My precious!! |

My girl will have to work hard. I will load with blocks of Styrofoam and cover everything with "canvas" made with the tracing-paper technique.
 |
| Cargo time: styrofoam !! |
 |
| Carving the styrofoam... |
 |
| Ok... The monk approves!! |
 |
| Detail: with the cargo in the trailer, I lowered the suspension to simulate the weight !!! |
 |
| And now: scratch of chock blocks and chains!! RB Models for my rescue!!! |
 |
| Chock blocks in position (the real pic is reversed...) left side |
 |
| Chock blocks in position - right side |
 |
| Chock blocks and chains of auxiliary supports - left side |
 |
| Chock blocks and chains of auxiliary supports - right side |
I did not put the upper chain of of auxiliary supports because the future canvas cover will cover this detail ... We need to save chains !!!
 |
| Let save chains!!! |
After painting the traiuler with olive-drab, let's put cargo in the cargo bay. Time to use the styrofoam. First of all, glue the styrofoam in the cargo bay, with specific glue for styrofoam.
 |
| The cargo glued in place |
 |
| Cutting the tracing-paper in the correct size... |
Using soft drink caps, we will put PVA glues at the disposal of the modeler: a cap with pure PVA glue (100%) and a cap with PVA glue diluted in 50% water.
 |
| The ingredients for the canvas... |
The first thing we do is apply with brush, PVA glue 100% on the front portion of the trailer and on the top flat surfaces of the cargo and the trailer. This to allow an initial adhesion of the tracing-paper in these areas ...
 |
| Applying PVA glue in 100% to the first canvas positioning... |
Meanwhile, we "painted" one side of the "canvas" with PVA glue diluted by 50%. The paper starts to wrinkle and curl up ... Don't worry ... this is normal ...
 |
| The paper (canvas) with first layer of diluited PVA glue... |
Then, you turn the "canvas" and apply the "wet" face on the parts previously "painted" with pure PVA glue. Do this maneuver with wet fingers, to avoid unwanted adhesions ... At this stage, you start the folding of the paper, to simulate the folds of the actual canvas...
The work at this stage gets a bit "dirty, mass and sticky", but that's how the things evolve ... Use a wide soft brush to apply a layer of diluted glue on the applied canvas and go forming the softened paper in depressions and reentrances ...
 |
| The "canvas" softened by new layer of glue and water... Notice the foldings in the canvas... |
 |
| Use pure glue with a thin brush, punctually, to glue and align the position of the folds of the canvas ... |
 |
| It sounds complicated, but it's not ... Now you expect to dry ... |
 |
| Drying... |
 |
| After the diluted glue dries, the paper again acquires its characteristic transparence !!! |
 |
| Transparent: soooo sexy!!! |

 |
| Testing the spare wheel... Next step: painting the canvas!!! |
 |
| Trailer painted and with moorings!! Testing with Studebaker US-6 U6 tractor. |
 |
| Almost there...Next: weathering!! |
And the trailer was ready!!


 |
| Studebaker US6 U-6 tractor 6x4 "DESTRUCTOR" with 7-Ton American Semitrailer, Panel Cargo. 21st British Army Group - Royal Army Service Corps (RASC) 536 GT Company - 11 June 1944, Normandy - France. |


 |
| Studebaker US6 U-6 tractor 6x4 "DESTRUCTOR" with 7-Ton American Semitrailer, Panel Cargo. 21st British Army Group - Royal Army Service Corps (RASC) 536 GT Company - 11 June 1944, Normandy - France. with Kojak and Rover, the dog!! |
Thank for Sharing sach a beautifull blog with us. I hope you will share more in Future. Please Keep sharing.
ResponderExcluirclick here
Thanks a lot, Autolinkqatar. This is my intention!!! Hugs!!
ExcluirVery nicely done!
ResponderExcluirThanks a lot, Pat!! Still a long road ahead ... Stay tuned and thanks for the encouragement !!!
ResponderExcluirShow, mais um grandioso projeto, acompanhando
ResponderExcluirMuito obrigado Marcão!! É sempre um prazer te ver por aqui!!!
ExcluirMuito massa, Mestre Serra!
ResponderExcluirO EB também utilizou destes semitrailers, mas tracionados pelos CCKWs. O amigo teria como me enviar os arquivos do corel que fizestes para guiar o corte das peças?
E mais uma vez, parabéns pelo espetacular trabalho!
Oi Yuri... Muito obrigado... sim, sem dúvida.. me manda o seu email, por favor... Aguardando e um abraço!!
Excluir