No...You didn't miss the Bunker. We're still at Panzerserra Bunker, about 1/35 military models. But today let's talk a little about the men of the German Navy. More specifically about this heavy truck used by Kriegsmarine in the task of transporting a Biber midget submarine in a Sonderanhänger (Sd. Ah.) 115 trailer . Let's talk about the Faun L900 D567 6x4 heavy truck.
The plant Fahrzeugfabriken Ansbach und Nürnberg AG (FAUN) came into being in 1919 from a merger of the "Fahrzeugfabriken Ansbach AG" brand and the "Nümberger Feuerlöschgeräte-, Automobillastwagen- und Fahrzeugfabrik." The production program included trucks from 2 to 9 tons, with the numbers of each held within modest limits.
FAUN received Wehrmacht contracts for, among others, the Uniform Diesel Einheits 2,5 ton 6x6 truck (700), the Faun L900 D567 6x4 heavy truck 9-ton (also as a tank transporter), truck-cranes (road and rail versions) and heavy wheeled tractors (Faun Zugmaschine ZRS- road and rail versions).
The Faun was produced by a variety of manufacturers, including Büssing-NAG, Vomag, Faun, Fross-Büssing, Krupp and MAN. The Faun was mostly used from the early to mid part of World War II, as it was primarily used to carry and recover small German light tanks such as the
Panzer I and
Panzer II.
These light tanks became obsolete very fast and the Army had no more need of these early tank-transporters. So, the Faun L900's were transferred to the engineer and transport companies or used as heavy ammunition supply trucks, especially on the long roads in Russia.
 |
Faun L900 (Luftwaffe) cargo truck snorting up an icy slope with trailer in
Staraya-Russa. Winter 1942-43. |
| Faun L900 D567 6x4 tank transporter |
|---|
| Type | heavy truck - tank transporter |
|---|
| Place of origin | Nazi Germany |
|---|
| Service history |
|---|
| In service | 1935–1945 |
|---|
| Used by | Nazi Germany |
|---|
| Wars | Second World War |
|---|
| Production history |
|---|
| Designed | 1934 |
|---|
| Manufacturer | Faun |
|---|
| Produced | 1934–1937 |
|---|
| Specifications |
|---|
| Weight | 9.000 Kg |
|---|
| Length | 9.80 m |
|---|
| Width | 2.50 m |
|---|
| Height | 2.60 m |
|---|
| Crew | 1 driver |
|---|
|
| Armor | none |
|---|
Armament
| none |
|---|
| Engine |
Deutz F6M5171 diesel engine
13.500 cc 6 cyl. - 150 HP or
18.000 cc 8 cyl. - 180 HP |
|---|
Suspension
Transmission | semi-elliptical leaf spring
suspension (front and rear)
4 speed foward x 1 reverse |
|---|
Cargo capacity
| 10.000 Kg |
|---|
Speed
Cruise range
Fuel tank
Brakes
Turning radius | 50 km/h (max.)
360 Km
200 L
pneumatic (service)
20m |
|---|
The kits:
For this project, I'll use the amazing injected kit from
Das Werke Scale Models, very, very different ( and better, of course...) from the
Faun L900 resin kit that I built few years ago. It's almost like comparing a Ferrari with a Clio !!
 |
| Das Werke kit (DW 35003) box art |
The
building of this resin kit was, according to our modeler friend
Alexander Glass (
Uschi van der Rosten) one of the factors that motivated
Das Werk to inject this amazing and impressive truck. And in a very courteous attitude from
Das Werk, I received a complete kit as gift, sent by
Alexander. Thank you very much, Gentlemen.
 |
The kit from Das Werke, with wood decals and chains...
Kojak was simply amazed !!! |
Das Werke staff, you are to be congratulated... The kit is very well injected and features great construction engineering solutions and very elaborate details. The parts fit like a glove, as you will see later in the building of this model... I really hope you continue releasing as good models as this !!
But as I (and Kojak) love to innovate, we decided to build this girl in the 1944s, when they no longer worked as tank transporters, but as heavy transport.
So, this Faun will be my first girl in
Kriegsmarine colors. We imagine her carrying a Biber midget submarine in her cargo area. And as she still had breath for more load, she will be pulling a trailer Sd.Ah.115, loaded with magnetic mines for an attempt of counterattack to the Allied landings in Normandy.
 |
| Italeri's kit (#5609) Biber midget submarine - kit box art |
 |
| Cammet Ltd. kit (CAMB 35005) EMC mines resin kit - kit box |
But let's talk less and work harder !!!
First of all, the concept: Both the trailer and the truck have the capacity to carry the Biber with its full armament without any overweight problem. The options would be either to transport the Biber in the trailer or in the cargo area of the truck. At a glance, the trailer transport would perhaps be the first choice, but by detailing the transportation (see drawing below), the positioning angled of the boat made me choose to transport the midget in the Faun's cargo area. Mechanically, it seems more viable and safe to me...
But what really made me decide on the option of transporting the U-boot in the truck was this photo below:
 |
| A captured Biber in exhibition somewhere in England |
Notice that the Biber is in the trailer of this Ford tractor, in the horizontal position. And this "horizontality" of weight and mass distribution that was the deciding factor in choosing to transport the minisub into the Faun's cargo area. BINGO!!
Decided that, now is to build the characters of our little show... Dive, dive, dive!!!
 |
| Kojak is literally "chained" to the triple project ... |
Starting at the beginning ... Chassis, with extreme care with the alignment of the stringers ...
 |
| Chassis under construction...Notice the steel blocks for perpendicular alignment... |
 |
cargo bed brackets and footboards in position...
The pieces fit perfectly. "Tamiya style" !! Well done, Das Werke |
 |
| Turning the chassis upside down ... notice the alignment of the cargo bed supports ... |
 |
| Starting with transmission and axes... Kojak's direct supervision!! |
 |
| The building is easy and swift... cabin and front bonet... |
 |
| Cabin interior. The dashboard and seats will be placed later to facilitate painting and finishing work ... |
 |
Bonnet in position. Perfect positioning ...
The kit features enviable engineering ...
Notice the dashboard and seats... |
 |
| Steering system and Pitman axle installed ... |
 |
| Notice the fuel tank and tool box in the chassis... |
 |
Wheels and tires ... of vinyl. Ah !! Too bad, Das Werke ...
Vinyl tires are a shame !!!
The tires will be installed later, after the wheels have been painted ... |
 |
| Gluing the cargo bed to the chassis brackets ... It's time to use the alligators clamps ... |
While the chassis and the cargo bed dry up, let's start building the trailer ... And then it got complicated: the instruction manual and the part trees don't talk to each other. The letters are different. In Sprue it is spelled "H" and in the instructions it is "A". Less bad than the numbers are equal ...The chassis Instruction Manual is very confusing ...
My advice: Look and check the steps VERY CAREFULLY !!! There are parts that are not reported or shown in the graphic drawings ... Das Werk, the Sd.Ah.115 manual needs an URGENT overhaul !!
 |
| The trailer chassis under construction... |
Here's an example of the instructions booklet mess )see below): The manual indicates that A19 parts are glued to the front of the trailer, but A19 parts (the cranks) are glued to the squared points of the load tensioners ... and this step is described only in the end of booklet. And these load tensioners are usually the last to be placed in the kit ...
 |
| Notice the crancks and the tensioners... |
 |
| The tensioners and his position in the front of the trailer... |
Indeed, the biggest problems with interpreting the instructions are in the trailer's building. A great initiative from Das Werke was to print QRCodes in the instructions, that direct the reader to the Das Werke website with short explanatory films... But unfortunately, these films do not have some of these little details...
 |
| The trailer under construction. Parts are stunning, but the instructions are tricksy... |
The rear axle features a trick as well. Do not use A25 parts yet, as they will be the pins that secure the axle to the rear suspension. Leave these two pins for the final step.
 |
| Pay attention and be smart ... |
 |
| This is wrong!! |
 |
| This is correct!! |
As I said, instructional issues are revealed in the trailer. When building the front portion of the trailer, parts A18 are hollow. But in the instructions nothing is mentioned to "plug" the cavities of the pieces. They are locking wedges. While inspecting the sprue trees, I came across the "covers" of these parts But the assembly manual makes no reference to them ...
 |
| The parts A18 with the rear "naked"... But the rectangular parts are in the sprues... |
 |
The rear view of the A18 partes "sealed"... Now, we can use these wedges
in their positions... |
 |
| A dry-run of the entire project... |
I decided to transform the rear door of cargo area in movable, in case your colleague wants to change the load on your truck. As the parts are very well injected, the hinges can be drilled with thin drills (0.4mm) and we use a copper wire of this thickness as the hinge pin ...
 |
| The holes, the drill amd the hinge's pins... |
 |
| Close up of the hinge... |
 |
| The rear door moveable... |
 |
| Up...down... |
 |
The cargo area with all doors in position...
You can make ALL hinges of the cargo area parts moveable if you want...
Just repeat the process described above ... |
 |
| But my option was only the rear door with movement... |
When Das Werke's Faun was released in the market, some reviews criticized the shape of the front fenders. In the Missing Lynx forum there was a debate about the curvature of the fenders and the photos shown as an argument actually present this discrepancy. I'm not a rivet-counter, but I like working on a kit... In my opinion, this detail is minimal (especially since I built a Faun with an old, very old resin kit, that was a real brick ...), but as modeling is fun, let's have fun. Watch now how to do a small plastic surgery with Dr. Kojak !!
 |
| The patient and the radiographs of "pathology" |
 |
Planning the surgery: The cuts will be made with a very thin (0,2mm) steel abrasive disc (yellow arrows)
to allow an overhauling in the fenders curvature. The goal is "to close" the curvature of the fender... |
 |
| The disease and the cure!!! |
 |
The doctor Kojak is really an audacious doctor ...
Incisions being made only at the edge of the fender ... |
 |
| After applying cyanoacrylate glue in the incisions, we compressed and repositioned the curvature of the fender... |
 |
| Before and after surgery...The difference is significant ... |
 |
| Incisions in the other patient ... |
 |
Planning to cut the anterior portion and add the posterior portion in the fender.
A true reconstructive surgery !!! |
 |
| The front cut...with anesthesia, of course !! |
 |
| The rear lip added |
 |
| The front part reconstructed !! |
 |
Te patient now, after the surgery: new curvature,
new front and rear portions... |
 |
| In the Faun's truck... Wheel in dry-run... |
 |
| Faun's front portion in construction... |
 |
| Right side... |
 |
| Folding the canvas frame with the kit template. Very good, Das Werke !!! |
 |
| The frames tied together ... Chuck approves!! |
 |
| And in position!!! Uff...this girl is almost ready !!! |
 |
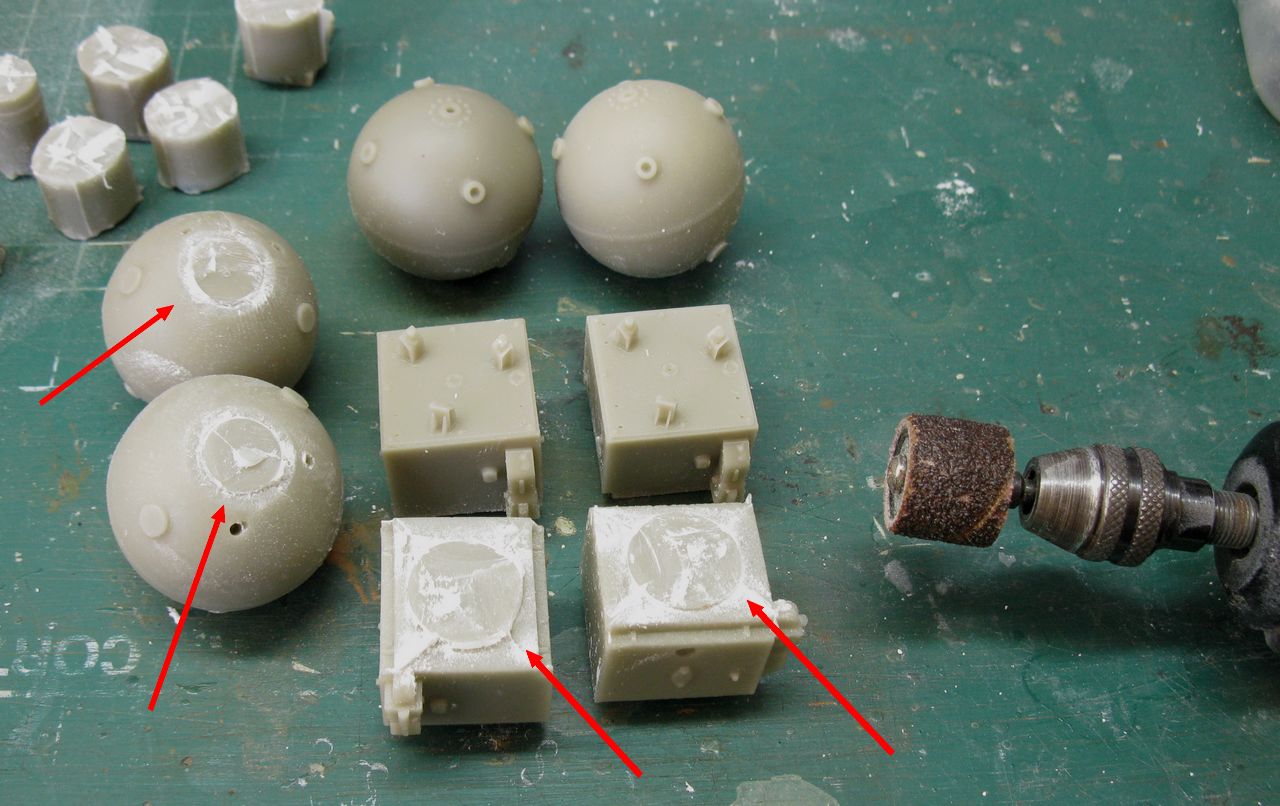
Cammett resin kit - 1/35th scaleType EMC Mines (CAMB35005)
This kit is from 2009!! Kojak is simply impressed ... |
 |
| Photo-etched |
 |
| Lots of parts to be clean ... thankfully Kojak is a Dremel expert !! |
 |
| Very careful at this time ... A mistake and goodbye fingers !!! |
 |
My old and faithful Dremel...
This disc in steel is a true weapon!! |
 |
After cutting the excess portions with steel disc, it's time to relax with these abrasive tools ...
And those won't tear your fingers off !!! |
 |
| "Lowering" the cut in the resin to the level of the piece ... |
 |
After Dremel, is time for my sanding glass plate...
Water and gentle circular motions... |
 |
| Rectifying the cut area ... Be careful not to go beyond the ideal point ... |
 |
| And the resin part is smoother than angel's butt !!! |
 |
| The same process in all parts that have gone through the cut ... |
 |
| Kojak (and the Monk ...) are definitely pleased with the result ... |
 |
| Smaller parts ... same procedure ... |
 |
| After the cut with the steel disc... |
 |
| Sanding the operated area ... |
 |
| Smooth!! |
 |
PE handles are flat profile. I will replace them with round profile handles with copper wire and patience.
I think it will be much better !! |
 |
| Done!! Indeed, much better!! |
 |
| Replaces other handles with copper wire, too (green arrows). But some that are left are the PE sheet of the kit ... |
 |
| The mines, almost ready...but still bald!! |
 |
| With "hair", now... Fuses in position ... |
 |
| And testing the mines in the trailer Sd.Ah.115 ... Hmmm..this thing is taking shape ... |
 |
| The dry-run of the project... Kojak is a happy guy!! |
But since these mines will be in "transport mode", the fuses cannot be characterized in this way, as this is the "combat mode". I have to remove the fuses, or in naval jargon, I have to defuse the mines.
 |
| A swift and painless method of defuse mines |
There is a difference between not installing fuses and detonators (transport mines) and defuse mines (done in the field): When in transport, fuses are covered with a small shield.
 |
Notice the rounded caps over the fuse horns...
Inert and virgin mines. |
But when the mines are defused, the spindle is completely removed, leaving only the recess where the fuse is threaded.
 |
Defused mine. Notice the holes after removal of detonator fuses
German sea mine defused on Great Yarmouth beach - 1941 |
In our case, how the mines are being sent "virgins"to the front, the fuses will be protected by a round cylindrical cap.
 |
Mines under construction: without fuses (red circles) and with fuse horns
protected by conical caps (green circles) |
This matter decided, it's time to relax a little, before the mine defuse surgery !!
 |
I love an ice cream at the beach !!! It's very relaxing!!
Notice the horns smashed after defuse...
Deal beach - England - 1940. |
And Kojak defused the mines!! Great sucess!!
 |
| Mines defused!!! Kojak is still among us ... |
My idea is build a "sub-body" to be transported by the trailer. Something like a 3 tonne truck lcargo bed. Something like this:
 |
| Testing the concept.... |
 |
| Testing the concept two... |
We are really moving towards the final stages of the project: Time to take care of the crib of the
midget submarine Biber:
 |
| I reworked the mini submarine display cradle to use as a transport cradle... |
 |
The cradle in position... I placed the transport cradle on the rear axle of the truck
so as not to overload the chassis of the Faun... |
 |
| The mass of the load distributed over the truck, with good distribution. Kojak is an efficient guy ... |
 |
The total composition ready for painting...
Indeed, a very big project!! |
Starting the painting:
 |
| The Faun, in shades of gray... |
 |
| Wheels without tires, for easy painting ... |
 |
| The mines cargo bay. The idea is that this cargo bay was recycled from a truck with dark yellow paint. |
 |
And the Faun with Biber and mines.
Notice the cargo bay with post-1942 cammo. |
 |
The decals, made with Corel Draw and printed in a white decal sheet.
Kriegsmarine!!! |
 |
| Decals with Pledge, to prevent silvering... |
 |
| The number 2 is from Das Werke |
 |
| Das Werke decals with Panzerserra decals: a perfect match!! |
 |
| The dashboard after decals... |
 |
| ...and in the cabin!! |
 |
| The canvas top in position... |
 |
Little chains I got as a gift from Uschi van der Rosten.
They looked perfect on the back door of the cargo area.
Tanks, man!! |
 |
| The Faun and his "parasite"... |
 |
| The composition is almost ready!! |
 |
| The stabilizing moorings being installed ... |
 |
| The Sd.Ah.115 trailer with four ECM mines in his (adapted) cargo bay |
 |
| Notice the license plate; this trailer was kidnapped from Wermacht!!! |
And the Faun under final weathering. This vehicle will not be too dirty as the idea is that this composition is moving along paved highways for delivery of your cargo.
 |
| Faun L900 D-567 6x4 heavy truck from Kriegsmarine - K-261 Flotille |
 |
| Notice the Biber's cradle without paint... |
 |
| The lowered rear door... |
 |
| Installing the moorings... Notice the wood logs used as motion limiters... |
 |
| the moorings prevent forward and backward movements .... |
 |
| The wood logs... |
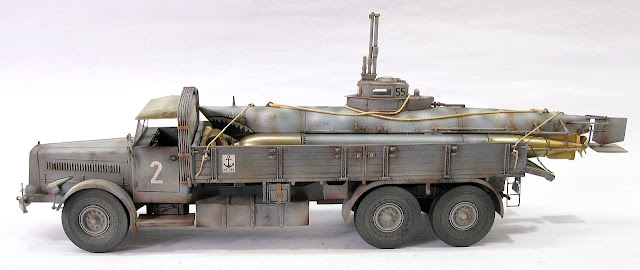
And finally, the complete composition of the project was completed: Here is the Faun L900 D567 6x4 heavy truck from K-261 Flotille (Kriegsmarine) carrying a
Biber midget submarine in its cargo area and pulling an adapted Sd.Ah.115 trailer with four ECM mines. This composition addresses to Fécamp, France, in August 28, 1944.
 |
| Faun L900 D567 6x4 heavy truck with Biber midget submarine in its cargo area and pulling an adapted Sd.Ah.115 trailer with four ECM mines. |
 |
| Adapted Sd.Ah.115 trailer with ECM mines. |
 |
| Kojak did a good job improvising in the trailer a cargo bed of a damaged Ford V3000 ... |
 |
| Detail of the submarine in the cargo area ... the wood logs serve as movement limiters ... |
 |
| Notice the trailer tow pin, made from scratch... |
 |
| Kojak overseeing the moorings ...... |
 |
| Congratulations, Kojak. Another project well executed !!! |
 |
| Best job ever!!! |
 |
| Faun L900 D567 6x4 heavy truck from K-261 Flotille (Kriegsmarine) carrying a Biber midget submarine in its cargo area and pulling an adapted Sd.Ah.115 trailer with four ECM mines. This composition addresses to Fécamp, France, in August 28, 1944. |
 |
| trailer close-up |
 |
| truck in close-up |
 |
Faun L900 D567 6x4 heavy truck - K-261 Flotille (Kriegsmarine)
Fécamp, France - August 28, 1944. |
Final considerations:
The
Das Werk kit was a very pleasant surprise. A kit with perfect fit and fantastic engineering. Parts and subassemblies simply fit together like a glove !! One of the nicest build kits I've ever had in my hands. Congratulations to this young company. The instruction book with some confusing details and steps can be improved. And for God's sake, plastic tires ... not vinyl !!! And a suggestion for
Uschi van der Rosten: make a decal sheet for the Faun's cargo area, too... I didn't use the trailer's "wood" decals because it would look different from the truck with "wood" painting ...
See you, soon, Gents!!


What an amazing work !!
ResponderExcluirHi, Hubert!! Thanks, my friend ...stay tunned in this project!!! Hugs!!
ExcluirKalispera from Souda, Krete. There is erratum for the Das Werk manual regarding sprue lettering. I found that on scalemates.com / the last page of the instruction manual. Milosz
ResponderExcluirThanks Anonimo: About Scalemates, I found this pdf later...my kit comes without erratum sheet. But the big problem is the order of a some steps in gluing the pieces ... it really needs to be reviewed. Thanks for the tip!!!
ResponderExcluirHello, Panzerserra! I've been enjoying your blog for some time, your models are an inspiration. I just today found and ordered a Das Werk Faun w/Sd.Ah.115. I might do mine as Afrika Korps. Take care! ~Anna-Elizabeth
ResponderExcluirHi, Anna!! Welcome to the Bunker!!! yeah...the Das Werke trailer is awesome...have fun with your project...and send pics from your model kit!!! Hugs!!!
ExcluirHello again! I just got my kit, I bought the 35003X with the corrected instructions, optional hardtop, optional styrene "sagged" wheels - like you, I hate vinyl tires on kits - and optional civilian markings. What a lovely kit, my first from Das Werk. Your blog inspired me to try a truck, I have lots of tanks. My friends sometimes call me "Tank Grrl".
ExcluirHi, Tank Girl!!! I have to warn you of one thing: building trucks is just as addictive as building tanks... Be careful!!!!
ExcluirLOL....
I'm glad you're going to try a new "strand" of our amazing hobby... But what do you intend to do, in terms of markings?? Wermacht, SS, Luftwaffe or civil one??? Maybe captured and used by the Allies??? The important thing is to have fun!!!
Good modeling and keep me updated...
Hugs!!!
Thank you! I am already looking at more truck kits, ICM make some nice ones...
ExcluirFor the FAUN, I'm think of Luftwaffe carrying a FLaK36, or Heer transporting 2 light tanks, looking at references for now.
Good hunt, Tank-girl!!! If I can help with anything, just write. A big hug and let's modeling!!!
ExcluirGreat work i like you Faun
ResponderExcluirThanks, man!!! Big hug!!!
Excluir